How to Generate PHP Random String Token (8 Ways)

 Generating random string token may sound like a trivial work. If you really want something “truly random”, it is one difficult job to do. In a project where you want a not so critical scrambled string there are many ways to get it done.

I present eight different ways of getting a random string token using PHP.

  1. Using random_int()
  2. Using rand()
  3. By string shuffling to generate a random substring.
  4. Using bin2hex()
  5. Using mt_rand()
  6. Using hashing sha1()
  7. Using hashing md5()
  8. Using PHP uniqid()

There are too many PHP functions that can be used to generate the random string. With the combination of those functions, this code assures to generate an unrepeatable random string and unpredictable by a civilian user.

1) Using random_int()

The PHP random_int() function generates cryptographic pseudo random integer. This random integer is used as an index to get the character from the given string base.

The string base includes 0-9, a-z and A-Z characters to return an alphanumeric random number.

Quick example

<?php
/**
 * Uses random_int as core logic and generates a random string
 * random_int is a pseudorandom number generator
 *
 * @param int $length
 * @return string
 */
function getRandomStringRandomInt($length = 16)
{
    $stringSpace = '0123456789abcdefghijklmnopqrstuvwxyzABCDEFGHIJKLMNOPQRSTUVWXYZ';
    $pieces = [];
    $max = mb_strlen($stringSpace, '8bit') - 1;
    for ($i = 0; $i < $length; ++ $i) {
        $pieces[] = $stringSpace[random_int(0, $max)];
    }
    return implode('', $pieces);
}
echo "<br>Using random_int(): " . getRandomStringRandomInt();
?>
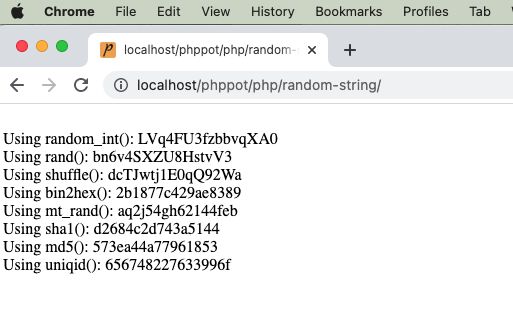
php random string

2) Using rand()

It uses simple PHP rand() and follows straightforward logic without encoding or encrypting.

It calculates the given string base’s length and pass it as a limit to the rand() function.

It gets the random character with the random index returned by the rand(). It applies string concatenation every time to form the random string in a loop.

<?php
/**
 * Uses the list of alphabets, numbers as base set, then picks using array index
 * by using rand() function.
 *
 * @param int $length
 * @return string
 */
function getRandomStringRand($length = 16)
{
    $stringSpace = '0123456789abcdefghijklmnopqrstuvwxyzABCDEFGHIJKLMNOPQRSTUVWXYZ';
    $stringLength = strlen($stringSpace);
    $randomString = '';
    for ($i = 0; $i < $length; $i ++) {
        $randomString = $randomString . $stringSpace[rand(0, $stringLength - 1)];
    }
    return $randomString;
}
echo "<br>Using rand(): " . getRandomStringRand();
?>

3) By string shuffling to generate a random substring.

It returns the random integer with the specified length.

It applies PHP string repeat and shuffle the output string. Then, extracts the substring from the shuffled string with the specified length.

<?php
/**
 * Uses the list of alphabets, numbers as base set.
 * Then shuffle and get the length required.
 *
 * @param int $length
 * @return string
 */
function getRandomStringShuffle($length = 16)
{
    $stringSpace = '0123456789abcdefghijklmnopqrstuvwxyzABCDEFGHIJKLMNOPQRSTUVWXYZ';
    $stringLength = strlen($stringSpace);
    $string = str_repeat($stringSpace, ceil($length / $stringLength));
    $shuffledString = str_shuffle($string);
    $randomString = substr($shuffledString, 1, $length);
    return $randomString;
}
echo "<br>Using shuffle(): " . getRandomStringShuffle();
?>

4) Using bin2hex()

Like random_int(), the random_bytes() returns cryptographically secured random bytes.

If the function doesn’t exists, this program then uses openssl_random_pseudo_bytes() function.

<?php
/**
 * Get bytes of using random_bytes or openssl_random_pseudo_bytes
 * then using bin2hex to get a random string.
 *
 * @param int $length
 * @return string
 */
function getRandomStringBin2hex($length = 16)
{
    if (function_exists('random_bytes')) {
        $bytes = random_bytes($length / 2);
    } else {
        $bytes = openssl_random_pseudo_bytes($length / 2);
    }
    $randomString = bin2hex($bytes);
    return $randomString;
}
echo "<br>Using bin2hex(): " . getRandomStringBin2hex();
?>

5) Using mt_rand()

PHP mt_rand() is the replacement of rand(). It generates a random string using the Mersenne Twister Random Number Generator.

This code generates the string base dynamically using the range() function.

Then, it runs the loop to build the random string using mt_rand() in each iteration.

<?php
/**
 * Using mt_rand() actually it is an alias of rand()
 *
 * @param int $length
 * @return string
 */
function getRandomStringMtrand($length = 16)
{
    $keys = array_merge(range(0, 9), range('a', 'z'));
    $key = "";
    for ($i = 0; $i < $length; $i ++) {
        $key .= $keys[mt_rand(0, count($keys) - 1)];
    }
    $randomString = $key;
    return $randomString;
}
echo "<br>Using mt_rand(): " . getRandomStringMtrand();
?>

6) Using hashing sha1()

It applies sha1 hash of the string which is the result of the rand().

Then, it extracts the substring from the hash with the specified length.

<?php
/**
 *
 * Using sha1().
 * sha1 has a 40 character limit and always lowercase characters.
 *
 * @param int $length
 * @return string
 */
function getRandomStringSha1($length = 16)
{
    $string = sha1(rand());
    $randomString = substr($string, 0, $length);
    return $randomString;
}
echo "<br>Using sha1(): " . getRandomStringSha1();
?>

7) Using hashing md5()

It applies md5() hash on the rand() result. Then, the rest of the process are same as the above example.

<?php
/**
 *
 * Using md5().
 *
 * @param int $length
 * @return string
 */
function getRandomStringMd5($length = 16)
{
    $string = md5(rand());
    $randomString = substr($string, 0, $length);
    return $randomString;
}
echo "<br>Using md5(): " . getRandomStringMd5();
?>

8) Using PHP uniqid()

The PHP unigid() function gets prefixed unique identifier based on the current time in microseconds.

It is not generating cryptographically random number like random_int() and random_bytes().

<?php
/**
 *
 * Using uniqid().
 *
 * @param int $length
 * @return string
 */
function getRandomStringUniqid($length = 16)
{
    $string = uniqid(rand());
    $randomString = substr($string, 0, $length);
    return $randomString;
}
echo "<br>Using uniqid(): " . getRandomStringUniqid();
?>

Download

Share:

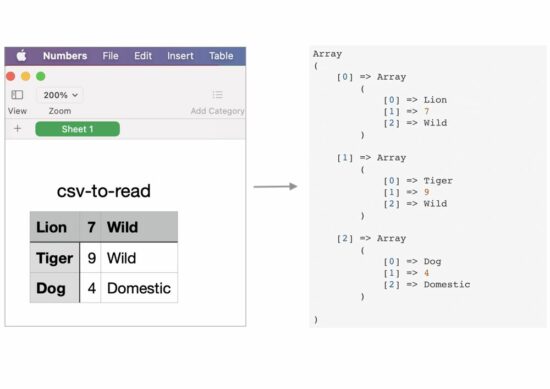
How to Read a CSV to Array in PHP

 There are many ways to read a CSV file to an array. Online hosted tools provide interfaces to do this. Also, it is very easy to create a custom user interface for the purpose of reading CSV to the array.

In PHP, it has more than one native function to read CSV data.

  • fgetcsv() – It reads the CSV file pointer and reads the line in particular to the file handle.
  • str_getcsv() -It reads the input CSV string into an array.

This article provides alternate ways of reading a CSV file to a PHP array. Also, it shows how to prepare HTML from the array data of the input CSV.

Quick example

This example reads an input CSV file using the PHP fgetcsv() function. This function needs the file point to refer to the line to read the CSV row columns.

<?php

// PHP function to read CSV to array
function csvToArray($csv)
{
    // create file handle to read CSV file
    $csvToRead = fopen($csv, 'r');

    // read CSV file using comma as delimiter
    while (! feof($csvToRead)) {
        $csvArray[] = fgetcsv($csvToRead, 1000, ',');
    }

    fclose($csvToRead);
    return $csvArray;
}

// CSV file to read into an Array
$csvFile = 'csv-to-read.csv';
$csvArray = csvToArray($csvFile);

echo '<pre>';
print_r($csvArray);
echo '</pre>';
?>

This program sets the CSV file stream reference and other parameters to read the records in a loop.

The loop iteration pushes the line data into an array. The PHP array push happens using one of the methods we have seen in the linked article.

Save the below comma-separated values to a csv-to-array.csv file. It has to be created as an input of the above program.

csv-to-array.csv

Lion,7,Wild
Tiger,9,Wild
Dog,4,Domestic

Output:

The above program returns the following array after reading the input CSV file data.

Array
(
    [0] => Array
        (
            [0] => Lion
            [1] => 7
            [2] => Wild
        )

    [1] => Array
        (
            [0] => Tiger
            [1] => 9
            [2] => Wild
        )

    [2] => Array
        (
            [0] => Dog
            [1] => 4
            [2] => Domestic
        )

)

csv to PHP array

Map str_getcsv() to read CSV and convert it into a PHP array

This program will be suitable if you want to skip the step of writing a loop. It saves the developer’s effort. But the background processing will be the same as the above program.

The PHP file() converts the entire CSV into an array. Then, the array_map sets the str_getcsv() function as a callback to iterate the array of CSV file rows.

The str_getcsv() imports the CSV row data into an array. In a previous article, we have seen about handling CSV file read and other operations like import, and export.

The resultant $csvArray variable will contain the complete CSV data in a multi-dimensional array.

The output of this program will be similar to that of the quick example.

<?php
// a one-line simple option to reade CSV to array
// it uses PHP str_getcsv
$csvArray = array_map('str_getcsv', file('csv-to-read.csv'));
echo '<pre>';
print_r($csvArray);
echo '</pre>';
?>

Convert CSV to Array and then convert array to HTML

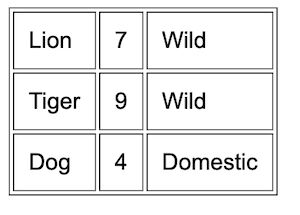
This example will be useful if you want to display the CSV content in the UI in a tabular form.

Mostly, this code must be more useful since it has the possibility of using it in real-time projects. But, the other examples are basics which are also important to learn about reading CSV using PHP.

This code iterates the CSV row and reads the column data using fgetcsv() as did in the quick example.

Then, it forms the HTML table structure using the CSV array data. In a previous tutorial, we saw code to convert an HTML table into an excel.

<?php

// PHP script to read CSV and convert to HTML table

// create file handle to read CSV file
$csvFile = fopen('csv-to-read.csv', 'r');

if ($csvFile !== FALSE) {
    echo "<table border=1 cellpadding=10>";
    while (($csvArray = fgetcsv($csvFile, 100, ',')) !== FALSE) {
        echo "<tr>";
        for ($i = 0; $i < count($csvArray); $i ++) {
            echo "<td>" . $csvArray[$i] . "</td>";
        }
        echo "</tr>";
    }
    echo "</table>";
    fclose($csvFile);
}
?>

Output:

This program will display the HTML table on the screen. The row data is from the input CSV file.

csv to html
Download

Share:

Chart JS Pie Chart Example

 we are going to learn how to create a pie chart using JavaScript libraries. We have used Chart.js library for the generating the pie charts. As an alternate option, I have also presented a 3d pie chart example using Google charts library.

Let us see the following examples of creating a pie chart using JavaScript.

  • Quick example – Simple pie chart example via ChartJS.
  • 3D pie chart with Google Charts library.
  • Responsive ChartJS pie chart.

Quick example – Simple pie chart example via ChartJS

<!DOCTYPE html>
<html>
<head>
<title>Chart JS Pie Chart</title>
<link rel='stylesheet' href='style.css' type='text/css' />
</head>
<body>
    <div class="phppot-container">
        <h1>Responsive Pie Chart</h1>
        <div>
            <canvas id="pie-chart"></canvas>
        </div>
    </div>
    <script
        src="https://cdn.jsdelivr.net/npm/chart.js@4.0.1/dist/chart.umd.min.js"></script>
    <script>
        new Chart(document.getElementById("pie-chart"), {
        	type : 'pie',
        	data : {
        		labels : [ "Lion", "Horse", "Elephant", "Tiger",
        				"Jaguar" ],
        		datasets : [ {
        			backgroundColor : [ "#51EAEA", "#FCDDB0",
        					"#FF9D76", "#FB3569", "#82CD47" ],
        			data : [ 418, 263, 434, 586, 332 ]
        		} ]
        	},
        	options : {
        		title : {
        			display : true,
        			text : 'Chart JS Pie Chart Example'
        		}
        	}
        });
	</script>
</body>
</html>

Creating a ChartJS pie chart is a three-step process as shown below.

  1. Add the ChartJS library include to the head section of your HTML.
  2. Add a canvas element to the HTML.
  3. Add the ChartJS class initiation and invoking script before closing the HTML body tag.

About the ChartJS pie chart script

The script sets the following properties to initiate the ChartJS library.

  • type – The type of the chart supported by the ChartJS library.
  • data – It sets the chart labels and datasets. The dataset contains the data array and the display properties.
  • options – It sets the chart title text and its display flag as a boolean true to show it on the browser.

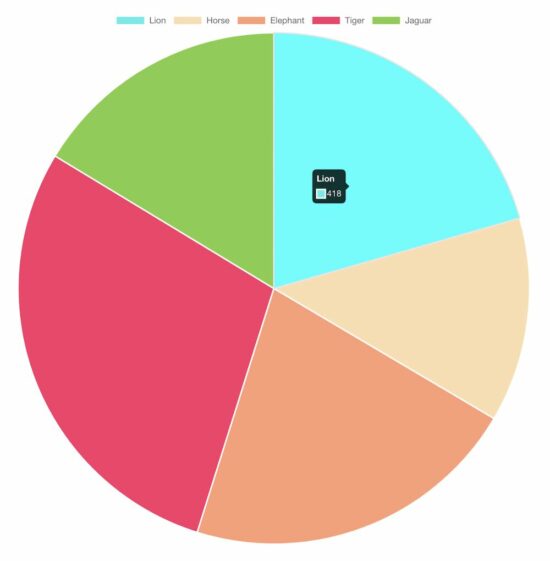
Output:

chartjs pie chart

In a previous tutorial, we have seen the various ways of creating line charts using the Chart JS library.

View Demo

Creating 3D pie chart

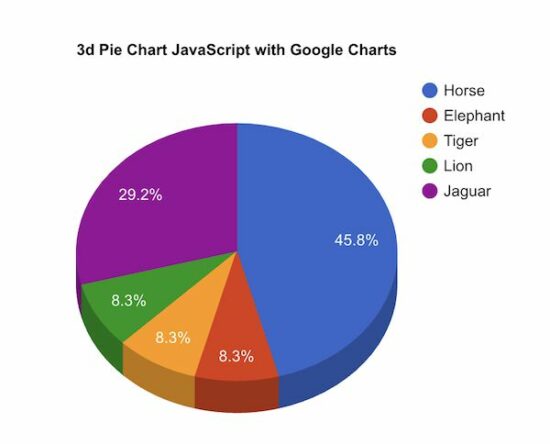
There is no option for a 3D pie chart using chart JS. For those users who have landed here looking for a 3D pie chart, you may try Google Charts.

This example uses Google Charts to create a 3D pie chart for a webpage. In a previous code, we use Google Charts to render a bar chart to show students’ attendance statistics.

The Google Charts JavaScript code prepares the array of animal distribution data. This array is for sending it to the chart data table which helps to draw the pie chart.

The Google Charts library accepts the is3D with a boolean true to output a 3D pie chart.

It creates a chart visualization object with the reference with respect to the UI element target. Then, it calls the Google Charts library function to draw and render the chart.

<!DOCTYPE html>
<html>
<head>
<title>3d Pie Chart JavaScript with Google Charts</title>
<link rel='stylesheet' href='style.css' type='text/css' />

<script type="text/javascript"
    src="https://www.gstatic.com/charts/loader.js"></script>
<script type="text/javascript">
	google.charts.load("current", {
		packages : [ "corechart" ]
	});
	google.charts.setOnLoadCallback(drawChart);
	function drawChart() {
		var data = google.visualization.arrayToDataTable([
				[ 'Animal', 'Distribution' ], [ 'Horse', 11 ],
				[ 'Elephant', 2 ], [ 'Tiger', 2 ], [ 'Lion', 2 ],
				[ 'Jaguar', 7 ] ]);

		var options = {
			title : '3d Pie Chart JavaScript with Google Charts',
			is3D : true,
		};

		var chart = new google.visualization.PieChart(document
				.getElementById('3d-pie-chart'));
		chart.draw(data, options);
	}
</script>
</head>
<body>
    <div class="phppot-container">
        <h1>3d Pie Chart JavaScript with Google Charts</h1>
        <div id="3d-pie-chart" style="width: 700px; height: 500px;"></div>
    </div>
</body>
</html>

3d pie chart

Responsive pie chart using Chart JS

The Chart JS library provides JavaScript options to make the output pie chart responsive.

This example script uses those options to render a responsive pie chart in a browser.

The JavaScript code to render a responsive pie chart is the same as we have seen in the quick example above.

The difference is nothing but to set responsive: true in the ChartJS options properties.

If you want to create a responsive chart using Google Charts, then the linked article has an example.

<!DOCTYPE html>
<html>
<head>
<title>Responsive Pie Chart</title>
<link rel='stylesheet' href='style.css' type='text/css' />
<meta name="viewport" content="width=device-width, initial-scale=1">
</head>
<body>
    <div class="phppot-container">
        <h1>Responsive Pie Chart</h1>
        <div>
            <canvas id="pie-chart"></canvas>
        </div>
    </div>
    <script
        src="https://cdn.jsdelivr.net/npm/chart.js@4.0.1/dist/chart.umd.min.js"></script>
    <script>
		new Chart(document.getElementById("pie-chart"), {
			type : 'pie',
			data : {
				labels : [ "Lion", "Horse", "Elephant", "Tiger",
						"Jaguar" ],
				datasets : [ {
					backgroundColor : [ "#51EAEA", "#FCDDB0",
							"#FF9D76", "#FB3569", "#82CD47" ],
					data : [ 418, 263, 434, 586, 332 ]
				} ]
			},
			options : {
				title : {
					display : true,
					text : 'Responsive Pie Chart'
				},
				responsive : true
			}
		});
	</script>
</body>
</html>
Share:

In-plant Training/Internship Training with Project supports|Training Tra...

Share:

AI Internship Training Class -1|| In-plant Training/Internship Training|...

Share:

Data Science using python project. implant and internship training intam...

Share:

Placement Training|In-plant Training/Internship Training with Project in...

Share:

How to Get IT companies Job in Tamil|Internship Training Trains |Domainh...

Share:

IT- Training With Live Projects Working experience

Share:

Android app development training in tamil-1|919698548633

Share:

Free Angular Open Source Projects


Free Angular Open Source Projects

1. NGX-Admin

The ngx-admin is a web dashboard template that has a component-based structure. Being accessible free of charge, it is based on Angular 8+, Bootstrap 4+, and, another cool product invented by our company.

Key features

  • The most popular and trusted Angular open-source dashboard template is out there. Used by hundreds of thousands of developers worldwide and Fortune 500 companies*.
  • Over 40+ Angular Components and 60+ Usage Examples. Kick-off your project and save money by using ngx-admin.
  • Already using ngx-admin and willing to switch to the material theme? The material theme is backward-compatible. Check out the article describing how to do that.
  • ngx-admin material works perfectly with Angular Material and Nebular. Take the best from both!

Source Code on GitHub

GitHub: https://github.com/akveo/ngx-admin
Stars: 20.8k
Web-site: http://akveo.github.io/ngx-admin/

2. StarAdminAngular

This free & fully responsive admin dashboard template is built on the Bootstrap 4 framework. Star Admins features more than 15 handcrafted elements and 4 custom plugins that feature.

3. AngularSpree - E-Commerce Application

AngularSpree is an Angular(7) e-commerce application.

It is a plug-and-play frontend application for AviaCommerce API built using Angular(7), Redux, Observables & ImmutableJs.

GitHub: https://github.com/aviabird/angularspree

Stars: 1.6k

Website: https://www.aviacommerce.org/

4. Angular Material

This is one of the most popular Angular-based projects. Angular Material provides UI experts with a variety of design components allowing teams to build truly amazing products.

GitHub: https://github.com/angular/components
Stars: 20k
Web-site: https://material.angular.io/

5. Storybook

Storybook is one of the best open-source Angular projects that allows teams to make UI (user interface) components for React.js, Vue, and Angular. Furthermore, support for React Native, a cross-platform framework, has been added recently.

6. Angular-CLI

The Angular CLI is a command-line interface tool used to initialize, develop, scaffold, and maintain Angular applications.

GitHub: https://github.com/angular/angular-cli
Stars: 23.5k
Web-site: https://cli.angular.io/

7. Angular calendar

The product is a calendar component for Angular 6.0+ that can display events on a month, week or day view. The template is highly customizable. You can build your own components instead of those not meeting your project specs.

GitHub: https://github.com/mattlewis92/angular-calendar
Stars: 2k
Web-site: https://mattlewis92.github.io/angular-calendar/

8. SB-Admin-BS4-Angular-6 

This simple and very neat admin platform is based on Angular 6 and Bootstrap 4. Looks really usable. As Ngx-admin it also has RTL/LTR feature, so a wider audience can apply it to their projects.

Demo link: http://treesflower.com/ng-pi-admin

9. Material Dashboard Angular4

This Angular template is fully responsive, stylish, and free. As many users all over the world, I also love this one. The way it looks - comes with 5 color filter choices for both the sidebar and the card headers.

10. PaperAdmin

PaperAdmin is a bootstrap single-page dashboard developed using Angular JS 4. PaperAdmin features built-in components to make dashboard development easy. It features custom components such as calendars, list views with CRUD(Create, Read, Update, Delete) functionality, pie charts with status, and custom cards to display relevant information.

11. CDK-admin

 A very powerful open source admin dashboard was generated with the tool Angular CLI version 1.5.0. It’s built on Angular 5 and provides a range of responsive, reusable, and commonly used components. 

Demo link:https://newproject-5d731.firebaseapp.com

Share:

Live Chat With Us

My Blog List

Search This Blog

Locations

Training

Pages

My Blog List

Blog Archive

Privacy policy