How to start Android Application Development

How to start Android Application Development


how to start android application development

Hey Folks! Many of you are here with one question in your mind: How to kickstart android application development? Don’t worry you have landed in the safest hands. From this article, you will get everything that requires you to start with android application development. There are many tools and frameworks available both online and offline that you can use for android development.

If you wish to know more about those tools, then do refer to the article mentioned here.

After understanding the tools available and knowing their features, I hope you have your mind for which framework or tool suits you the best. If you still feel confused, I recommend going with Android Studio and starting your android journey.

Through this article, we will try to cover each aspect of building an application in Android Studio in a very basic banner. Please ensure that you follow each step clearly and do it side by side.


About Android Studio

Before proceeding with the android application development with android studio, let’s give a brief glance over what android studio is. Android Studio is one of the most widely used tools for android development. The simplicity and immense user experience make android studio one of the best tools for android development.

Android Studio allows you to build native android apps with relatively less effort and provides many features. Using Android Studio, you can both design the app as well as code the application. Android Studio supports both Java and Kotlin, and users can choose any of them depending on their interests.

Android Studio has a large community and provides you support all the time when you face some issue. When you develop Android Studio apps, you can easily integrate your applications with backend services like Firebase. You can also generate signed versions of APK that we can directly upload on the Google Play Store.


Prerequisites of Android Application Development

As stated before, this tutorial is quite simple and doesn’t require any prerequisites. However, you should once know the basics of the following topics to start your android application development.

Kotlin or Java Programming
Basics of XML
Basics of Object-Oriented Programming
So, if you are comfortable with the above three, then you are good to start.

Keeping you updated with latest technology trends, Join TechVidvan on Telegram

Description of terms involved in Android Application Development
One more thing you should be familiar with is the basic terms involved in android application development. You will often encounter these terms while developing android applications, so knowing them will advance your learning.

1. MainActivity File: MainActivity is one of the most often encountered files while developing any android application. The MainActivity file is by default created by Android Studio and is well known as the first activity of your application. By activity, I mean the first screen that is visible after opening your application.


2. Gradle file – Gradle in android is the build tool that builds the application from your app source code.

3. \res directory – You can see a res directory present in your project files. The res directory consists of all assets of your project like images, strings, layouts, etc.

4. AndroidManifest.xml – AndroidManifest.xml files consist of declarations of various app components and also defines permissions for your application.

Step by Step building of an Android Application
So, now it’s time for us to explore the essential steps to build an android application. let’s see the steps below:


1: If you don’t have Android Studio installed, follow the article here, which takes you through the step-by-step installation of Android Studio.

2: Search the Android Studio application in your system and then open it.

3: Click on New Project, as shown below in the screenshot.


Android application development

4: Now, you need to select Empty Activity and click on Next.


Android Application

5: Now, you will see a window prompting you to enter the application name, package name, select location, Language, and minimum SDK. While filling in these details, keep the following things in mind:

Application Name: Application Name can be anything of your desire and will appear as the name of your app also when you install iron on some device.
Package Name: For development purposes, you can keep the Package name of your choice, but when you go for publishing, you have to specify a unique package name. Usually, the package name is of the form “com.example.application_name”.
Save Location: You can decide where you wish to save all your applications by browsing the path.
Language: If you are comfortable with Java, you can select Java or if you are comfortable with Kotlin, then select Kotlin.
Minimum SDK: You should be cautious while selecting minimum SDK. Minimum SDK defines the minimum requirement for any device. In other words, by specifying a minimum SDK, you ensure that your application would perfectly run on the android version the same or above the specified version.
Choosing a lower SDK makes your app compatible with most of the available android devices. However, selecting a low version is also problematic because some features are not allowed in those SDK.


The below screenshot shows you an example of filling in the above details for your application.


android application building

6: After filing the application details, click on Finish. Now, wait for some time until Gradle makes the project files ready for you. When it gets ready, the screen looks as follows:


android application building

7: Now navigate to activity_main.xml and edit the code shown there. You can see “Hello World” there, and you can edit it and name it “My First Application,” as shown below.


android first application

8: Now, you need to connect your device to a PC and enable USB Debugging in your device. Now, you need to press the green play button present in android studio to run an application on your device.


android application building

Now, open your device, and you will see your first android application installed on your device.


Android Application Development

Summary
Through this article, you came across the android application development process. You came across briefly what Android Studio is and how it helps in application development. Later on, you saw the prerequisites that are essential to building Android Development. Moving forth, you saw the description of the files that you usually encountered while developing an android application. Finally, you saw the step-by-step procedure to build an android application.
Share:

MEAN stack developer training for VCEW


Vivekanada College of engineering for Women

MEAN stack developer training
Node js angular JS database 
Thanks to principal ,management ,hod , professors and my dear students
Day 1 and Day 2 training
Vivekanada College of engineering for Women
Department of CSE

Vivekanada College of engineering for Women

MEAN stack developer training
Node js angular JS database 
Thanks to principal ,management ,hod , professors and my dear students
Day 1 and Day 2 training
Vivekanada College of engineering for Women
Department of CSE
Share:

How to check if Node js is installed and check Node js version

How to check if Node js is installed and check Node js version

Yep, I have had to do this on more than one occasion too. In order to check if you have Node js installed, or how to check your Node js version, follow these steps:


Open your command line tool (as above, Terminal, Command, Git Bash etc.)

Type node -v

This will print a version number if you do have node installed

You can see in this image the line where I’ve typed node -v and then pressed return, and then the subsequent response of the version number. You can use this for any npm package as well by typing packagename -v to find out if it’s installed, and if so, what version you have.


how to check if you have node installed or check your node js version

So to run a node js file in terminal / command / git bash you simply type ‘node‘ followed by the filename and include the .js extension:


node myfilename.js

how to run a node js file in a terminal

Share:

how to node js Step by steps

Here are the exact steps I just took to run the "Hello World" example found at http://nodejs.org/. This is a quick and dirty example. For a permanent installation you'd want to store the executable in a more reasonable place than the root directory and update your PATH to include its location.

  1. Download the Windows executable here: http://nodejs.org/#download
  2. Copy the file to C:\
  3. Create C:\hello.js
  4. Paste in the following content:
    var http = require('http');
    http.createServer(function (req, res) {
      res.writeHead(200, {'Content-Type': 'text/plain'});
      res.end('Hello World\n');
    }).listen(1337, "127.0.0.1");
    console.log('Server running at http://127.0.0.1:1337/');
  1. Save the file
  2. Start -> Run... -> cmd
  3. c:
  4. C:>node hello.js

    Server running at http://127.0.0.1:1337/
    

That's it. This was done on Windows XP.

Share:

How to Run Node js Step by Step

Here are the exact steps I just took to run the "Hello World" example found at http://nodejs.org/. This is a quick and dirty example. For a permanent installation you'd want to store the executable in a more reasonable place than the root directory and update your PATH to include its location.

  1. Download the Windows executable here: http://nodejs.org/#download
  2. Copy the file to C:\
  3. Create C:\hello.js
  4. Paste in the following content:
    var http = require('http');
    http.createServer(function (req, res) {
      res.writeHead(200, {'Content-Type': 'text/plain'});
      res.end('Hello World\n');
    }).listen(1337, "127.0.0.1");
    console.log('Server running at http://127.0.0.1:1337/');
  1. Save the file
  2. Start -> Run... -> cmd
  3. c:
  4. C:>node hello.js

    Server running at http://127.0.0.1:1337/
    

That's it. This was done on Windows XP.

Share:

Installation of NodeJS and NPM


Introduction

In this article, I am going to introduce NodeJS with Node Package Module (NPM), step-by-step basic implementation and explanation.

This article covers the following areas of NodeJS.

  • Introduction of NodeJS
  • Installation of NodeJS and NPM
  • Node Package Module (NPM)
  • Package.json
  • Basic Example

NodeJS

NodeJS is an open-source, cross-platform runtime environment for developing server-side web applications. NodeJS also has an event-driven architecture capable of asynchronous I/O.

NodeJS uses an event-driven, non-blocking I/O model that makes it lightweight and efficient.

Installation of NodeJS and NPM

Installation of NodeJS and NPM is straightforward using the installer package available at NodeJS official web site.

  • Download the installer from NodeJS WebSite.
  • Run the installer.
  • Follow the installer steps, agree the license agreement and click the next button.
  • Restart your system/machine.

Now, test NodeJS by printing its version using the following command in Command Prompt:

1> node -v
bash

and test npm by printing its version using command

1> npm -v
bash

Simple way to test nodeJS work in your system is to create a javascript file which print a message.

Lets create test.js file

1/*test.js file*/
2console.log("Node is working");
js

Run the test.js file using Node command > node test.js in command prompt.

description

You are done with installation.

Node Package Module

NPM is the package module which helps javascript developers load dependencies effectively. To load dependencies we just have to run a command in command prompt:

1> npm install
bash

This command is finding a json file named as package.json in root directory to install all dependencies defined in the file.

Share:

What is an internship?


What is an internship?

Internships are short-term work experiences that allow you to observe and participate in professional work environments and explore how your interests relate to possible careers. More specifically, doing internships is beneficial because you will get an opportunity to:

Get an inside view of an organization

Gain valuable Technical skills and knowledge

Make professional connections and grow your network

Get experience in a field to allow you to make a career decision

Helpful for your Placements

Increasingly, Companies are looking for students who have gained experience through internships. Internships should be substantive learning experiences that provide you with a better understanding of an industry, a position and of yourself. They should also provide you with a chance to improve your skill set and learn from those you are working with.


Internship at  Training Trains Coimbatore

Internship or Final Year Project in Training Trains Coimbatore is an opportunity given to students who are really interested in learning the skills and working on Projects.

Internships available in

IT Services - Web Development, Mobile Application Development – Android, Big Data

IT Products – B2C, Ecommerce, Marketplace Software

Internship Projects available in Technologies like PHP, Java, Android, Big data, MongoDB, Cloud Computing, Mobile Computing, Data Mining, IoT, Networking, Secured Computing and Forensics.

Students have to undergo 1 month training in PHP, Java, Core Android, Advanced Android, Wordpress, HTML, CSS, Javascript, Jquery, Laravel framework, AJAX, J2EE, Hibernate, Springs, Struts, SQL, MySQL, Python, R language, based on their projects and technologies chosen

During training, project will assign to Individual or group.

Project Modules will be explained.

Students have to develop the application on own and guidance will be provided from Training Trains, Domainhostly, W3appdevelopers.

Students need to participate in open discussion forums based on technologies to solve any technical issues.

Internship Certificate will be provided.


Eligibility:Final Year Students of Any Degree who want to do IT Projects


Benefits:

Live Project Experience

Free Hosting / Google Playstore

Placement Assistance / Job

Interview Coaching

Artificial Intelligence , Machine Learning & Data Science Overview

Industry Exposure

Start-Up India Guidance

Technology Trends

Research

Digital Marketing Overview

What should I expect from an internship?

Expect to gain a greater understanding of the organization and IT industry through direct participation. Successful interns demonstrate that they're team players and willing to contribute to an organization in any and all capacities. Interns are encouraged to remember that it's their responsibility to get the most out of the internship experience. Come and Discuss with us for experiencing the maximum of Internship.

Workflow:


Work Flow of Internship

 Technology Training for 1 month (PHP / Java / Android)

 Initiation Phase starts along with Training

 Web Application Project Allocation

 Requirement Analysis

 Analyzing user needs and develops user

requirements. Create a functional requirement

document

 Discussion with Project Leader

 Discuss with Project leader about the Concept of the

Project & Requirement Analysis

 Project Proposal Documentation

 Prepare a Project Proposal document with objectives,

scope, Reference, Assumptions, software used etc.,

 Approval by Project Leader

 Project Leader Approves or suggests for any

modification if required.

 Modules Break up

 User Module, Admin Module, Payment module, etc


Database Design

 Table Design, Data design etc.,

 Coding

 PHP Coding, Framework etc.,

 UI Design

 Appearance design

 Payment Gateway Integration

 Ecommerce

 Implementation

 Hosting in Live Server - CPanel / FTP access

 Documentation

 Complete Project Documentation

 Key Skills used in PHP Internship

 HTML, CSS, Java script, Jquery, AJAX, MySQL, PHP,

Bootstrap, Laravel Framework, MVC Structure,

 Technical Overview of the Project:

 Forms, Fields, Email, Database, Add, Edit, Delete,

Shopping Cart (payment Gateway Integration) CPanel, FTP, 3rd party plugins,

Login through Facebook , Login through G+, Login through Linkedin 


Job Description of this Project

 Understand the Client Requirements

 Develop new features and bug fixes to address

customer needs

 Work with Project Leader to define requirements,

design, and document, develop, and implement application features.

 Develop new Application & other tools as per

requirement

 For Group Project - Collaborate with software team

members, and other cross-functional teams, in order to see projects to

completion

 Identify new processes that will lead to an improved

development lifecycle

 Exhibit and demonstrate a positive attitude

 Perform other related duties as assigned

 Should develop written communication skills (English)

Develop Aptitude skill


Benefits of Doing Internship With us

 3 Certificates

 Course Completion for your Job Search

 Experience Certificate for your Job search

 Internship Certificate for your College

 2 Types of Interviews

 We arrange Interviews with our Clients

 We conduct Interviews for all Internship Students to

recruit for our company

 Live Hosting

 You can share the url to your College / Recruiter of

your work

 After this Internship, you’re equivalent to 6 months

Experience in IT Companies

 Reviews / Viva & Interviews

 You can easily clear your Reviews / Viva & Interviews as this your Project and Coding
Share:

How to run PHP program in Xampp step-by-step?

How to run PHP program in Xampp step-by-step?

  • Write this program in a notepad and save it as file.php or any other name.
<?php echo " hello ! Welcome to Itxperts" ?>
  • After completion of the installation, you can use the XAMPP Control Panel to start/ stop all servers.
  • Start Mysql and Apache servers.
Xamp Control Panel - how to run php program - Edureka
  • Copy file.php to htdocs (C:/Program Files/XAMPP/htdocs)
  • You can also create any folders inside htdocs folder and save our codes over there.

In order to get the dashboard for localhost: search http://localhost in any browser.

Xamp UI- how to run php program - Edureka
  • Now to run your code, open localhost/file.php then it gets executed.

With this we come to an end of this article. I hope you have learned about XAMP, the installation of XAMP and how to run a PHP program in Xampp

Share:

How to execute PHP Script in Website using XAMPP webserver ?

How to execute PHP Script in Website using XAMPP webserver ?

First we have to install the XAMPP/WAMP webserver in our system. Please follow the link to download and install XAMPP/WAMP server. Link https://www.apachefriends.org/download.html


After successful installation, the steps we should follow are-


Open XAMPP control panel, if you want to link database to your code then start MySQL otherwise you will need to start Filezilla and Apache


Xampp starts


Then open Notepad/Notepad++ or any text editor to write PHP program.

<?php 


echo "Geeks for Geeks"; 

?>

Save you file in path xampp/htdocs/gfg/a.php


Then go to your browser and type localhost/gfg/a.php in URL section. It will display the result.


Note: If there are multiple files in your code similarly then you can put all your files in one folder and can run it.


<?php  


// Declare the variable 


$x = 20;   


$y = 10;   


// Evaluate arithmetic operations 


$z = $x + $y;  


$m = $x - $y; 


$p = $x * $y;  


$a = $x / $y; 


// Addition 


echo "Sum: ", $z; // Sum: 30 


// Subtraction 


echo "Diff: ", $m; // Diff: 10 


// Multiplication 


echo "Mul: ", $p; // Mul: 200 


// Division 


echo "Div: ", $a; // Div: 2 

?>

Type the URL xampp/htdocs/gfg/code/1.php in the browser, it will display the result.


Share:

Create table in XAMPP PHPMyAdmin

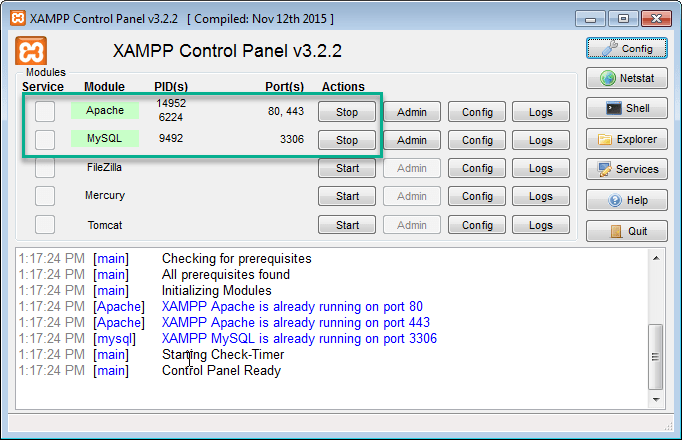
To access phpMyAdmin from XAMPP you will need to make sure you have Apache and MySQL running in the XAMPP control panel by clicking the start buttons under the Actions column:

xampp control panel

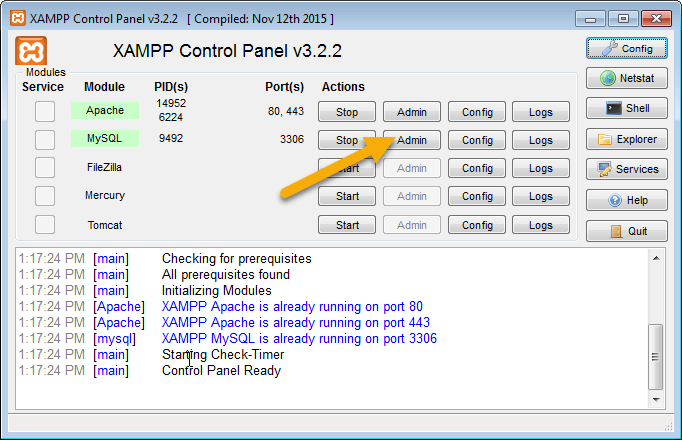
If Apache and MySQL are green then all is well.  Then you can click the “Admin” button in the MySQL row and that will launch phpMyAdmin:

xampp mysql admin button

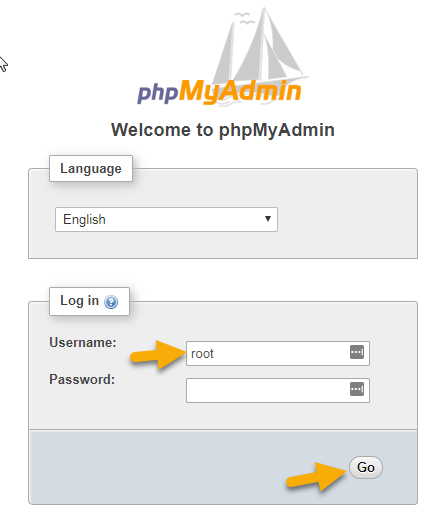
You can also access phpMyAdmin by typing in http://localhost/phpmyadmin/ into your browser.  The first time you access it, you will need to login using “root” as the username and there will be no password.  Once you’ve typed that in, click on “Go”:

login phpmyadmin

Once you are logged in I would recommend changing your password to secure your databases and their settings:

change pw phpmyadmin

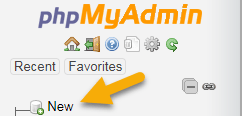
After you’ve done that.  You will want to create a new database by clicking here:

create new database

You will then be prompted to name the database, do so, and then click on “Create”:

create database

Then you will be asked to create a table with however many columns you want.  Once you’ve decided that, click “Go” again:

create database table

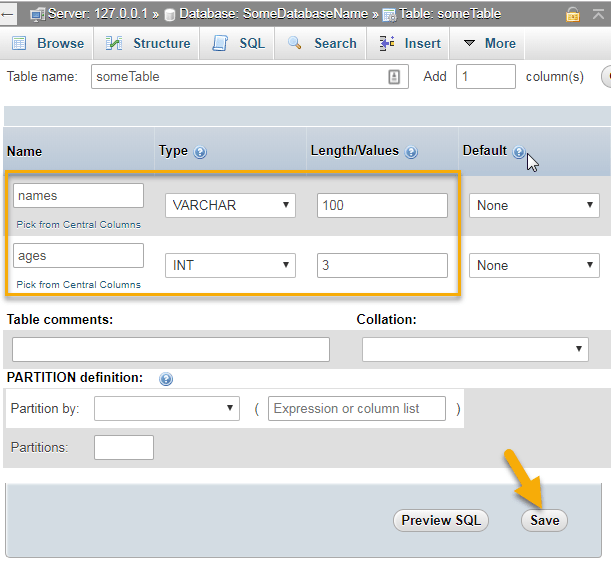
This will require that you preplan your database a bit.  You’ll need to know exactly what you will be storing in it.  For this example, we will be storing the user’s name and age.  So on the next screen we will put in a names and ages column.  We will also need to give them a type, age will be INT (integer/numbers) and names will be VARCHAR (characters/letters).  Finally we will need to say how many characters can be in each column.  Age will be 3 since I don’t think anyone would live to be older than 999 (: and we will give 100 characters for their name which should be enough.  Once we filled in those fields, we would click “Save”:

create columns

And there you have it!  A new database with a table with two columns in it ready to be filled.  Be sure to watch the video at the top of this post if you want to see how to connect to the database using PHP Data Objects (PDO).  Also, be sure to check out our  if you want to learn more about PHP, databases, and how to use them together.  Have an amazing day!

Share:

How to Install MySQL and PHPMyAdmin

How to Install MySQL and PHPMyAdmin

1. Install Xampp on your PC.

2. In your Xampp Control Panel, Start Apache and MySQL.
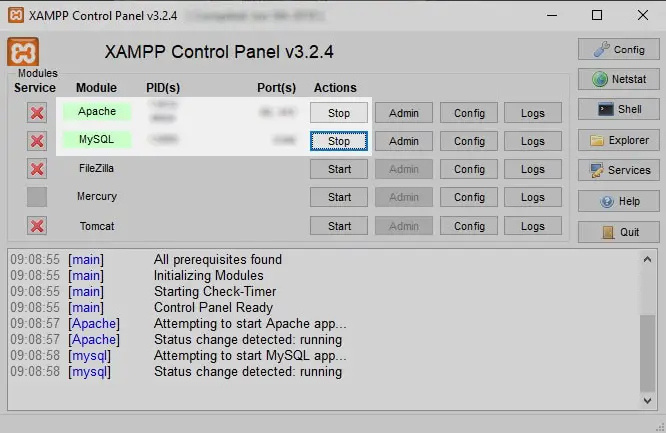
L’attribut alt de cette image est vide, son nom de fichier est xampp.jpg.

3. Open your browser and enter http://localhost/phpmyadmin.

L’attribut alt de cette image est vide, son nom de fichier est image-23.png.
Share:

simple CRUD based Web API using Angular JS as middleware and PHP Core for backend service

In this, tutorial, we are going to create a simple CRUD based Web API using Angular JS as middleware and PHP Core for backend service. This tutorial here aims at explaining how to create AngularJS application utilizing PHP Web Services and MySQL Database. We may skip the basic concept of AngularJS which is not part of this tutorial but you can get those concepts from the official documentation of Angular JS. We may skip the basic concept of AngularJS which is not part of this tutorial but you can get those concepts from the official documentation of AngularJS.


Database:

After starting Apache and MySQL ports from XAMPP or any other local server deployment application, first of all we need to create a database called “api” in phpmyadmin and create a table named “tbl_users” under the database with four attributes, ‘u_id‘, ‘u_name‘, ‘u_age‘, ‘u_phone‘, you can do that by using the Graphical User Interface (GUI) or running the following script:

-- phpMyAdmin SQL Dump
-- version 5.0.2
-- https://www.phpmyadmin.net/
--
-- Host: 127.0.0.1
-- Generation Time: Dec 10, 2020 at 09:46 PM
-- Server version: 10.4.14-MariaDB
-- PHP Version: 7.2.33

SET SQL_MODE = "NO_AUTO_VALUE_ON_ZERO";
START TRANSACTION;
SET time_zone = "+00:00";


/*!40101 SET @OLD_CHARACTER_SET_CLIENT=@@CHARACTER_SET_CLIENT */;
/*!40101 SET @OLD_CHARACTER_SET_RESULTS=@@CHARACTER_SET_RESULTS */;
/*!40101 SET @OLD_COLLATION_CONNECTION=@@COLLATION_CONNECTION */;
/*!40101 SET NAMES utf8mb4 */;

--
-- Database: `api`
--

DELIMITER $$
--
-- Procedures
--
CREATE DEFINER=`root`@`localhost` PROCEDURE `st_deleteUser` (`id` INT) BEGIN
     DELETE FROM tbl_users WHERE u_id = id;
    END$$

CREATE DEFINER=`root`@`localhost` PROCEDURE `st_getUser` () BEGIN
     SELECT u.u_id as "ID",
            u.u_name as "Name",
               u.u_age as "Age",
               u.u_phone as "Phone"
               
               FROM tbl_users u
               ORDER BY u.u_id ASC;
    END$$

CREATE DEFINER=`root`@`localhost` PROCEDURE `st_insertUser` (IN `name` VARCHAR(30), IN `age` TINYINT, IN `phone` VARCHAR(15)) BEGIN
     INSERT INTO tbl_users (u_name, u_age, u_phone) VALUES (name, age, phone);
    END$$

CREATE DEFINER=`root`@`localhost` PROCEDURE `st_updateUser` (`name` VARCHAR(30), `age` TINYINT, `phone` VARCHAR(15), `id` INT) BEGIN
     UPDATE tbl_users SET 
         u_name = name,
            u_age = age,
            u_phone = phone
             WHERE 
            u_id = id;
    END$$

DELIMITER ;

-- --------------------------------------------------------

--
-- Table structure for table `tbl_users`
--

CREATE TABLE `tbl_users` (
  `u_id` int(11) NOT NULL,
  `u_name` varchar(30) NOT NULL,
  `u_age` tinyint(4) NOT NULL,
  `u_phone` varchar(15) NOT NULL
) ENGINE=InnoDB DEFAULT CHARSET=utf8mb4;

--
-- Indexes for dumped tables
--

--
-- Indexes for table `tbl_users`
--
ALTER TABLE `tbl_users`
  ADD PRIMARY KEY (`u_id`);

--
-- AUTO_INCREMENT for dumped tables
--

--
-- AUTO_INCREMENT for table `tbl_users`
--
ALTER TABLE `tbl_users`
  MODIFY `u_id` int(11) NOT NULL AUTO_INCREMENT;
COMMIT;

/*!40101 SET CHARACTER_SET_CLIENT=@OLD_CHARACTER_SET_CLIENT */;
/*!40101 SET CHARACTER_SET_RESULTS=@OLD_CHARACTER_SET_RESULTS */;
/*!40101 SET COLLATION_CONNECTION=@OLD_COLLATION_CONNECTION */;
view rawapi.sql hosted with ❤ by GitHub
Backend API:

Once the database is done, let’s move towards setting up your back end. We will create the Web API project in Visual Studio Code or any Text Editor of your choice and steps are pretty simple:

Step 1:

Open the location where your local server application like XAMPP/WAP is installed and go to directory called “C/xampp/htdocs“, this is the default server configuration of mine, you might have your own so you can navigate to your respective folder and create a directory named “api“. Boo yeah, you have created the folder. Time to connect the database in your app. A small reminder, your link will be like C/xampp/htdocs/api.

Step 2:

Now, start VS Code and open the folder you just created. Create a file including a connection to the database. Create a file named “connection.php”.

<?php
    $con = mysqli_connect("localhost", "root", "", "api");
    if($con) {
        // echo "Connection Established";
    } else {
        die();
    }
?>
view rawconnection.php hosted with ❤ by GitHub
Step 3:

Try running the connection.php file in the browser by typing “localhost/api/connection.php” as the URL, if it returns “Connection Established“ you are good to continue.

Step 4:

Now create “insert.php” file and write the following code mentioned below. This file will be responsible for carrying out and handling the Request and Response system in the API whenever we insert data.

<?php
    require "connection.php";
    $data = json_decode(file_get_contents("php://input"));
        $name = $data->name;
        $age = $data->age;
        $phone = $data->phone;

    $query = "CALL st_insertUser('$name', $age, '$phone')";

    if(mysqli_query($con, $query)) {
        $response["msg"] = "User added successfully";
    } else {
        $response["msg"] = "Add user response from server failed";
    }

    echo json_encode($response);
?>
view rawinsert.php hosted with ❤ by GitHub
Step 5:

Now create the “update.php” file and write the following code mentioned below. This file will be responsible for carrying out and handling the Request and Response system in the API whenever we update data.

<?php
    require "connection.php";
    $data = json_decode(file_get_contents("php://input"));
        $id = $data->id;
        $name = $data->name;
        $age = $data->age;
        $phone = $data->phone;

    $query = "CALL st_updateUser('$name', $age, '$phone', $id)";

    if(mysqli_query($con, $query)) {
        $response["msg"] = "User update response from server was a success ";
    } else {
        $response["msg"] = "User update response from server failed";
    }

    echo json_encode($response);
?>
view rawupdate.php hosted with ❤ by GitHub
Step 6:

Now create the “select.php” file and write the following code mentioned below. This file will be responsible for carrying out and handling the Request and Response system in the API whenever we select data.

<?php
    require "connection.php";

    $query = "CALL st_getUser()";
    $response = array();
    $res = mysqli_query($con, $query);

    if(mysqli_num_rows($res)) {
        while($row = mysqli_fetch_assoc($res)) {
            $response[] = $row;
        }
    } else {
        $response["msg"] = "No records";
    }

    echo json_encode($response);
?>
view rawselect.php hosted with ❤ by GitHub
Step 7:

Now create the “select.php” file and write the following code mentioned below. This file will be responsible for carrying out and handling the Request and Response system in the API whenever we select data.

<?php
    require "connection.php";
    $data = json_decode(file_get_contents("php://input"));
        $id = $data->id;

    $query = "CALL st_deleteUser($id)";

    if(mysqli_query($con, $query)) {
        $response["msg"] = "User deleted response from server was a success ";
    } else {
        $response["msg"] = "Delete user response from server failed";
    }

    echo json_encode($response);
?>
view rawdelete.php hosted with ❤ by GitHub
We know from the name of the files that they are performing a specific function, but if we use them, what will be point of using an API, to create a front end, it will be a singular HTML file, yes an HTML file, because that is the point of our API, it is sending request to the server which is responding us with some result. This file is basically the visual interface for our API since all the above files are the backend.

Frontend Framework

Create a “home.html” file and write the following code as shown below.

<!DOCTYPE html>
<html lang="en">

<head>
    <meta charset="UTF-8">
    <meta name="viewport" content="width=device-width, initial-scale=1.0">
    <meta http-equiv="X-UA-Compatible" content="ie=edge">
    <meta name="Description" content="Enter your description here" />
    <link rel="stylesheet" href="https://cdnjs.cloudflare.com/ajax/libs/twitter-bootstrap/4.5.2/css/bootstrap.min.css">
    <link rel="stylesheet" href="https://cdnjs.cloudflare.com/ajax/libs/font-awesome/5.15.0/css/all.min.css">
    <link rel="stylesheet" href="assets/css/style.css">
    <!-- Angular Script -->
    <script src="https://ajax.googleapis.com/ajax/libs/angularjs/1.8.0/angular.min.js"></script>
    <title>Angular JS CRUD API</title>
    <style>
      //Color for jumbotron
        .jumbotron {
            background-color: rgba(73, 104, 105, 0.486);
        }
    </style>
</head>

<body ng-app="myApp" ng-controller="myCont">
    <div class="container" ng-init="retrieve(); btnName='SAVE'">
        <div class="jumbotron">
            <h3 class="text-center">Angular and PHP based Application Programming Interface</h3>
        </div>
        <div class="col-8 offset-2">
            <div class="form-group">
                <label for="name">Name: </label>
                <input type="text" class="form-control form-control-sm" ng-model="nameTxt" placeholder="Enter your name (e.g. Ali)">
            </div>

            <div class="form-group">
                <label for="name">Age: </label>
                <input type="text" class="form-control form-control-sm" ng-model="ageTxt" placeholder="Enter your age (e.g. 23)">
            </div>

            <div class="form-group">
                <label for="name">Phone: </label>
                <input type="text" class="form-control form-control-sm" ng-model="phoneTxt" placeholder="Enter number (e.g. 0900-78601)">
            </div>

            <div class="form-group">
                <input type="button" class="btn btn-dark btn-sm col-12" value="{{btnName}}" ng-click="insert()">
            </div>
            <p class="text-center alert alert-dark">{{ message }}</p>
            <hr />
            <table class="table table-secondary table-bordered">
                <thead>
                    <th class="text-center text-uppercase">S. No</th>
                    <th class="text-center text-uppercase">Name</th>
                    <th class="text-center text-uppercase">Age</th>
                    <th class="text-center text-uppercase">Phone</th>
                    <th class="text-center text-uppercase" colspan="2">Actions</th>
                </thead>

                <tbody>
                    <tr ng-repeat="x in myData">
                        <td>{{ x.ID }}</td>
                        <td>{{ x.Name }}</td>
                        <td>{{ x.Age }}</td>
                        <td>{{ x.Phone }}</td>
                        <td class="text-center" colspan="2">
                            <button class="btn btn-info" ng-click="edit(x.ID, x.Name, x.Age, x.Phone)">Edit</button>
                            <button class="btn btn-danger" ng-click="delete(x.ID)">Delete</button>
                        </td>
                    </tr>
                </tbody>
            </table>
        </div>
    </div>
    <script>
        var app = angular.module("myApp", []);
        app.controller("myCont", function($scope, $http) {
            //Data Deletion Starts
            $scope.delete = function(id) {
                $http.post("delete.php", {
                    'id': id
                }).then(function($response) {
                    $scope.message = $response.data.msg;
                    console.log($scope.message);
                    $scope.retrieve();
                    $scope.nameTxt = "";
                    $scope.ageTxt = "";
                    $scope.phoneTxt = "";
                });
            };
            //Data Deletion Ends
            //Data Fetching For Updation Starts
            $scope.edit = function(id, name, age, phone) {
                $scope.nameTxt = name;
                $scope.ageTxt = age;
                $scope.phoneTxt = phone;
                $scope.userID = id;
                $scope.btnName = "UPDATE";
            };
            //Data Fetching For Updation Ends

            $scope.insert = function() {
                //Data Updation Starts
                if ($scope.btnName == "UPDATE") {
                    $http.post("update.php", {
                        'id': $scope.userID,
                        'name': $scope.nameTxt,
                        'age': $scope.ageTxt,
                        'phone': $scope.phoneTxt
                    }).then(function($response) {
                        $scope.message = $response.data.msg;
                        $scope.nameTxt = "";
                        $scope.ageTxt = "";
                        $scope.phoneTxt = "";
                        $scope.userID = 0;
                        console.log($scope.message);
                        $scope.retrieve();
                    });
                    //Data Updation Ends
                } else {
                    // Data Insertion Starts
                    $http.post("insert.php", {
                        'name': $scope.nameTxt,
                        'age': $scope.ageTxt,
                        'phone': $scope.phoneTxt
                    }).then(function($response) {
                        $scope.message = $response.data.msg;
                        $scope.nameTxt = "";
                        $scope.ageTxt = "";
                        $scope.phoneTxt = "";
                        console.log($scope.message);
                        $scope.retrieve();
                    });
                    // Data Insertion Ends
                }

            };
            // Data Retrieval Starts
            $scope.retrieve = function() {
                $http.get('select.php').then(function($response) {
                    $scope.myData = $response.data;
                    console.log("$scope.myData");
                });
            };
        });
        // Data Retrieval Ends
    </script>


    <script src="https://cdnjs.cloudflare.com/ajax/libs/jquery/3.5.1/jquery.slim.min.js"></script>
    <script src="https://cdnjs.cloudflare.com/ajax/libs/popper.js/1.16.1/umd/popper.min.js"></script>
    <script src="https://cdnjs.cloudflare.com/ajax/libs/twitter-bootstrap/4.5.2/js/bootstrap.min.js"></script>
</body>

</html>
view rawhome.html hosted with ❤ by GitHub
On line 73 and forward of home.html basically, what we are doing is naming the angular module with the name “myApp” and defining it’s controller as “myCont“. Dependencies which we used are “$scope” (the glue between application controller and the view) and insert, update, select and delete files.

Then we create delete, insert, edit and retrieve methods which will be called from our view (home.html) to our controllers, the respective php files for each function by sending a request as seen with $http.post(“<controllers>.php”).

Basically, the point of this file is Angular JS sending a request to the server, the Angular code and callback functions are point to the specific pages where the request is being sent using a specific code block. This is what is the cause behind our HTML page inserting, updating, deleting and fetching the data on the webserver. And there guys, we have our code completed. Try running you API with going to the browser and posting the following URL, “localhost/api/home.html” and boo yeah, you have a working API. with complete CRUD (Create, Read, Update and Delete) function.

NOTE:

You will have to enter the first port number that you see under the Ports section of XAMPP. I have 80 so I do not have to pass it in my URL, if you have 81, 90 or 8080, you will have to enter your port after “localhost:<your-port>/api/home.html“.
Share:

Database in XAMPP

Database setup using XAMPP


XAMPP is an open source package that is widely used for PHP development. XAMPP contains MariaDB, PHP, and Perl; it provides a graphical interface for SQL (phpMyAdmin), making it easy to maintain data in a relational database.

If you have not installed XAMPP, please refer to XAMPP-setup to install and set up XAMPP.

Assuming that you have already set up XAMPP

  • Start the database server ("MySQL Database")
  • Start the PHP environment ("Apache Web Server")

Note:  phpMyAdmin  runs on a PHP environment. To use  phpMyAdmin  to manage databases, Apache Web server must be started.

Reminder: be sure to stop the server when you are done. Leaving the servers running consumes energy and may later prevent the servers from starting (in particular, MySQL server).


Access phpMyAdmin

  1. Open a web browser, enter a URL   http://localhost   to access XAMPP dashboard
  2. Select  phpMyAdmin  tab

XAMPP dashboard

Alternatively, you may access  phpMyAdmin  via the XAMPP manager / controller, click  Go to Application  button to access XAMPP dashboard.

The main page should look similar to the following
screen showing the main page of phpMyAdmin


Add a user account

  1. On the  phpMyAdmin  screen, select  User accounts  tab.
  2. Select  Add user account  link.
  3. Enter user name and password of your choice. Note: do not use any of your official accounts such as UVA account.
  4. Select  Local  for  Host name
  5. Check  Create database with same name and grant all privileges
  6. Check  Grant all privileges on wildcard name (username\_%)
  7. Check  Check all  for  Global privileges
  8. At the bottom-right of the screen. click the  Go  button

Do not change or update the  root  account. If you may forget or need to reset your password, you can use the  root  account to manage users.

sample screen to add a user account

To verify that the account has been created, go to  User accounts  tab. You should see the newly created user account (as shown below).

sample screen showing the account has been created


Create a database

Let's create a  guestbook  database. To create a database, there are several options.

You may use the  Create database  feature.
  • On the  phpMyAdmin  screen, select the  Databases  tab. Alternatively, you may click the  New  link on the left panel.
  • Under the  Create database,  enter a Database name
  • Click the  Create  button

screen showing the create database screen of phpMyAdmin


You may run the SQL command to create a database.
  • On the  phpMyAdmin  screen, select the  SQL  tab
  • Enter  CREATE DATABASE guestbook; 
    Note: SQL commands are not case sensitive. This example uses uppercase and lowercase simply to make it easy to read.
  • Click the  Go  button to run the command.
    • For Mac users, you may press  Control+Enter  to run
    • For Windows users, you may press  Control+Enter  to run

screen showing the SQL command to create a database


Create a table

Let's create a table named  entries.  To create a table, there are several options.

You may use the  Create table  feature.
  • On the  phpMyAdmin  screen, select the  guestbook  database.
  • Select the  Structure  tab.
  • Under the  Create table,  enter a table name and the number of columns.
  • Click the  Go  button. This will prompt you to enter the column information.

screen showing the create table screen of phpMyAdmin


You may run the SQL command to create a table.
  • On the  phpMyAdmin  screen, select the  SQL  tab
  • Enter the following code
    USE guestbook; 
    CREATE TABLE entries (guestName VARCHAR(255), content VARCHAR(255), 
        entryID INT NOT NULL AUTO_INCREMENT, PRIMARY KEY(entryID));

    screen showing the SQL command to create a table

    If you already selected the  guestbook  database (on the left panel), no need to include USE guestbook in your SQL to run.

    screen showing the SQL command to create a table

  • Click the  Go  button to run the command.
    • For Mac users, you may press  Control+Enter  to run
    • For Windows users, you may press  Control+Enter  to run

Insert data

To insert data into a table, there are several options.

You may use the  Insert  feature.
  • On the  phpMyAdmin  screen, select the  guestbook  database, select the  entries  table.
  • Select the  Insert  tab.
  • For each record of data to be inserted, enter the value for each column.
  • Click the  Go  button.

screen showing the insert data screen of phpMyAdmin


You may run the SQL command to insert data.
  • On the  phpMyAdmin  screen, select the  guestbook  database, select the  entries  table.
  • Select the  SQL  tab
  • Enter the following code
    INSERT INTO entries (guestName, content) values ("Humpty", "Humpty's here!");
    INSERT INTO entries (guestName, content) values ("Dumpty", "Dumpty's here too!");

    screen showing the SQL command to insert data into a table

  • Click the  Go  button to run the command.
    • For Mac users, you may press  Control+Enter  to run
    • For Windows users, you may press  Control+Enter  to run

Retrieve data

To retrieve data from a table, there are several options.

You may use the  Browse  feature.
  • On the  phpMyAdmin  screen, select the  guestbook  database, select the  entries  table.
  • Select the  Browse  tab. This will display all existing records of the table.

screen showing the Browse screen of phpMyAdmin


You may run the SQL command to retrieve data.
  • On the  phpMyAdmin  screen, select the  guestbook  database, select the  entries  table.
  • Select the  SQL  tab
  • Enter the following code
    SELECT * FROM entries;

    screen showing the SQL command to retrieve data from a table

  • Click the  Go  button to run the command.
    • For Mac users, you may press  Control+Enter  to run
    • For Windows users, you may press  Control+Enter  to run

Import SQL file

  • Create a blank file named  friendbook.sql.  Paste the following content in the file
    CREATE TABLE friends
       (friendName VARCHAR(255),
        phone VARCHAR(255),
        entryID INT NOT NULL AUTO_INCREMENT,
        PRIMARY KEY(entryID));
    
    INSERT INTO friends (friendName, phone) values ("Humpty", "111-111-1111");
    INSERT INTO friends (friendName, phone) values ("Dumpty", "222-222-2222");  
  • On the  phpMyAdmin  screen, select the  guestbook  database
  • Select the  Import  tab

    screen showing how to import SQL file

  • Choose the .sql file to import

    screen showing how to import SQL file

  • Click the  Go  button to run the command.
    • For Mac users, you may press  Control+Enter  to run
    • For Windows users, you may press  Control+Enter  to run

Export SQL file (back up your database)

  • On the  phpMyAdmin  screen, select the  guestbook  database
  • Select the  Export  tab

    screen showing how to export SQL file

  • Click the  Go  button to run the command.

    screen showing how to export SQL file

    • For Mac users, you may press  Control+Enter  to run
    • For Windows users, you may press  Control+Enter  to run
Share:

Creating MySQL Database with XAMPP

Creating MySQL Database with XAMPP
XAMPP stack of software is an open-source localhost server providing a number of functionalities through the package of software it contains. The software, which is part of XAMPP is started/stopped using the XAMPP Control Panel. It is used for testing the projects and modifications offline before launching it on the global web. One such very important functionality provided by XAMPP is the creation of the MySQL database. This is done by using phpMyAdmin. The detailed explanation of what is phpMyAdmin and how to use it to create MySQL database with XAMPP will be discussed in this article.

phpMyAdmin

phpMyAdmin is a costless and open source software that provides the functionality of operating and managing MySQL over the internet. It provides an ease to the user to control and supervise the database with the help of a graphic user interface known as phpMyAdmin.This GUI is written in PHP programming language. Over time it has gained a lot of trust and demand for the purpose of finding a web-based MySQL administration solution. The user can operate upon MySQL via phpMyAdmin user interface while still directly executing SQL queries. The GUI allows the host to carry a number of manipulation operations on the database, such as editing, creating, dropping, amending, alteration of fields, tables, indexes, etc. It can also be used to manage access control over the data by giving privileges and permissions. phpMyAdmin has thus a vital role to play in handling and creating a database.

Steps To Create MySQL Database Using XAMPP

STEP 1- Navigate to XAMPP in your system or simply launch it by clicking the XAMPP Creating MySQL Database with XAMPP Icon. The Control Panel is now visible and can be used to initiate or halt the working of any module.

STEP 2- Click on the "Start" button corresponding to Apache and MySQL modules. Once it starts working, the user can see the following screen:


Creating MySQL Database with XAMPP
STEP 3- Now click on the "Admin" button corresponding to the MySQL module. This automatically redirects the user to a web browser to the following address-

http://localhost/phpmyadmin


STEP 4- One can see a number of tabs such as Database, SQL, User Accounts, Export, Import, Settings, etc. Click on the "Database" tab. Here you can see the Create option. Choose an appropriate name for the input field titled Database name. Things to keep in mind while selecting the name for the database are-

The number of characters used should be equal to or less than 64.
The name should comprise of letters, numbers and underscore.
The DB name should not start with a number.
It should be relevant to the topic for which it is being created.
Creating MySQL Database with XAMPP
Make sure the database is successfully created.


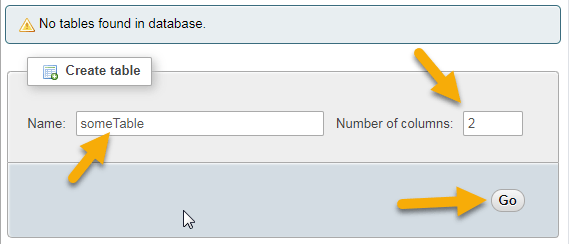
STEP 5- It is very important to create tables in order to store the information in a systematic manner. In this step, we will build tables for the created database. In the created Database (Login page in this case), click on the 'Structure' tab. Towards the end of the tables list, the user will see a 'Create Table' option. Fill the input fields titled "Name" and "Number of Columns" and hit the 'Go' button.

Creating MySQL Database with XAMPP
STEP 6- Now, we have to initialize our columns based on their type. Enter the names for each of your columns, select the type, and the maximum length allowed for the input field. Click on "Save" in the bottom right corner. The table with the initialized columns has been created. You can create any number of tables for your database.


Creating MySQL Database with XAMPP
Controlling Access
Share:

How to install XAMPP on Windows 10

How to install XAMPP on Windows 10

To download and install XAMPP on Windows 10, use these steps:

  1. Open Apache Friends website.

  2. Click the Download button for the Windows version of XAMPP and save the file on your computer.

    Quick note: If you have special version requirements for PHP, download the version you need to install. If you do not have a version requirement, download the oldest version, as it may help you avoid issues trying to install PHP-based software. In addition, these instructions have been tested to work for XAMPP version 8.1.1 and older versions, but you can use this guide for other versions.
  3. Double-click the downloaded file to launch the installer.

  4. Click the OK button.

  5. Click the Next button.

    Complete XAMPP installation on Windows 10
    Complete XAMPP installation on Windows 10

  6. XAMPP offers various components that you can install, such as MySQL, phpMyAdmin, PHP, Apache, and more. For the most part, you will be using most of these components, which means that it is recommended to leave the default options.

  7. Click the Next button.

    XAMPP install components
    XAMPP install components

  8. Use the default installed location. (Or choose another folder to install the software in the “Select a folder” field.)

  9. Click the Next button.

    XAMPP installation location
    XAMPP installation location

  10. Select the language for the XAMPP Control Panel.

  11. Click the Next button.

  12. Clear the Learn more about Bitnami for XAMPP option.

  13. Click the Next button.

  14. Click the Next button again.

    XAMPP installation wizard on Windows 10
    XAMPP installation wizard on Windows 10

  15. Click the Allow access button to allow the app through the Windows Firewall (if applicable).

  16. Click the Finish button.

Once you complete the steps, the XAMPP Control Panel will launch, and you can begin the web server environment configuration.

Share:

Live Chat With Us

My Blog List

Search This Blog

Locations

Training

Pages

My Blog List

Blog Archive

Privacy policy