Python is a general purpose, dynamic, high level and interpreted programming language. It supports Object Oriented programming approach to develop applications. It is simple and easy to learn and providest,ltl,,really, ei
ss of high-level data structureiik
Iiinl
s.
Python is easy to learn yet powerful and versatile scripting language which makes it attractive for Application Development.
Python's syntax and dynamic typing with its interpreted nature, makes it an ideal language for scripting and rapid application development.
Python supports multiple programming pattern, including object oriented, imperative and functional or procedural programming styles.
Python is not intended to work on special area such as web programming. That is why it is known
Q
V
H
it can be
Ww
sed with web, enterprise, 3D CAD etc.7
We don't need to use data types to declare variable because it is dynamically typed so we can write a=10 to assign an integer value in an integer variable.
Python makes the development and debugging fast because there is no compilation step included in python development and edit-test-debug cycle is very fast.
Python Features
Python provides lots of features that are listed below.
1) Easy to Learn and Use
Python is easy to learn and use. It is developer-friendly and high level programming language.
2) Expressive Language
Python language is more expressive means that it is more understandable and readable.
3) Interpreted Language
Python is an interpreted language i.e. interpreter executes the code line by line at a time. This makes debugging easy and thus suitable for beginners.
4) Cross-platform Language
Python can run equally on different platforms such as Windows, Linux, Unix and Macintosh etc. So, we can say that Python is a portable language.
5) Free and Open Source
Python language is freely available at offical web address.The source-code is also available. Therefore it is open source.
6) Object-Oriented Language
Python supports object oriented language and concepts of classes and objects come into existence.
7) Extensible
It implies that other languages such as C/C++ can be used to compile the code and thus it can be used further in our python code.
8) Large Standard Library
Python has a large and broad library and prvides rich set of module and functions for rapid application development.
9) GUI Programming Support
Graphical user interfaces can be developed using Python.
10) Integrated
It can be easily integrated with languages like C, C++, JAVA etc.
Python History
Python laid its foundation in the late 1980s.
The implementation of Python was started in the December 1989 by Guido Van Rossum at CWI in Netherland.
In February 1991, van Rossum published the code (labeled version 0.9.0) to alt.sources.
In 1994, Python 1.0 was released with new features like: lambda, map, filter, and reduce.
Python 2.0 added new features like: list comprehensions, garbage collection system.
On December 3, 2008, Python 3.0 (also called "Py3K") was released. It was designed to rectify fundamental flaw of the language.
ABC programming language is said to be the predecessor of Python language which was capable of Exception Handling and interfacing with Amoeba Operating System.
Python is influenced by following programming languages:
Python Version
Python programming language is being updated regularly with new features and supports. There are lots of updations in python versions, started from 1994 to current release.
A list of python versions with its released date is given below.
Python Version | Released Date |
Python 1.0 | January 1994 |
Python 1.5 | December 31, 1997 |
Python 1.6 | September 5, 2000 |
Python 2.0 | October 16, 2000 |
Python 2.1 | April 17, 2001 |
Python 2.2 | December 21, 2001 |
Python 2.3 | July 29, 2003 |
Python 2.4 | November 30, 2004 |
Python 2.5 | September 19, 2006 |
Python 2.6 | October 1, 2008 |
Python 2.7 | July 3, 2010 |
Python 3.0 | December 3, 2008 |
Python 3.1 | June 27, 2009 |
Python 3.2 | February 20, 2011 |
Python 3.3 | September 29, 2012 |
Python 3.4 | March 16, 2014 |
Python 3.5 | September 13, 2015 |
Python 3.6 | December 23, 2016 |
Python 3.6.4 | December 19, 2017 |
Python Applications Area
Python is known for its general purpose nature that makes it applicable in almost each domain of software development. Python as a whole can be used in any sphere of development.
Here, we are specifing applications areas where python can be applied.
1) Web Applications
We can use Python to develop web applications. It provides libraries to handle internet protocols such as HTML and XML, JSON, Email processing, request, beautifulSoup, Feedparser etc. It also provides Frameworks such as Django, Pyramid, Flask etc to design and delelop web based applications. Some important developments are: PythonWikiEngines, Pocoo, PythonBlogSoftware etc.
2) Desktop GUI Applications
Python provides Tk GUI library to develop user interface in python based application. Some other useful toolkits wxWidgets, Kivy, pyqt that are useable on several platforms. The Kivy is popular for writing multitouch applications.
3) Software Development
Python is helpful for software development process. It works as a support language and can be used for build control and management, testing etc.
4) Scientific and Numeric
Python is popular and widely used in scientific and numeric computing. Some useful library and package are SciPy, Pandas, IPython etc. SciPy is group of packages of engineering, science and mathematics.
5) Business Applications
Python is used to build Bussiness applications like ERP and e-commerce systems. Tryton is a high level application platform.
6) Console Based Application
We can use Python to develop console based applications. For example: IPython.
7) Audio or Video based Applications
Python is awesome to perform multiple tasks and can be used to develop multimedia applications. Some of real applications are: TimPlayer, cplay etc.
8) 3D CAD Applications
To create CAD application Fandango is a real application which provides full features of CAD.
9) Enterprise Applications
Python can be used to create applications which can be used within an Enterprise or an Organization. Some real time applications are: OpenErp, Tryton, Picalo etc.
10) Applications for Images
Using Python several application can be developed for image. Applications developed are: VPython, Gogh, imgSeek etc.
There are several such applications which can be developed using Python
HOW TO INSTALL PYTHON
To start with Python, first make sure that the Python is installed on local computer.
To install Python, visit the official site and download Python from the download section.
To install Python on Ubuntu operating system, visit our installation section where we have provided detailed installation process.
For Windows operating system, the installation process is given below.
1. To install Python, firstly download the Python distribution from www.python.org/download.
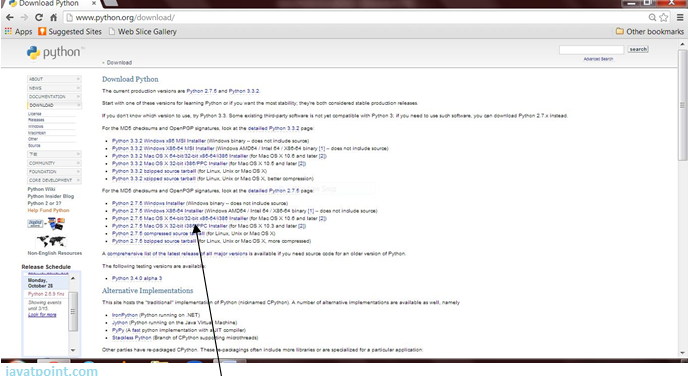
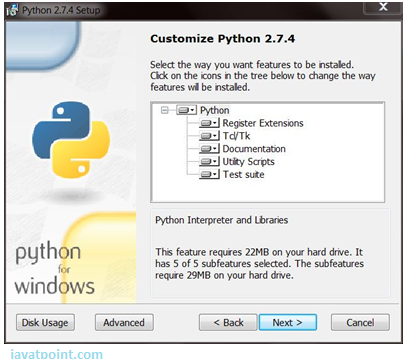
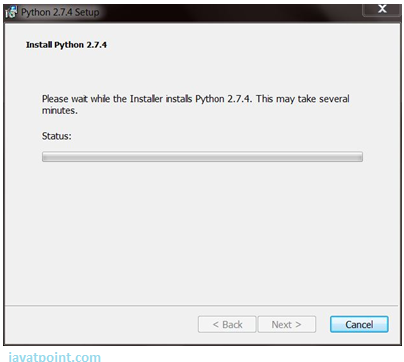
2. After downloading the Python distribution, double click on the downloaded software to execute it. Follow the following installtion steps.

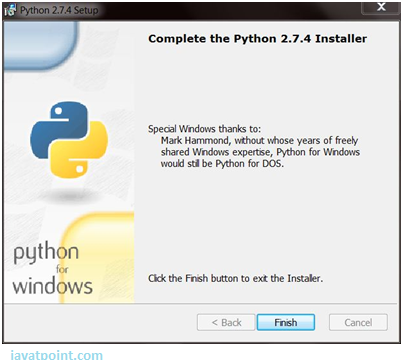
Click the Finish button and Python will be installed on your system.
SETTING PATH IN PYTHON
Before starting working with Python, a specific path is to set.
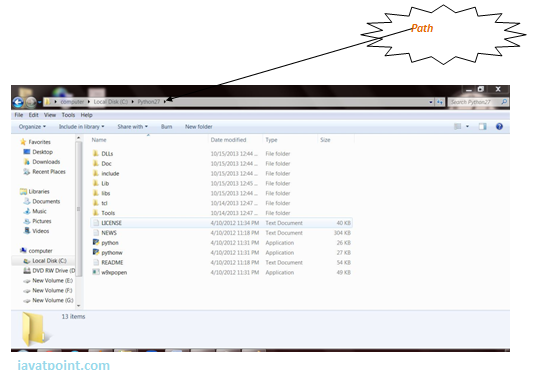
Your Python program and executable code can reside in any directory of your system, therefore Operating System provides a specific search path that index the directories Operating System should search for executable code.
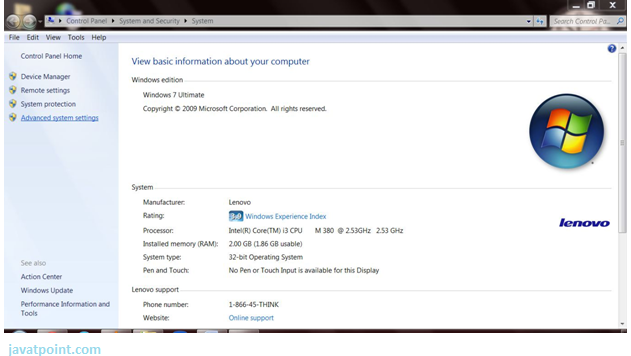
The Path is set in the Environment Variable of My Computer properties:
To set path follow the steps:
Right click on My Computer ->Properties ->Advanced System setting ->Environment Variable ->New
In Variable name write path and in Variable value copy path up to C://Python(i.e., path where Python is installed). Click Ok ->Ok.
Path will be set for executing Python programs.
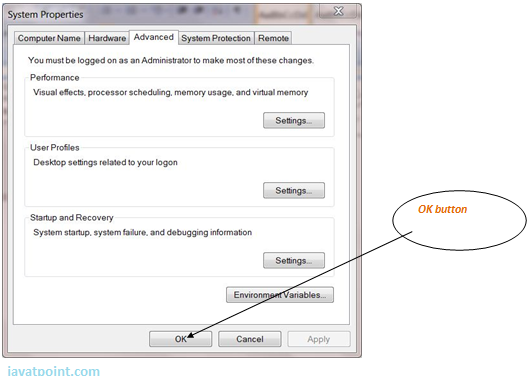
1. Right click on My Computer and click on properties.
2. Click on Advanced System settings
3. Click on Environment Variable tab.
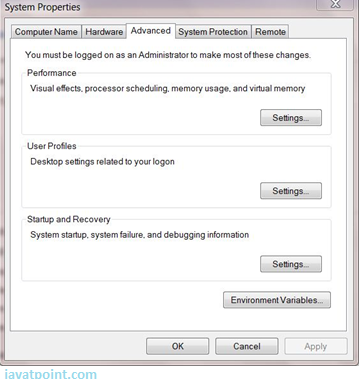
4. Click on new tab of user variables.
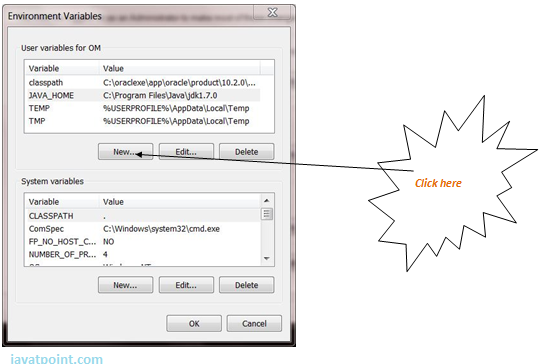
5. Write path in variable name
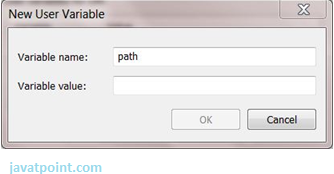
6. Copy the path of Python folder
7. Paste path of Python in variable value.
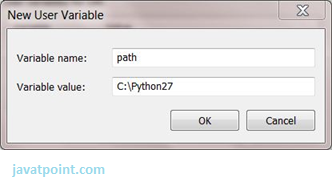
8. Click on Ok button:
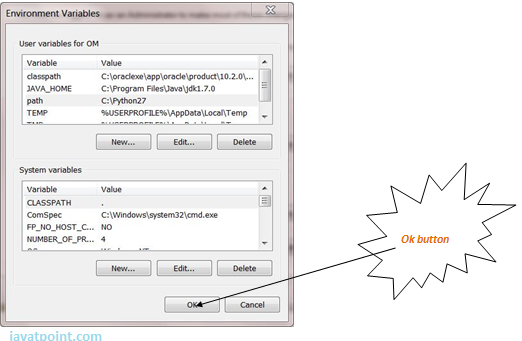
9. Click on Ok button:
Python Example
Python is easy to learn and code and can be execute with python interpreter. We can also use Python interactive shell to test python code immediately.
A simple hello world example is given below. Write below code in a file and save with .py extension. Python source file has .pyextension.
hello.py
print("hello world by python!")
Execute this example by using following command.
Python3 hello.py
After executing, it produces the following output to the screen.
Output
hello world by python!
Python Example using Interactive Shell
Python interactive shell is used to test the code immediately and does not require to write and save code in file.
Python code is simple and easy to run. Here is a simple Python code that will print "Welcome to Python".
A simple python example is given below.
>>> a="Welcome To Python"
>>> print a
Welcome To Python
>>>
Explanation:
Here we are using IDLE to write the Python code. Detail explanation to run code is given in Execute Python section.
A variable is defined named "a" which holds "Welcome To Python".
"print" statement is used to print the content. Therefore "print a" statement will print the content of the variable. Therefore, the output "Welcome To Python" is produced.
Python 3.4 Example
In python 3.4 version, you need to add parenthesis () in a string code to print it.
>>> a=("Welcome To Python Example")
>>> print a
Welcome To Python Example
>>>
How to execute python
To execute Python code, we can use any approach that are given below.
1) Interactive Mode
Python provides Interactive Shell to execute code immediatly and produce output instantly. To get into this shell, write python in the command prompt and start working with Python.
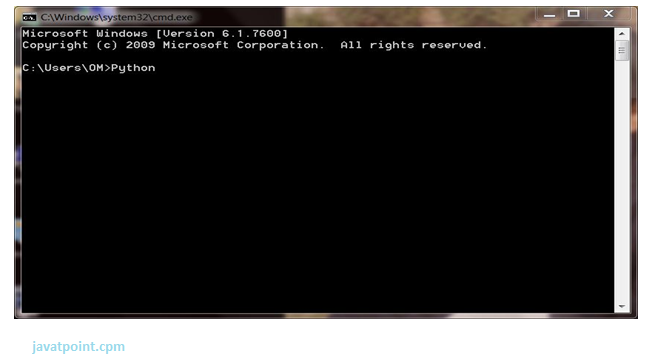
Press Enter key and the Command Prompt will appear like:
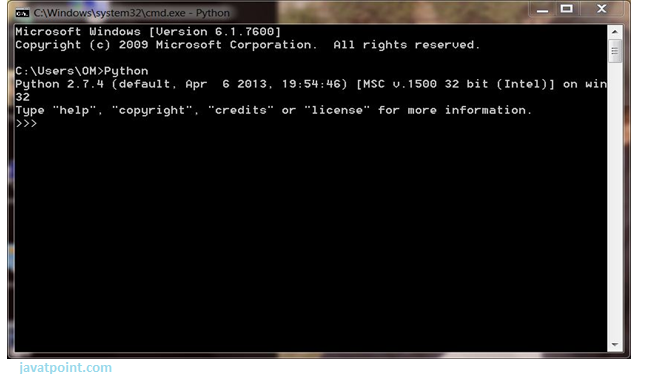
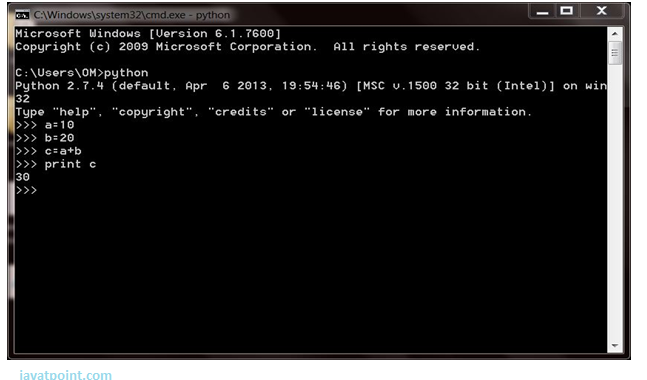
Now we can execute our Python commands.
Eg:
2) Script Mode
Using Script Mode, we can write our Python code in a separate file of any editor in our Operating System.
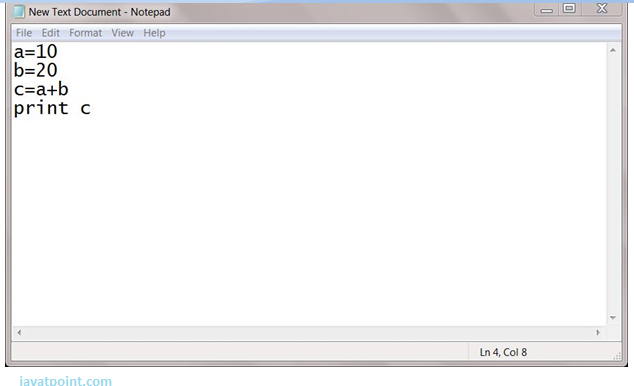
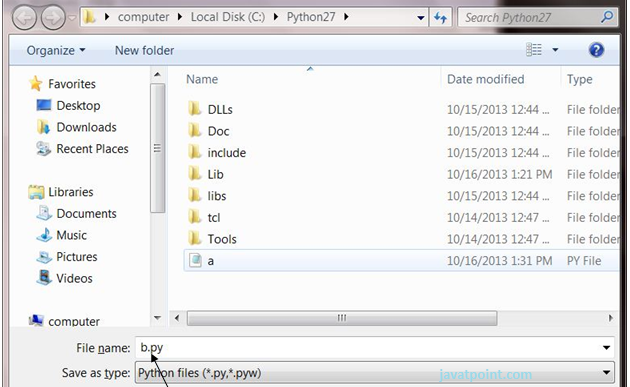
Save it by .py extension.
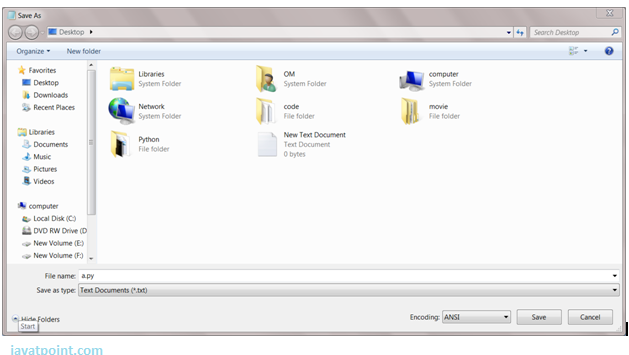
Now open Command prompt and execute it by :
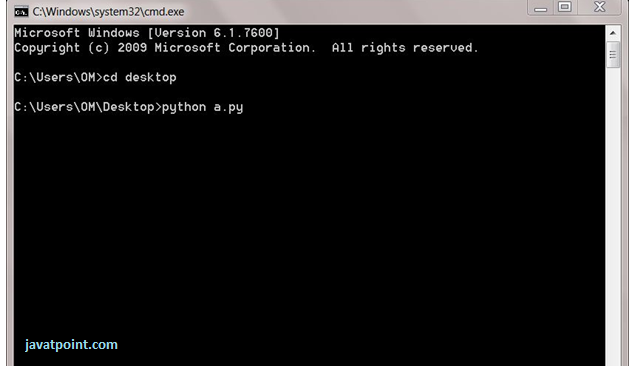
NOTE: Path in the command prompt should be location of saved file.where you have saved your file. In the above case file should be saved at desktop.
3) Using IDE (Integrated Development Environment)
We can execute our Python code using a Graphical User Interface (GUI).
All you need to do is:
Click on Start button -> All Programs -> Python -> IDLE(Python GUI)
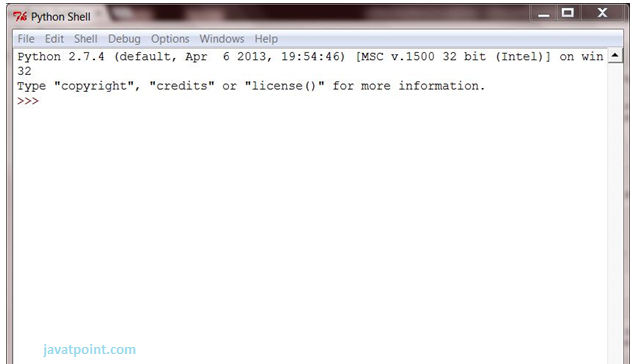
We can use both Interactive as well as Script mode in IDE.
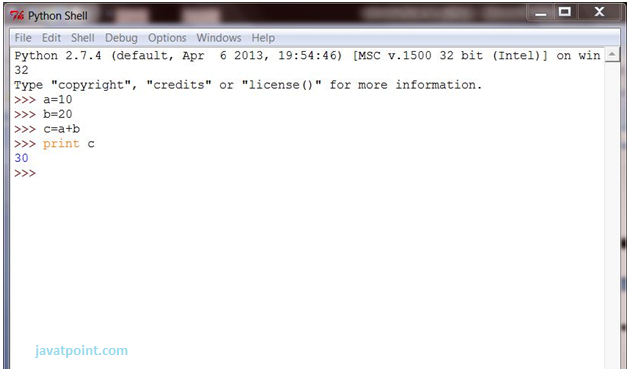
1) Using Interactive mode:
Execute our Python code on the Python prompt and it will display result simultaneously.
2) Using Script Mode:
i) Click on Start button -> All Programs -> Python -> IDLE(Python GUI)
ii) Python Shell will be opened. Now click on File -> New Window.
A new Editor will be opened. Write our Python code here.
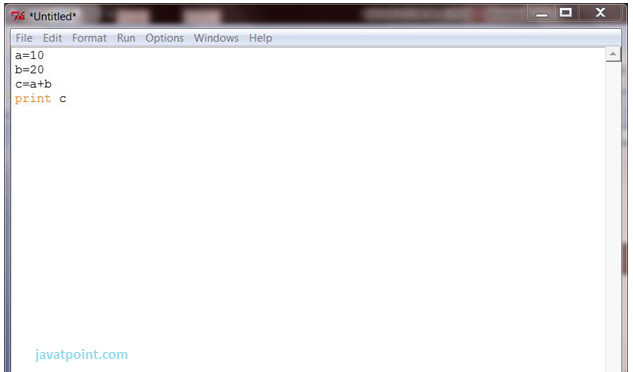
Click on file -> save as
Run code by clicking on Run in the Menu bar.
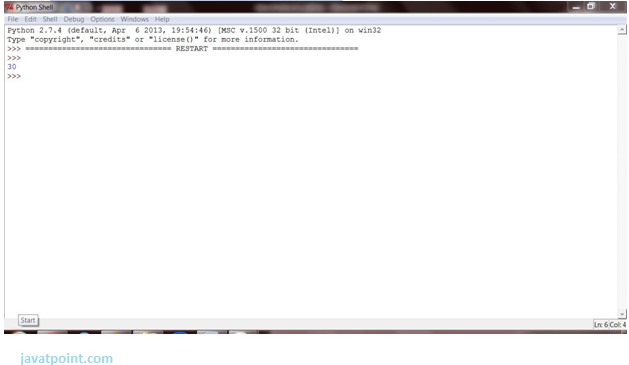
Run -> Run Module
Result will be displayed on a new Python shell as:
Next TopicPython Variables
Python Variables
Variable is a name which is used to refer memory location. Variable also known as identifier and used to hold value.
In Python, we don't need to specify the type of variable because Python is a type infer language and smart enough to get variable type.
Variable names can be a group of both letters and digits, but they have to begin with a letter or an underscore.
It is recomended to use lowercase letters for variable name. Rahul and rahul both are two different variables.
Note - Variable name should not be a keyword.
Declaring Variable and Assigning Values
Python does not bound us to declare variable before using in the application. It allows us to create variable at required time.
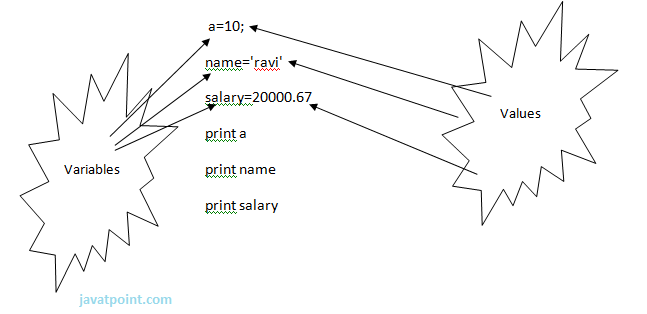
We don't need to declare explicitly variable in Python. When we assign any value to the variable that variable is declared automatically.
The equal (=) operator is used to assign value to a variable.
Eg:
Output:
>>>
10
ravi
20000.67
>>>
Multiple Assignment
Python allows us to assign a value to multiple variables in a single statement which is also known as multiple assignment.
We can apply multiple assignments in two ways either by assigning a single value to multiple variables or assigning multiple values to multiple variables. Lets see given examples.
1. Assigning single value to multiple variables
Eg:
x=y=z=50
print iple
print y
print z
Output:
>>>
50
50
50
>>>
2.Assigning multiple values to multiple variables:
Eg:
a,b,c=5,10,15
print a
print b
print c
Output:
>>>
5
10
15
>>>
The values will be assigned in the order in which variables appears.
Basic Fundamentals:
This section contains the basic fundamentals of Python like :
i)Tokens and their types.
ii) Comments
a)Tokens:
Tokens can be defined as a punctuator mark, reserved words and each individual word in a statement.
Token is the smallest unit inside the given program.
There are following tokens in Python:
Keywords.
Identifiers.
Literals.
Operators.
Tuples:
Tuple is another form of collection where different type of data can be stored.
It is similar to list where data is separated by commas. Only the difference is that list uses square bracket and tuple uses parenthesis.
Tuples are enclosed in parenthesis and cannot be changed.
Eg:
>>> tuple=('rahul',100,60.4,'deepak')
>>> tuple1=('sanjay',10)
>>> tuple
('rahul', 100, 60.4, 'deepak')
>>> tuple[2:]
(60.4, 'deepak')
>>> tuple1[0]
'sanjay'
>>> tuple+tuple1
('rahul', 100, 60.4, 'deepak', 'sanjay', 10)
>>>
Dictionary:
Dictionary is a collection which works on a key-value pair.
It works like an associated array where no two keys can be same.
Dictionaries are enclosed by curly braces ({}) and values can be retrieved by square bracket([]).
Eg:
>>> dictionary={'name':'charlie','id':100,'dept':'it'}
>>> dictionary
{'dept': 'it', 'name': 'charlie', 'id': 100}
>>> dictionary.keys()
['dept', 'name', 'id']
>>> dictionary.values()
['it', 'charlie', 100]
>>>
Python Keywords
Python Keywords are special reserved words which convey a special meaning to the compiler/interpreter. Each keyword have a special meaning and a specific operation. These keywords can't be used as variable. Following is the List of Python Keywords.
True | False | None | and | as |
asset | def | class | continue | break |
else | finally | elif | del | except |
global | for | if | from | import |
raise | try | or | return | pass |
nonlocal | in | not | is | lambda |
Identifiers are the names given to the fundamental building blocks in a program.
These can be variables ,class ,object ,functions , lists , dictionaries etc.
There are certain rules defined for naming i.e., Identifiers.
I. An identifier is a long sequence of characters and numbers.
II.No special character except underscore ( _ ) can be used as an identifier.
III.Keyword should not be used as an identifier name.
IV.Python is case sensitive. So using case is significant.
V.First character of an identifier can be character, underscore ( _ ) but not digit.
Python Literals
Literals can be defined as a data that is given in a variable or constant.
Python support the following literals:
I. String literals:
String literals can be formed by enclosing a text in the quotes. We can use both single as well as double quotes for a String.
Eg:
"Aman" , '12345'
Types of Strings:
There are two types of Strings supported in Python:
a).Single line String- Strings that are terminated within a single line are known as Single line Strings.
Eg:
>>> text1='hello'
b).Multi line String- A piece of text that is spread along multiple lines is known as Multiple line String.
There are two ways to create Multiline Strings:
1). Adding black slash at the end of each line.
Eg:
>>> text1='hello\
user'
>>> text1
'hellouser'
>>>
2).Using triple quotation marks:-
Eg:
>>> str2='''''welcome
to
SSSIT'''
>>> print str2
welcome
to
SSSIT
>>>
II.Numeric literals:
Numeric Literals are immutable. Numeric literals can belong to following four different numerical types.
Int(signed integers) | Long(long integers) | float(floating point) | Complex(complex) |
Numbers( can be both positive and negative) with no fractional part.eg: 100 | Integers of unlimited size followed by lowercase or uppercase L eg: 87032845L | Real numbers with both integer and fractional part eg: -26.2 | In the form of a+bj where a forms the real part and b forms the imaginary part of complex number. eg: 3.14j |
III. Boolean literals:
A Boolean literal can have any of the two values: True or False.
IV. Special literals.
Python contains one special literal i.e., None.
None is used to specify to that field that is not created. It is also used for end of lists in Python.
Eg:
>>> val1=10
>>> val2=None
>>> val1
10
>>> val2
>>> print val2
None
>>>
V.Literal Collections.
Collections such as tuples, lists and Dictionary are used in Python.
List:
List contain items of different data types. Lists are mutable i.e., modifiable.
The values stored in List are separated by commas(,) and enclosed within a square brackets([]). We can store different type of data in a List.
Value stored in a List can be retrieved using the slice operator([] and [:]).
The plus sign (+) is the list concatenation and asterisk(*) is the repetition operator.
Eg:
>>> list=['aman',678,20.4,'saurav']
>>> list1=[456,'rahul']
>>> list
['aman', 678, 20.4, 'saurav']
>>> list[1:3]
[678, 20.4]
>>> list+list1
['aman', 678, 20.4, 'saurav', 456, 'rahul']
>>> list1*2
[456, 'rahul', 456, 'rahul']
>>>
Python Operators
Operators are particular symbols that are used to perform operations on operands. It returns result that can be used in application.
Example
4 + 5 = 9
Here 4 and 5 are Operands and (+) , (=) signs are the operators. This expression produces the output 9.
Types of Operators
Python supports the following operators
Arithmetic Operators.
Relational Operators.
Assignment Operators.
Logical Operators.
Membership Operators.
Identity Operators.
Bitwise Operators.
Arithmetic Operators
The following table contains the arithmetic operators that are used to perform arithmetic operations.
Operators | Description |
// | Perform Floor division(gives integer value after division) |
+ | To perform addition |
- | To perform subtraction |
* | To perform multiplication |
/ | To perform division |
% | To return remainder after division(Modulus) |
** | Perform exponent(raise to power) |
Example
>>> 10+20
30
>>> 20-10
10
>>> 10*2
20
>>> 10/2
5
>>> 10%3
1
>>> 2**3
8
>>> 10//3
3
>>>
Relational Operators
The following table contains the relational operators that are used to check relations.
Operators | Description |
< | Less than |
> | Greater than |
<= | Less than or equal to |
>= | Greater than or equal to |
== | Equal to |
!= | Not equal to |
<> | Not equal to(similar to !=) |
eg:
>>> 10<20
True
>>> 10>20
False
>>> 10<=10
True
>>> 20>=15
True
>>> 5==6
False
>>> 5!=6
True
>>> 10<>2
True
>>>
Assignment Operators
The following table contains the assignment operators that are used to assign values to the variables.
Operators | Description |
= | Assignment |
/= | Divide and Assign |
+= | Add and assign |
-= | Subtract and Assign |
*= | Multiply and assign |
%= | Modulus and assign |
**= | Exponent and assign |
//= | Floor division and assign |
Example
>>> c=10
>>> c
10
>>> c+=5
>>> c
15
>>> c-=5
>>> c
10
>>> c*=2
>>> c
20
>>> c/=2
>>> c
10
>>> c%=3
>>> c
1
>>> c=5
>>> c**=2
>>> c
25
>>> c//=2
>>> c
12
>>>
Logical Operators
The following table contains the arithmetic operators that are used to perform arithmetic operations.
Operators | Description |
and | Logical AND(When both conditions are true output will be true) |
or | Logical OR (If any one condition is true output will be true) |
not | Logical NOT(Compliment the condition i.e., reverse) |
Example
a=5>4 and 3>2
print a
b=5>4 or 3<2
print b
c=not(5>4)
print c
Output:
>>>
True
True
False
>>>
Membership Operators
The following table contains the membership operators.
Operators | Description |
in | Returns true if a variable is in sequence of another variable, else false. |
not in | Returns true if a variable is not in sequence of another variable, else false. |
Example
a=10
b=20
list=[10,20,30,40,50];
if (a in list):
print "a is in given list"
else:
print "a is not in given list"
if(b not in list):
print "b is not given in list"
else:
print "b is given in list"
Output:
>>>
a is in given list
b is given in list
>>>
Identity Operators
The following table contains the identity operators.
Operators | Description |
is | Returns true if identity of two operands are same, else false |
is not | Returns true if identity of two operands are not same, else false. |
Example
a=20
b=20
if( a is b):
print a,b have same identity
else:
print a, b are different
b=10
if( a is not b):
print a,b have different identity
else:
print a,b have same identity
Output
>>>
a,b have same identity
a,b have different identity
>>>
Python Comments
Python supports two types of comments:
1) Single lined comment:
In case user wants to specify a single line comment, then comment must start with ?#?
Eg:
# This is single line comment.
2) Multi lined Comment:
Multi lined comment can be given inside triple quotes.
eg:
''''' This
Is
Multipline comment'''
eg:
#single line comment
print "Hello Python"
'''''This is
multiline comment'''
Python If Statements
The Python if statement is a statement which is used to test specified condition. We can use if statement to perform conditional operations in our Python application.
The if statement executes only when specified condition is true. We can pass any valid expression into the if parentheses.
There are various types of if statements in Python.
if statement
if-else statement
nested if statement
Python If Statement Syntax
if(condition):
statements
Python If statement flow chart
Python If Statement Example
a=10
if a==10:
print "Welcome to javatpoint"
Output:
Hello User
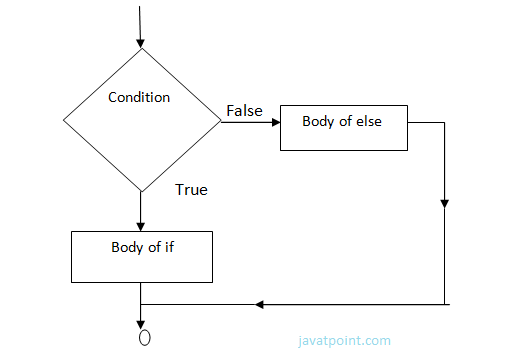
Python If Else Statements
The If statement is used to test specified condition and if the condition is true, if block executes, otherwise else block executes.
The else statement executes when the if statement is false.
Python If Else Syntax
if(condition): False
statements
else: True
statements
Example-
year=2000
if year%4==0:
print "Year is Leap"
else:
print "Year is not Leap"
Output:
Year is Leap
Python Nested If Else Statement
In python, we can use nested If Else to check multiple conditions. Python provides elif keyword to make nested If statement.
This statement is like executing a if statement inside a else statement.
Python Nested If Else Syntax
If statement:
Body
elif statement:
Body
else:
Body
Python Nested If Else Example
a=10
if a>=20:
print "Condition is True"
else:
if a>=15:
print "Checking second value"
else:
print "All Conditions are false"
Output:
All Conditions are false.
For Loop
Python for loop is used to iterate the elements of a collection in the order that they appear. This collection can be a sequence(list or string).
Python For Loop Syntax
for <variable> in <sequence>:
Output:
1
7
9
Explanation:
Firstly, the first value will be assigned in the variable.
Secondly all the statements in the body of the loop are executed with the same value.
Thirdly, once step second is completed then variable is assigned the next value in the sequence and step second is repeated.
Finally, it continues till all the values in the sequence are assigned in the variable and processed.
Python For Loop Simple Example
num=2
for a in range (1,6):
print num * a
Output:
2
4
6
8
10
Python Example to Find Sum of 10 Numbers
sum=0
for n in range(1,11):
sum+=n
print sum
Output:
55
Python Nested For Loops
Loops defined within another Loop are called Nested Loops. Nested loops are used to iterate matrix elements or to perform complex computation.
When an outer loop contains an inner loop in its body it is called Nested Looping.
Python Nested For Loop Syntax
for <expression>:
for <expression>:
Body
Python Nested For Loop Example
for i in range(1,6):
for j in range (1,i+1):
print i,
print
Output:
>>>
1
2 2
3 3 3
4 4 4 4
5 5 5 5 5
>>>
Explanation:
For each value of Outer loop the whole inner loop is executed.
For each value of inner loop the Body is executed each time.
Python Nested Loop Example 2
for i in range (1,6):
for j in range (5,i-1,-1):
print "*",
print
Output:
>>>
* * * * *
* * * *
* * *
* *
*
Python While Loop
In Python, while loop is used to execute number of statements or body till the specified condition is true. Once the condition is false, the control will come out of the loop.
Python While Loop Syntax
while <expression>:
Body
Here, loop Body will execute till the expression passed is true. The Body may be a single statement or multiple statement.
Python While Loop Example 1
a=10
while a>0:
print "Value of a is",a
a=a-2
print "Loop is Completed"
Output:
>>>
Value of a is 10
Value of a is 8
Value of a is 6
Value of a is 4
Value of a is 2
Loop is Completed
>>>
Explanation:
Firstly, the value in the variable is initialized.
Secondly, the condition/expression in the while is evaluated. Consequently if condition is true, the control enters in the body and executes all the statements . If the condition/expression passed results in false then the control exists the body and straight away control goes to next instruction after body of while.
Thirdly, in case condition was true having completed all the statements, the variable is incremented or decremented. Having changed the value of variable step second is followed. This process continues till the expression/condition becomes false.
Finally Rest of code after body is executed.
Python While Loop Example 2
n=153
sum=0
while n>0:
r=n%10
sum+=r
n=n/10
print sum
Output:
>>>
9
>>>
Python Break
Break statement is a jump statement which is used to transfer execution control. It breaks the current execution and in case of inner loop, inner loop terminates immediately.
When break statement is applied the control points to the line following the body of the loop, hence applying break statement makes the loop to terminate and controls goes to next line pointing after loop body.
Python Break Example 1
for i in [1,2,3,4,5]:
if i==4:
print "Element found"
break
print i,
Output:
>>>
1 2 3 Element found
>>>
Python Break Example 2
for letter in 'Python3':
if letter == 'o':
break
print (letter)
Output:
P
y
t
h
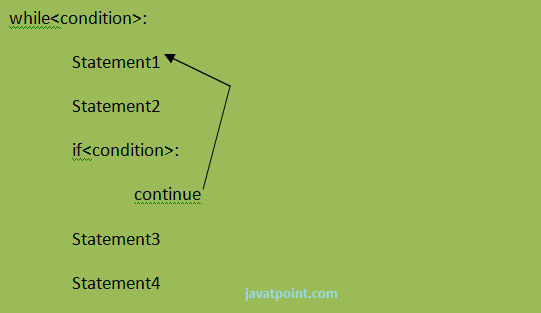
Python Continue Statement
Python Continue Statement is a jump statement which is used to skip execution of current iteration. After skipping, loop continue with next iteration.
We can use continue statement with for as well as while loop in Python.
Python Continue Statement Example
a=0
while a<=5:
a=a+1
if a%2==0:
continue
print a
print "End of Loop"
Output:
>>>
1
3
5
End of Loop
>>>
Python Continue Statement Flow chart
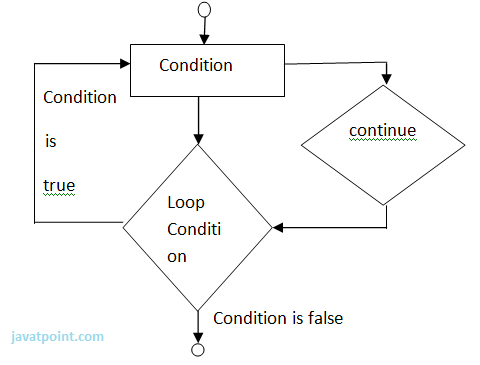
Python Pass
In Python, pass keyword is used to execute nothing; it means, when we don't want to execute code, the pass can be used to execute empty. It is same as the name refers to. It just makes the control to pass by without executing any code. If we want to bypass any code pass statement can be used.
Python Pass Syntax
pass
Python Pass Example
for i in [1,2,3,4,5]:
if i==3:
pass
print "Pass when value is",i
print i,
Output:
>>>
1 2 Pass when value is 3
3 4 5
>>>
Python OOPs Concepts
Python is an object-oriented programming language. You can easily create and use classes and objects in Python.
Major principles of object-oriented programming system are given below:
Object
Class
Method
Inheritance
Polymorphism
Data Abstraction
Encapsulation
Object
Object is an entity that has state and behavior. It may be anything. It may be physical and logical. For example: mouse, keyboard, chair, table, pen etc.
Everything in Python is an object, and almost everything has attributes and methods. All functions have a built-in attribute __doc__, which returns the doc string defined in the function source code.
Class
Class can be defined as a collection of objects. It is a logical entity that has some specific attributes and methods. For example: if you have an employee class then it should contain an attribute and method i.e. an email id, name, age, salary etc.
Syntax:
class ClassName:
<statement-1>
.
.
.
<statement-N>
Method
Method is a function that is associated with an object. In Python, method is not unique to class instances. Any object type can have methods.
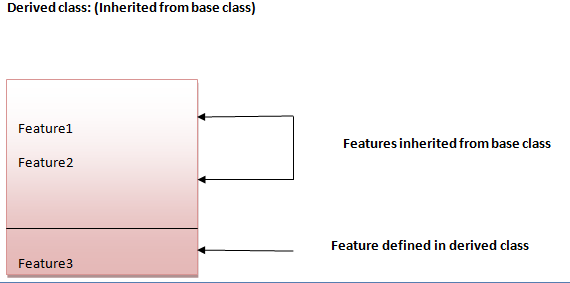
Inheritance
Inheritance is a feature of object-oriented programming. It specifies that one object acquires all the properties and behaviors of parent object. By using inheritance you can define a new class with a little or no changes to the existing class. The new class is known as derived class or child class and from which it inherits the properties is called base class or parent class.
It provides re-usability of the code.
Polymorphism
Polymorphism is made by two words "poly" and "morphs". Poly means many and Morphs means form, shape. It defines that one task can be performed in different ways. For example: You have a class animal and all animals talk. But they talk differently. Here, the "talk" behavior is polymorphic in the sense and totally depends on the animal. So, the abstract "animal" concept does not actually "talk", but specific animals (like dogs and cats) have a concrete implementation of the action "talk".
Encapsulation
Encapsulation is also the feature of object-oriented programming. It is used to restrict access to methods and variables. In encapsulation, code and data are wrapped together within a single unit from being modified by accident.
Data Abstraction
Data abstraction and encapsulation both are often used as synonyms. Both are nearly synonym because data abstraction is achieved through encapsulation.
Abstraction is used to hide internal details and show only functionalities. Abstracting something means to give names to things, so that the name captures the core of what a function or a whole program does.
Object-oriented vs Procedure-oriented Programming languages
Index | Object-oriented Programming | Procedural Programming |
1. | Object-oriented programming is an approach to problem solving where computation is done by using objects. | Procedural programming uses a list of instructions to do computation step by step. |
2. | It makes development and maintenance easier. | In procedural programming, It is not easy to maintain the codes when project becomes lengthy. |
3. | It simulates the real world entity. So real world problems can be easily solved through oops. | It doesn't simulate the real world. It works on step by step instructions divided in small parts called functions. |
4. | It provides data hiding. so it is more secure than procedural languages. You cannot access private data from anywhere. | Procedural language doesn't provide any proper way for data binding so it is less secure. |
5. | Example of object-oriented programming languages are: C++, Java, .Net, Python, C# etc. | Example of procedural languages are: C, Fortran, Pascal, VB etc. |
Python Object
Python is an object oriented programming language. So its main focus is on objects unlike procedure oriented programming languages which mainly focuses on functions.
In object oriented programming language, object is simply a collection of data (variables) and methods (functions) that act on those data.
Python Class
A class is a blueprint for the object. Let's understand it by an example:
Suppose a class is a prototype of a building. A building contains all the details about the floor, doors, windows, etc. we can make another buildings (as many as we want) based on these details. So building is a class and we can create many objects from a class.
An object is also called an instance of a class and the process of creating this object is known as instantiation.
Python classes contain all the standard features of Object Oriented Programming. A python class is a mixture of class mechanism of C++ and Modula-3.
Define a class in Python
In Python, a class is defined by using a keyword class like a function definition begins with the keyword def.
Syntax of a class definition:
class ClassName:
<statement-1>
.
.
.
<statement-N>
A class creates a new local namespace to define its all attribute. These attributes may be data or functions.
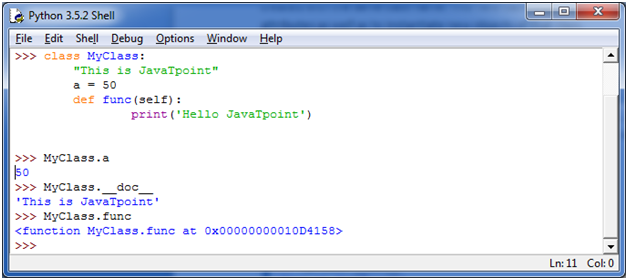
See this example:
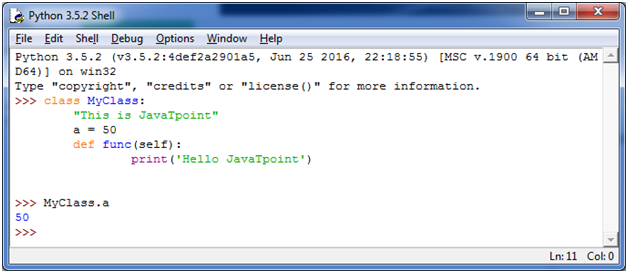
There are also some special attributes that begins with double underscore (__). For example: __doc__ attribute. It is used to fetch the docstring of that class. When we define a class, a new class object is created with the same class name. This new class object provides a facility to access the different attributes as well as to instantiate new objects of that class.
See this example:
Create an Object in Python
We can create new object instances of the classes. The procedure to create an object is similar to a function call.
Let's take an example to create a new instance object "ob". We can access attributes of objects by using the object name prefix.
See this example:
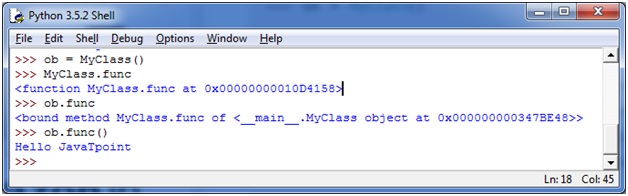
Here, attributes may be data or method. Method of an object is corresponding functions of that class. For example: MyClass.func is a function object and ob.func is a method object.
Python Object Class Example
class Student:
def __init__(self, rollno, name):
self.rollno = rollno
self.name = name
def displayStudent(self):
print "rollno : ", self.rollno, ", name: ", self.name
emp1 = Student(121, "Ajeet")
emp2 = Student(122, "Sonoo")
emp1.displayStudent()
emp2.displayStudent()
Output:
rollno : 121 , name: Ajeet
rollno : 122 , name: Sonoo
Python Constructors
A constructor is a special type of method (function) that is called when it instantiates an object using the definition found in your class. The constructors are normally used to initialize (assign values) to the instance variables. Constructors also verify that there are enough resources for the object to perform any start-up task.
Creating a constructor:
A constructor is a class function that begins with double underscore (_). The name of the constructor is always the same __init__().
While creating an object, a constructor can accept arguments if necessary. When you create a class without a constructor, Python automatically creates a default constructor that doesn't do anything.
Every class must have a constructor, even if it simply relies on the default constructor.
Let's take an example:
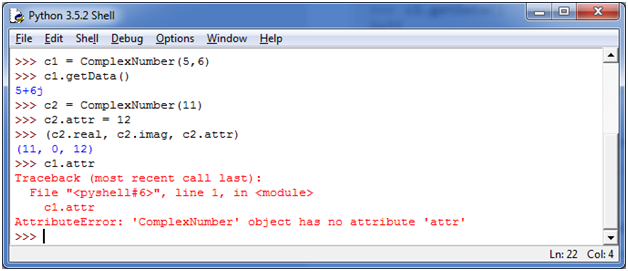
Let's create a class named ComplexNumber, having two functions __init__() function to initialize the variable and getData() to display the number properly.
See this example:

You can create a new attribute for an object and read it well at the time of defining the values. But you can't create the attribute for already defined objects.
See this example:
Inheritance in Python
What is Inheritance
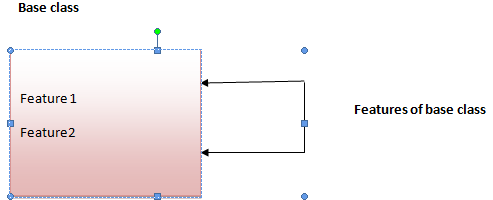
Inheritance is used to specify that one class will get most or all of its features from its parent class. It is a feature of Object Oriented Programming. It is a very powerful feature which facilitates users to create a new class with a few or more modification to an existing class. The new class is called child class or derived class and the main class from which it inherits the properties is called base class or parent class.
The child class or derived class inherits the features from the parent class, adding new features to it. It facilitates re-usability of code.
Image representation:
Syntax 1:
class DerivedClassName(BaseClassName):
<statement-1>
.
.
.
<statement-N>
Syntax 2:
class DerivedClassName(modulename.BaseClassName):
<statement-1>
.
.
.
<statement-N>
Parameter explanation:
The name BaseClassName must be defined in a scope containing the derived class definition. You can also use other arbitrary expressions in place of a base class name. This is used when the base class is defined in another module.
Python Inheritance Example
Let's see a simple python inheritance example where we are using two classes: Animal and Dog. Animal is the parent or base class and Dog is the child class.
Here, we are defining eat() method in Animal class and bark() method in Dog class. In this example, we are creating instance of Dog class and calling eat() and bark() methods by the instance of child class only. Since, parent properties and behaviors are inherited to child object automatically, we can call parent and child class methods by the child instance only.
class Animal:
def eat(self):
print 'Eating...'
class Dog(Animal):
def bark(self):
print 'Barking...'
d=Dog()
d.eat()
d.bark()
Output:
Eating...
Barking...
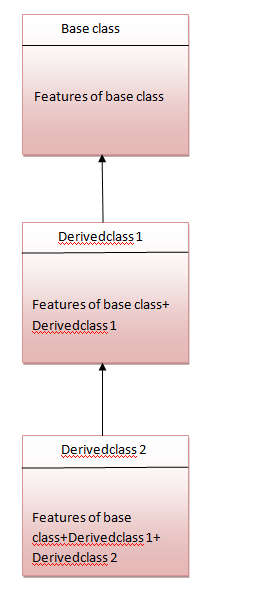
Multilevel Inheritance in Python
Multilevel inheritance is also possible in Python unlike other programming languages. You can inherit a derived class from another derived class. This is known as multilevel inheritance. In Python, multilevel inheritance can be done at any depth.
Image representation:
Python Multilevel Inheritance Example
class Animal:
def eat(self):
print 'Eating...'
class Dog(Animal):
def bark(self):
print 'Barking...'
class BabyDog(Dog):
def weep(self):
print 'Weeping...'
d=BabyDog()
d.eat()
d.bark()
d.weep()
Output:
Eating...
Barking...
Weeping
Multiple Inheritance in Python
Python supports multiple inheritance also. You can derive a child class from more than one base (parent) class.
Image representation:
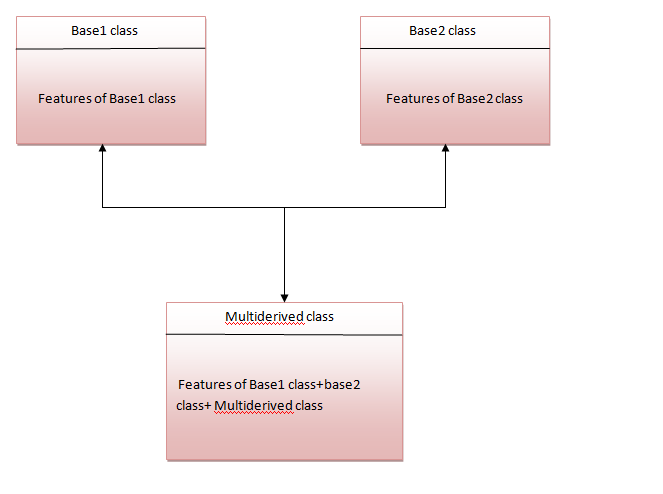
The multiderived class inherits the properties of both class base1 and base2.
Let's see the syntax of multiple inheritance in Python.
Syntax:
class DerivedClassName(Base1, Base2, Base3):
<statement-1>
.
.
.
<statement-N>
Or
class Base1:
pass
class Base2:
pass
class MultiDerived(Base1, Base2):
pass
Example:
class First(object):
def __init__(self):
super(First, self).__init__()
print("first")
class Second(object):
def __init__(self):
super(Second, self).__init__()
print("second")
class Third(Second, First):
def __init__(self):
super(Third, self).__init__()
print("third")
Third();
Output:
first
second
third
Why super () keyword
The most commonly super() is used with __init__ function in base classes. This is usually the only place where you need to do some things in a child then complete the initialization in the parent.
See this example:
class Child(Parent):
def __init__(self, stuff):
self.stuff = stuff
super(Child, self).__init__()
Composition in Python
Composition is used to do the same thing which can be done by inheritance.
PYTHON STRINGS
Strings are the simplest and easy to use in Python.
String pythons are immutable.
We can simply create Python String by enclosing a text in single as well as double quotes. Python treat both single and double quotes statements same.
Accessing Strings:
In Python, Strings are stored as individual characters in a contiguous memory location.
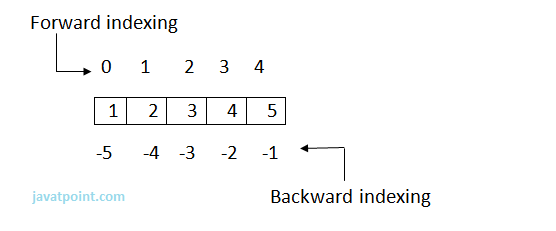
The benefit of using String is that it can be accessed from both the directions in forward and backward.
Both forward as well as backward indexing are provided using Strings in Python.
Forward indexing starts with 0,1,2,3,....
Backward indexing starts with -1,-2,-3,-4,....
eg:
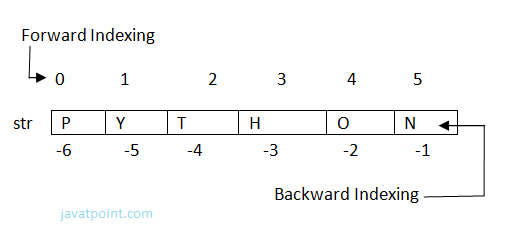
str[0]='P'=str[-6] , str[1]='Y' = str[-5] , str[2] = 'T' = str[-4] , str[3] = 'H' = str[-3]
str[4] = 'O' = str[-2] , str[5] = 'N' = str[-1].
Simple program to retrieve String in reverse as well as normal form.
name="Rajat"
length=len(name)
i=0
for n in range(-1,(-length-1),-1):
print name[i],"\t",name[n]
i+=1
Output:
>>>
R t
a a
j j
a a
t R
>>>
Strings Operators
There are basically 3 types of Operators supported by String:
Basic Operators.
Membership Operators.
Relational Operators.
Basic Operators:
There are two types of basic operators in String. They are "+" and "*".
String Concatenation Operator :(+)
The concatenation operator (+) concatenate two Strings and forms a new String.
eg:
>>> "ratan" + "jaiswal"
Output:
'ratanjaiswal'
>>>
Expression | Output |
'10' + '20' | '1020' |
"s" + "007" | 's007' |
'abcd123' + 'xyz4' | 'abcd123xyz4' |
NOTE: Both the operands passed for concatenation must be of same type, else it will show an error.
Eg:
'abc' + 3
>>>
output:
Traceback (most recent call last):
File "", line 1, in
'abc' + 3
TypeError: cannot concatenate 'str' and 'int' objects
>>>
Replication Operator: (*)
Replication operator uses two parameter for operation. One is the integer value and the other one is the String.
The Replication operator is used to repeat a string number of times. The string will be repeated the number of times which is given by the integer value.
Eg:
>>> 5*"Vimal"
Output:
'VimalVimalVimalVimalVimal'
Expression | Output |
"soono"*2 | 'soonosoono' |
3*'1' | '111' |
'$'*5 | '$$$$$' |
NOTE: We can use Replication operator in any way i.e., int * string or string * int. Both the parameters passed cannot be of same type.
Membership Operators
Membership Operators are already discussed in the Operators section. Let see with context of String.
There are two types of Membership operators:
1) in:"in" operator return true if a character or the entire substring is present in the specified string, otherwise false.
2) not in:"not in" operator return true if a character or entire substring does not exist in the specified string, otherwise false.
Eg:
>>> str1="javatpoint"
>>> str2='sssit'
>>> str3="seomount"
>>> str4='java'
>>> st5="it"
>>> str6="seo"
>>> str4 in str1
True
>>> str5 in str2
>>> st5 in str2
True
>>> str6 in str3
True
>>> str4 not in str1
False
>>> str1 not in str4
True
Relational Operators:
All the comparison operators i.e., (<,><=,>=,==,!=,<>) are also applicable to strings. The Strings are compared based on the ASCII value or Unicode(i.e., dictionary Order).
Eg:
>>> "RAJAT"=="RAJAT"
True
>>> "afsha">='Afsha'
True
>>> "Z"<>"z"
True
Explanation:
The ASCII value of a is 97, b is 98, c is 99 and so on. The ASCII value of A is 65,B is 66,C is 67 and so on. The comparison between strings are done on the basis on ASCII value.
Slice Notation:
String slice can be defined as substring which is the part of string. Therefore further substring can be obtained from a string.
There can be many forms to slice a string. As string can be accessed or indexed from both the direction and hence string can also be sliced from both the direction that is left and right.
Syntax:
<string_name>[startIndex:endIndex],
<string_name>[:endIndex],
<string_name>[startIndex:]
Example:
>>> str="Nikhil"
>>> str[0:6]
'Nikhil'
>>> str[0:3]
'Nik'
>>> str[2:5]
'khi'
>>> str[:6]
'Nikhil'
>>> str[3:]
'hil'
Note: startIndex in String slice is inclusive whereas endIndex is exclusive.
String slice can also be used with Concatenation operator to get whole string.
Eg:
>>> str="Mahesh"
>>> str[:6]+str[6:]
'Mahesh'
//here 6 is the length of the string.
String Functions and Methods:
There are many predefined or built in functions in String. They are as follows:
capitalize() | It capitalizes the first character of the String. |
count(string,begin,end) | Counts number of times substring occurs in a String between begin and end index. |
endswith(suffix ,begin=0,end=n) | Returns a Boolean value if the string terminates with given suffix between begin and end. |
find(substring ,beginIndex, endIndex) | It returns the index value of the string where substring is found between begin index and end index. |
index(subsring, beginIndex, endIndex) | Same as find() except it raises an exception if string is not found. |
isalnum() | It returns True if characters in the string are alphanumeric i.e., alphabets or numbers and there is at least 1 character. Otherwise it returns False. |
isalpha() | It returns True when all the characters are alphabets and there is at least one character, otherwise False. |
isdigit() | It returns True if all the characters are digit and there is at least one character, otherwise False. |
islower() | It returns True if the characters of a string are in lower case, otherwise False. |
isupper() | It returns False if characters of a string are in Upper case, otherwise False. |
isspace() | It returns True if the characters of a string are whitespace, otherwise false. |
len(string) | len() returns the length of a string. |
lower() | Converts all the characters of a string to Lower case. |
upper() | Converts all the characters of a string to Upper Case. |
startswith(str ,begin=0,end=n) | Returns a Boolean value if the string starts with given str between begin and end. |
swapcase() | Inverts case of all characters in a string. |
lstrip() | Remove all leading whitespace of a string. It can also be used to remove particular character from leading. |
rstrip() | Remove all trailing whitespace of a string. It can also be used to remove particular character from trailing. |
Examples:
1) capitalize()
>>> 'abc'.capitalize()
Output:
'Abc'
2) count(string)
msg = "welcome to sssit";
substr1 = "o";
print msg.count(substr1, 4, 16)
substr2 = "t";
print msg.count(substr2)
Output:
>>>
2
2
>>>
3) endswith(string)
string1="Welcome to SSSIT";
substring1="SSSIT";
substring2="to";
substring3="of";
print string1.endswith(substring1);
print string1.endswith(substring2,2,16);
print string1.endswith(substring3,2,19);
print string1.endswith(substring3);
Output:
>>>
True
False
False
False
>>>
4) find(string)
str="Welcome to SSSIT";
substr1="come";
substr2="to";
print str.find(substr1);
print str.find(substr2);
print str.find(substr1,3,10);
print str.find(substr2,19);
Output:
>>>
3
8
3
-1
>>>
5) index(string)
str="Welcome to world of SSSIT";
substr1="come";
substr2="of";
print str.index(substr1);
print str.index(substr2);
print str.index(substr1,3,10);
print str.index(substr2,19);
Output:
>>>
3
17
3
Traceback (most recent call last):
File "C:/Python27/fin.py", line 7, in
print str.index(substr2,19);
ValueError: substring not found
>>>
6) isalnum()
str="Welcome to sssit";
print str.isalnum();
str1="Python47";
print str1.isalnum();
Output:
>>>
False
True
>>>
7) isalpha()
string1="HelloPython"; # Even space is not allowed
print string1.isalpha();
string2="This is Python2.7.4"
print string2.isalpha();
Output:
>>>
True
False
>>>
8) isdigit()
string1="HelloPython";
print string1.isdigit();
string2="98564738"
print string2.isdigit();
Output:
>>>
False
True
>>>
9) islower()
string1="Hello Python";
print string1.islower();
string2="welcome to "
print string2.islower();
Output:
>>>
False
True
>>>
10) isupper()
string1="Hello Python";
print string1.isupper();
string2="WELCOME TO"
print string2.isupper();
Output:
>>>
False
True
>>>
11) isspace()
string1=" ";
print string1.isspace();
string2="WELCOME TO WORLD OF PYT"
print string2.isspace();
Output:
>>>
True
False
>>>
12) len(string)
string1=" ";
print len(string1);
string2="WELCOME TO SSSIT"
print len(string2);
Output:
>>>
4
16
>>>
13) lower()
string1="Hello Python";
print string1.lower();
string2="WELCOME TO SSSIT"
print string2.lower();
Output:
>>>
hello python
welcome to sssit
>>>
14) upper()
string1="Hello Python";
print string1.upper();
string2="welcome to SSSIT"
print string2.upper();
Output:
>>>
HELLO PYTHON
WELCOME TO SSSIT
>>>
15) startswith(string)
string1="Hello Python";
print string1.startswith('Hello');
string2="welcome to SSSIT"
print string2.startswith('come',3,7);
Output:
>>>
True
True
>>>
16) swapcase()
string1="Hello Python";
print string1.swapcase();
string2="welcome to SSSIT"
print string2.swapcase();
Output:
>>>
hELLO pYTHON
WELCOME TO sssit
>>>
17) lstrip()
string1=" Hello Python";
print string1.lstrip();
string2="@@@@@@@@welcome to SSSIT"
print string2.lstrip('@');
Output:
>>>
Hello Python
welcome to world to SSSIT
>>>
18) rstrip()
string1=" Hello Python ";
print string1.rstrip();
string2="@welcome to SSSIT!!!"
print string2.rstrip('!');
Output:
>>>
Hello Python
@welcome to SSSIT
>>>
Python List
1).Python lists are the data structure that is capable of holding different type of data.
2).Python lists are mutable i.e., Python will not create a new list if we modify an element in the list.
3).It is a container that holds other objects in a given order. Different operation like insertion and deletion can be performed on lists.
4).A list can be composed by storing a sequence of different type of values separated by commas.
5).A python list is enclosed between square([]) brackets.
6).The elements are stored in the index basis with starting index as 0.
eg:
data1=[1,2,3,4];
data2=['x','y','z'];
data3=[12.5,11.6];
data4=['raman','rahul'];
data5=[];
data6=['abhinav',10,56.4,'a'];
Accessing Lists
A list can be created by putting the value inside the square bracket and separated by comma.
Syntax:
<list_name>=[value1,value2,value3,...,valuen];
For accessing list :
<list_name>[index]
Different ways to access list:
Eg:
data1=[1,2,3,4];
data2=['x','y','z'];
print data1[0]
print data1[0:2]
print data2[-3:-1]
print data1[0:]
print data2[:2]
Output:
>>>
>>>
1
[1, 2]
['x', 'y']
[1, 2, 3, 4]
['x', 'y']
>>>
Elements in a Lists:
Data=[1,2,3,4,5];
Data[0]=1=Data[-5] , Data[1]=2=Data[-4] , Data[2]=3=Data[-3] ,
=4=Data[-2] , Data[4]=5=Data[-1].
Note: Internal Memory Organization:
List do not store the elements directly at the index. In fact a reference is stored at each index which subsequently refers to the object stored somewhere in the memory. This is due to the fact that some objects may be large enough than other objects and hence they are stored at some other memory location.
List Operations:
Various Operations can be performed on List. Operations performed on List are given as:
a) Adding Lists:
Lists can be added by using the concatenation operator(+) to join two lists.
Eg:
list1=[10,20]
list2=[30,40]
list3=list1+list2
print list3
Output:
>>>
[10, 20, 30, 40]
>>>
Note: '+'operator implies that both the operands passed must be list else error will be shown.
Eg:
list1=[10,20]
list1+30
print list1
Output:
Traceback (most recent call last):
File "C:/Python27/lis.py", line 2, in <module>
list1+30
b) Replicating lists:
Replicating means repeating . It can be performed by using '*' operator by a specific number of time.
Eg:
list1=[10,20]
print list1*1
Output:
>>>
[10, 20]
>>>
c) List slicing:
A subpart of a list can be retrieved on the basis of index. This subpart is known as list slice.
Eg:
list1=[1,2,4,5,7]
print list1[0:2]
print list1[4]
list1[1]=9
print list1
Output:
>>>
[1, 2]
7
[1, 9, 4, 5, 7]
>>>
Note: If the index provided in the list slice is outside the list, then it raises an IndexError exception.
Other Operations:
Apart from above operations various other functions can also be performed on List such as Updating, Appending and Deleting elements from a List:
a) Updating elements in a List:
To update or change the value of particular index of a list, assign the value to that particular index of the List.
Syntax:
<list_name>[index]=<value>
Eg:
data1=[5,10,15,20,25]
print "Values of list are: "
print data1
data1[2]="Multiple of 5"
print "Values of list are: "
print data1
Output:
>>>
Values of list are:
[5, 10, 15, 20, 25]
Values of list are:
[5, 10, 'Multiple of 5', 20, 25]
>>>
b) Appending elements to a List:
append() method is used to append i.e., add an element at the end of the existing elements.
Syntax:
<list_name>.append(item)
Eg:
list1=[10,"rahul",'z']
print "Elements of List are: "
print list1
list1.append(10.45)
print "List after appending: "
print list1
Output:
>>>
Elements of List are:
[10, 'rahul', 'z']
List after appending:
[10, 'rahul', 'z', 10.45]
>>>
c) Deleting Elements from a List:
del statement can be used to delete an element from the list. It can also be used to delete all items from startIndex to endIndex.
Eg:
list1=[10,'rahul',50.8,'a',20,30]
print list1
del list1[0]
print list1
del list1[0:3]
print list1
Output:
>>>
[10, 'rahul', 50.8, 'a', 20, 30]
['rahul', 50.8, 'a', 20, 30]
[20, 30]
>>>
Functions and Methods of Lists:
There are many Built-in functions and methods for Lists. They are as follows:
There are following List functions:
Function | Description |
min(list) | Returns the minimum value from the list given. |
max(list) | Returns the largest value from the given list. |
len(list) | Returns number of elements in a list. |
cmp(list1,list2) | Compares the two list. |
list(sequence) | Takes sequence types and converts them to lists. |
1) min(list):
Eg:
list1=[101,981,'abcd','xyz','m']
list2=['aman','shekhar',100.45,98.2]
print "Minimum value in List1: ",min(list1)
print "Minimum value in List2: ",min(list2)
Output:
>>>
Minimum value in List1: 101
Minimum value in List2: 98.2
>>>
2) max(list):
Eg:
list1=[101,981,'abcd','xyz','m']
list2=['aman','shekhar',100.45,98.2]
print "Maximum value in List : ",max(list1)
print "Maximum value in List : ",max(list2)
Output:
>>>
Maximum value in List : xyz
Maximum value in List : shekhar
>>>
3) len(list):
Eg:
list1=[101,981,'abcd','xyz','m']
list2=['aman','shekhar',100.45,98.2]
print "No. of elements in List1: ",len(list1)
print "No. of elements in List2: ",len(list2)
Output:
>>>
No. of elements in List1 : 5
No. of elements in List2 : 4
>>>
4) cmp(list1,list2):
Explanation: If elements are of the same type, perform the comparison and return the result. If elements are different types, check whether they are numbers.
If numbers, perform comparison.
If either element is a number, then the other element is returned.
Otherwise, types are sorted alphabetically .
If we reached the end of one of the lists, the longer list is "larger." If both list are same it returns 0.
Eg:
list1=[101,981,'abcd','xyz','m']
list2=['aman','shekhar',100.45,98.2]
list3=[101,981,'abcd','xyz','m']
print cmp(list1,list2)
print cmp(list2,list1)
print cmp(list3,list1)
Output:
>>>
-1
1
0
>>>
5) list(sequence):
Eg:
seq=(145,"abcd",'a')
data=list(seq)
print "List formed is : ",data
Output:
>>>
List formed is : [145, 'abcd', 'a']
>>>
There are following built-in methods of List:
Methods | Description |
index(object) | Returns the index value of the object. |
count(object) | It returns the number of times an object is repeated in list. |
pop()/pop(index) | Returns the last object or the specified indexed object. It removes the popped object. |
insert(index,object) | Insert an object at the given index. |
extend(sequence) | It adds the sequence to existing list. |
remove(object) | It removes the object from the given List. |
reverse() | Reverse the position of all the elements of a list. |
sort() | It is used to sort the elements of the List. |
1) index(object):
Eg:
data = [786,'abc','a',123.5]
print "Index of 123.5:", data.index(123.5)
print "Index of a is", data.index('a')
Output:
>>>
Index of 123.5 : 3
Index of a is 2
>>>
2) count(object):
Eg:
data = [786,'abc','a',123.5,786,'rahul','b',786]
print "Number of times 123.5 occured is", data.count(123.5)
print "Number of times 786 occured is", data.count(786)
Output:
>>>
Number of times 123.5 occured is 1
Number of times 786 occured is 3
>>>
3) pop()/pop(int):
Eg:
data = [786,'abc','a',123.5,786]
print "Last element is", data.pop()
print "2nd position element:", data.pop(1)
print data
Output:
>>>
Last element is 786
2nd position element:abc
[786, 'a', 123.5]
>>>
4) insert(index,object):
Eg:
data=['abc',123,10.5,'a']
data.insert(2,'hello')
print data
Output:
>>>
['abc', 123, 'hello', 10.5, 'a']
>>>
5) extend(sequence):
Eg:
data1=['abc',123,10.5,'a']
data2=['ram',541]
data1.extend(data2)
print data1
print data2
Output:
>>>
['abc', 123, 10.5, 'a', 'ram', 541]
['ram', 541]
>>>
6) remove(object):
Eg:
data1=['abc',123,10.5,'a','xyz']
data2=['ram',541]
print data1
data1.remove('xyz')
print data1
print data2
data2.remove('ram')
print data2
Output:
>>>
['abc', 123, 10.5, 'a', 'xyz']
['abc', 123, 10.5, 'a']
['ram', 541]
[541]
>>>
7) reverse():
Eg:
list1=[10,20,30,40,50]
list1.reverse()
print list1
Output:
>>>
[50, 40, 30, 20, 10]
>>>
8) sort():
Eg:
list1=[10,50,13,'rahul','aakash']
list1.sort()
print list1
Output:
>>>
[10, 13, 50, 'aakash', 'rahul']
>>>
Python Tuple
A tuple is a sequence of immutable objects, therefore tuple cannot be changed.
The objects are enclosed within parenthesis and separated by comma.
Tuple is similar to list. Only the difference is that list is enclosed between square bracket, tuple between parenthesis and List have mutable objects whereas Tuple have immutable objects.
eg:
>>> data=(10,20,'ram',56.8)
>>> data2="a",10,20.9
>>> data
(10, 20, 'ram', 56.8)
>>> data2
('a', 10, 20.9)
>>>
NOTE: If Parenthesis is not given with a sequence, it is by default treated as Tuple.
There can be an empty Tuple also which contains no object.
eg:
tuple1=()
For a single valued tuple, there must be a comma at the end of the value.
eg:
Tuple1=(10,)
Tuples can also be nested.
eg:
tupl1='a','mahesh',10.56
tupl2=tupl1,(10,20,30)
print tupl1
print tupl2
Output:
>>>
('a', 'mahesh', 10.56)
(('a', 'mahesh', 10.56), (10, 20, 30))
>>>
Accessing Tuple
Tuple can be accessed in the same way as List.
Some examples are given below:
eg:
data1=(1,2,3,4)
data2=('x','y','z')
print data1[0]
print data1[0:2]
print data2[-3:-1]
print data1[0:]
print data2[:2]
Output:
>>>
1
(1, 2)
('x', 'y')
(1, 2, 3, 4)
('x', 'y')
>>>
Elements in a Tuple
Data=(1,2,3,4,5,10,19,17)
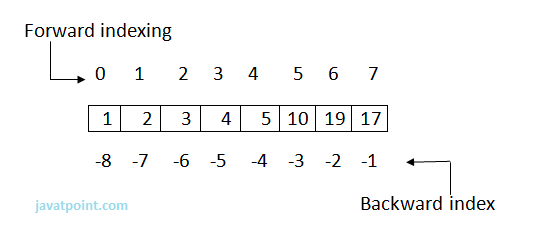
Data[0]=1=Data[-8] , Data[1]=2=Data[-7] , Data[2]=3=Data[-6] ,
Data[3]=4=Data[-5] , Data[4]=5=Data[-4] , Data[5]=10=Data[-3],
Data[6]=19=Data[-2],Data[7]=17=Data[-1]
Tuple Operations
Various Operations can be performed on Tuple. Operations performed on Tuple are given as:
a) Adding Tuple:
Tuple can be added by using the concatenation operator(+) to join two tuples.
eg:
data1=(1,2,3,4)
data2=('x','y','z')
data3=data1+data2
print data1
print data2
print data3
Output:
>>>
(1, 2, 3, 4)
('x', 'y', 'z')
(1, 2, 3, 4, 'x', 'y', 'z')
>>>
Note: The new sequence formed is a new Tuple.
b) Replicating Tuple:
Replicating means repeating. It can be performed by using '*' operator by a specific number of time.
Eg:
tuple1=(10,20,30);
tuple2=(40,50,60);
print tuple1*2
print tuple2*3
Output:
>>>
(10, 20, 30, 10, 20, 30)
(40, 50, 60, 40, 50, 60, 40, 50, 60)
>>>
c) Tuple slicing:
A subpart of a tuple can be retrieved on the basis of index. This subpart is known as tuple slice.
Eg:
data1=(1,2,4,5,7)
print data1[0:2]
print data1[4]
print data1[:-1]
print data1[-5:]
print data1
Output:
>>>
(1, 2)
7
(1, 2, 4, 5)
(1, 2, 4, 5, 7)
(1, 2, 4, 5, 7)
>>>
Note: If the index provided in the Tuple slice is outside the list, then it raises an IndexError exception.
Other Operations:
a) Updating elements in a List:
Elements of the Tuple cannot be updated. This is due to the fact that Tuples are immutable. Whereas the Tuple can be used to form a new Tuple.
Eg:
data=(10,20,30)
data[0]=100
print data
Output:
>>>
Traceback (most recent call last):
File "C:/Python27/t.py", line 2, in
data[0]=100
TypeError: 'tuple' object does not support item assignment
>>>
Creating a new Tuple from existing:
Eg:
data1=(10,20,30)
data2=(40,50,60)
data3=data1+data2
print data3
Output:
>>>
(10, 20, 30, 40, 50, 60)
>>>
b) Deleting elements from Tuple:
Deleting individual element from a tuple is not supported. However the whole of the tuple can be deleted using the del statement.
Eg:
data=(10,20,'rahul',40.6,'z')
print data
del data #will delete the tuple data
print data #will show an error since tuple data is already deleted
Output:
>>>
(10, 20, 'rahul', 40.6, 'z')
Traceback (most recent call last):
File "C:/Python27/t.py", line 4, in
print data
NameError: name 'data' is not defined
>>>
Functions of Tuple:
There are following in-built Type Functions:
Function | Description |
min(tuple) | Returns the minimum value from a tuple. |
max(tuple) | Returns the maximum value from the tuple. |
len(tuple) | Gives the length of a tuple |
cmp(tuple1,tuple2) | Compares the two Tuples. |
tuple(sequence) | Converts the sequence into tuple. |
1) min(tuple):
Eg:
data=(10,20,'rahul',40.6,'z')
print min(data)
Output:
>>>
10
>>>
2) max(tuple):
Eg:
data=(10,20,'rahul',40.6,'z')
print max(data)
Output:
>>>
z
>>>
3) len(tuple):
Eg:
data=(10,20,'rahul',40.6,'z')
print len(data)
Output:
>>>
5
>>>
4) cmp(tuple1,tuple2):
Explanation:If elements are of the same type, perform the comparison and return the result. If elements are different types, check whether they are numbers.
If numbers, perform comparison.
If either element is a number, then the other element is returned.
Otherwise, types are sorted alphabetically .
If we reached the end of one of the lists, the longer list is "larger." If both list are same it returns 0.
Eg:
data1=(10,20,'rahul',40.6,'z')
data2=(20,30,'sachin',50.2)
print cmp(data1,data2)
print cmp(data2,data1)
data3=(20,30,'sachin',50.2)
print cmp(data2,data3)
Output:
>>>
-1
1
0
>>>
5) tuple(sequence):
Eg:
dat=[10,20,30,40]
data=tuple(dat)
print data
Output:
>>>
(10, 20, 30, 40)
>>>
Why Use Tuple?
Processing of Tuples are faster than Lists.
It makes the data safe as Tuples are immutable and hence cannot be changed.
Tuples are used for String formatting.
Python Dictionary
Dictionary is an unordered set of key and value pair.
It is an container that contains data, enclosed within curly braces.
The pair i.e., key and value is known as item.
The key passed in the item must be unique.
The key and the value is separated by a colon(:). This pair is known as item. Items are separated from each other by a comma(,). Different items are enclosed within a curly brace and this forms Dictionary.
eg:
data={100:'Ravi' ,101:'Vijay' ,102:'Rahul'}
print data
Output:
>>>
{100: 'Ravi', 101: 'Vijay', 102: 'Rahul'}
>>>
Dictionary is mutable i.e., value can be updated.
Key must be unique and immutable. Value is accessed by key. Value can be updated while key cannot be changed.
Dictionary is known as Associative array since the Key works as Index and they are decided by the user.
eg:
plant={}
plant[1]='Ravi'
plant[2]='Manoj'
plant['name']='Hari'
plant[4]='Om'
print plant[2]
print plant['name']
print plant[1]
print plant
Output:
>>>
Manoj
Hari
Ravi
{1: 'Ravi', 2: 'Manoj', 4: 'Om', 'name': 'Hari'}
>>>
Accessing Values
Since Index is not defined, a Dictionaries value can be accessed by their keys.
Syntax:
[key]
Eg:
data1={'Id':100, 'Name':'Suresh', 'Profession':'Developer'}
data2={'Id':101, 'Name':'Ramesh', 'Profession':'Trainer'}
print "Id of 1st employer is",data1['Id']
print "Id of 2nd employer is",data2['Id']
print "Name of 1st employer:",data1['Name']
print "Profession of 2nd employer:",data2['Profession']
Output:
>>>
Id of 1st employer is 100
Id of 2nd employer is 101
Name of 1st employer is Suresh
Profession of 2nd employer is Trainer
>>>
Updation
The item i.e., key-value pair can be updated. Updating means new item can be added. The values can be modified.
Eg:
data1={'Id':100, 'Name':'Suresh', 'Profession':'Developer'}
data2={'Id':101, 'Name':'Ramesh', 'Profession':'Trainer'}
data1['Profession']='Manager'
data2['Salary']=20000
data1['Salary']=15000
print data1
print data2
Output:
>>>
{'Salary': 15000, 'Profession': 'Manager','Id': 100, 'Name': 'Suresh'}
{'Salary': 20000, 'Profession': 'Trainer', 'Id': 101, 'Name': 'Ramesh'}
>>>
Deletion
del statement is used for performing deletion operation.
An item can be deleted from a dictionary using the key.
Syntax:
del [key]
Whole of the dictionary can also be deleted using the del statement.
Eg:
data={100:'Ram', 101:'Suraj', 102:'Alok'}
del data[102]
print data
del data
print data #will show an error since dictionary is deleted.
Output:
>>>
{100: 'Ram', 101: 'Suraj'}
Traceback (most recent call last):
File "C:/Python27/dict.py", line 5, in
print data
NameError: name 'data' is not defined
>>>
Functions and Methods
Python Dictionary supports the following Functions:
Dictionary Functions:
Functions | Description |
len(dictionary) | Gives number of items in a dictionary. |
cmp(dictionary1,dictionary2) | Compares the two dictionaries. |
str(dictionary) | Gives the string representation of a string. |
Dictionary Methods:
Methods | Description |
keys() | Return all the keys element of a dictionary. |
values() | Return all the values element of a dictionary. |
items() | Return all the items(key-value pair) of a dictionary. |
update(dictionary2) | It is used to add items of dictionary2 to first dictionary. |
clear() | It is used to remove all items of a dictionary. It returns an empty dictionary. |
fromkeys(sequence,value1)/ fromkeys(sequence) | It is used to create a new dictionary from the sequence where sequence elements forms the key and all keys share the values ?value1?. In case value1 is not give, it set the values of keys to be none. |
copy() | It returns an ordered copy of the data. |
has_key(key) | It returns a boolean value. True in case if key is present in the dictionary ,else false. |
get(key) | Returns the value of the given key. If key is not present it returns none. |
Functions:
1) len(dictionary):
Eg:
data={100:'Ram', 101:'Suraj', 102:'Alok'}
print data
print len(data)
Output:
>>>
{100: 'Ram', 101: 'Suraj', 102: 'Alok'}
3
>>>
2) cmp(dictionary1,dictionary2):
Explanation:
The comparison is done on the basis of key and value.
If, dictionary1 == dictionary2, returns 0.
dictionary1 < dictionary2, returns -1.
dictionary1 > dictionary2, returns 1.
Eg:
data1={100:'Ram', 101:'Suraj', 102:'Alok'}
data2={103:'abc', 104:'xyz', 105:'mno'}
data3={'Id':10, 'First':'Aman','Second':'Sharma'}
data4={100:'Ram', 101:'Suraj', 102:'Alok'}
print cmp(data1,data2)
print cmp(data1,data4)
print cmp(data3,data2)
Output:
>>>
-1
0
1
>>>
3) str(dictionary):
Eg:
data1={100:'Ram', 101:'Suraj', 102:'Alok'}
print str(data1)
Output:
>>>
{100: 'Ram', 101: 'Suraj', 102: 'Alok'}
>>>
Methods:
1) keys():
Eg:
data1={100:'Ram', 101:'Suraj', 102:'Alok'}
print data1.keys()
Output:
>>>
[100, 101, 102]
>>>
2) values():
Eg:
data1={100:'Ram', 101:'Suraj', 102:'Alok'}
print data1.values()
Output:
>>>
['Ram', 'Suraj', 'Alok']
>>>
3) items():
Eg:
data1={100:'Ram', 101:'Suraj', 102:'Alok'}
print data1.items()
Output:
>>>
[(100, 'Ram'), (101, 'Suraj'), (102, 'Alok')]
>>>
4) update(dictionary2):
Eg:
data1={100:'Ram', 101:'Suraj', 102:'Alok'}
data2={103:'Sanjay'}
data1.update(data2)
print data1
print data2
Output:
>>>
{100: 'Ram', 101: 'Suraj', 102: 'Alok', 103: 'Sanjay'}
{103: 'Sanjay'}
>>>
5) clear():
Eg:
data1={100:'Ram', 101:'Suraj', 102:'Alok'}
print data1
data1.clear()
print data1
Output:
>>>
{100: 'Ram', 101: 'Suraj', 102: 'Alok'}
{}
>>>
6) fromkeys(sequence)/ fromkeys(seq,value):
Eg:
sequence=('Id' , 'Number' , 'Email')
data={}
data1={}
data=data.fromkeys(sequence)
print data
data1=data1.fromkeys(sequence,100)
print data1
Output:
>>>
{'Email': None, 'Id': None, 'Number': None}
{'Email': 100, 'Id': 100, 'Number': 100}
>>>
7) copy():
Eg:
data={'Id':100 , 'Name':'Aakash' , 'Age':23}
data1=data.copy()
print data1
Output:
>>>
{'Age': 23, 'Id': 100, 'Name': 'Aakash'}
>>>
8) has_key(key):
Eg:
data={'Id':100 , 'Name':'Aakash' , 'Age':23}
print data.has_key('Age')
print data.has_key('Email')
Output:
>>>
True
False
>>>
9) get(key):
Eg:
data={'Id':100 , 'Name':'Aakash' , 'Age':23}
print data.get('Age')
print data.get('Email')
Output:
>>>
23
None
>>>
Python Functions
A Function is a self block of code.
A Function can be called as a section of a program that is written once and can be executed whenever required in the program, thus making code reusability.
A Function is a subprogram that works on data and produce some output.
Types of Functions:
There are two types of Functions.
a) Built-in Functions: Functions that are predefined. We have used many predefined functions in Python.
b) User- Defined: Functions that are created according to the requirements.
Defining a Function:
A Function defined in Python should follow the following format:
1) Keyword def is used to start the Function Definition. Def specifies the starting of Function block.
2) def is followed by function-name followed by parenthesis.
3) Parameters are passed inside the parenthesis. At the end a colon is marked.
Syntax:
def <function_name>([parameters]):
</function_name>
eg:
def sum(a,b):
4) Before writing a code, an Indentation (space) is provided before every statement. It should be same for all statements inside the function.
5) The first statement of the function is optional. It is ?Documentation string? of function.
6) Following is the statement to be executed.
Syntax:
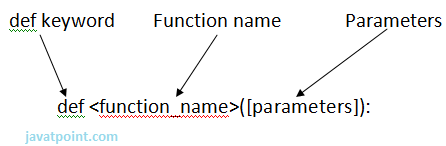

Invoking a Function:
To execute a function it needs to be called. This is called function calling.
Function Definition provides the information about function name, parameters and the definition what operation is to be performed. In order to execute the Function Definition it is to be called.
Syntax:
<function_name>(parameters)
</function_name>
eg:
sum(a,b)
here sum is the function and a, b are the parameters passed to the Function Definition.
Let?s have a look over an example:
eg:
#Providing Function Definition
def sum(x,y):
"Going to add x and y"
s=x+y
print "Sum of two numbers is"
print s
#Calling the sum Function
sum(10,20)
sum(20,30)
Output:
>>>
Sum of two numbers is
30
Sum of two numbers is
50
>>>
NOTE: Function call will be executed in the order in which it is called.
return Statement:
return[expression] is used to send back the control to the caller with the expression.
In case no expression is given after return it will return None.
In other words return statement is used to exit the Function definition.
Eg:
def sum(a,b):
"Adding the two values"
print "Printing within Function"
print a+b
return a+b
def msg():
print "Hello"
return
total=sum(10,20)
print ?Printing Outside: ?,total
msg()
print "Rest of code"
Output:
>>>
Printing within Function
30
Printing outside: 30
Hello
Rest of code
>>>
Argument and Parameter:
There can be two types of data passed in the function.
1) The First type of data is the data passed in the function call. This data is called ?arguments?.
2) The second type of data is the data received in the function definition. This data is called ?parameters?.
Arguments can be literals, variables and expressions.
Parameters must be variable to hold incoming values.
Alternatively, arguments can be called as actual parameters or actual arguments and parameters can be called as formal parameters or formal arguments.
Eg:
def addition(x,y):
print x+y
x=15
addition(x ,10)
addition(x,x)
y=20
addition(x,y)
Output:
>>>
25
30
35
>>>
Passing Parameters
Apart from matching the parameters, there are other ways of matching the parameters.
Python supports following types of formal argument:
1) Positional argument (Required argument).
2) Default argument.
3) Keyword argument (Named argument)
Positional/Required Arguments:
When the function call statement must match the number and order of arguments as defined in the function definition it is Positional Argument matching.
Eg:
#Function definition of sum
def sum(a,b):
"Function having two parameters"
c=a+b
print c
sum(10,20)
sum(20)
Output:
>>>
30
Traceback (most recent call last):
File "C:/Python27/su.py", line 8, in <module>
sum(20)
TypeError: sum() takes exactly 2 arguments (1 given)
>>>
</module>
Explanation:
1) In the first case, when sum() function is called passing two values i.e., 10 and 20 it matches with function definition parameter and hence 10 and 20 is assigned to a and b respectively. The sum is calculated and printed.
2) In the second case, when sum() function is called passing a single value i.e., 20 , it is passed to function definition. Function definition accepts two parameters whereas only one value is being passed, hence it will show an error.
Default Arguments
Default Argument is the argument which provides the default values to the parameters passed in the function definition, in case value is not provided in the function call.
Eg:
#Function Definition
def msg(Id,Name,Age=21):
"Printing the passed value"
print Id
print Name
print Age
return
#Function call
msg(Id=100,Name='Ravi',Age=20)
msg(Id=101,Name='Ratan')
Output:
>>>
100
Ravi
20
101
Ratan
21
>>>
Explanation:
1) In first case, when msg() function is called passing three different values i.e., 100 , Ravi and 20, these values will be assigned to respective parameters and thus respective values will be printed.
2) In second case, when msg() function is called passing two values i.e., 101 and Ratan, these values will be assigned to Id and Name respectively. No value is assigned for third argument via function call and hence it will retain its default value i.e, 21.
Keyword Arguments:
Using the Keyword Argument, the argument passed in function call is matched with function definition on the basis of the name of the parameter.
Eg:
def msg(id,name):
"Printing passed value"
print id
print name
return
msg(id=100,name='Raj')
msg(name='Rahul',id=101)
Output:
>>>
100
Raj
101
Rahul
>>>
Explanation:
1) In the first case, when msg() function is called passing two values i.e., id and name the position of parameter passed is same as that of function definition and hence values are initialized to respective parameters in function definition. This is done on the basis of the name of the parameter.
2) In second case, when msg() function is called passing two values i.e., name and id, although the position of two parameters is different it initialize the value of id in Function call to id in Function Definition. same with name parameter. Hence, values are initialized on the basis of name of the parameter.
Anonymous Function:
Anonymous Functions are the functions that are not bond to name.
Anonymous Functions are created by using a keyword "lambda".
Lambda takes any number of arguments and returns an evaluated expression.
Lambda is created without using the def keyword.
Syntax:
lambda arg1,args2,args3,?,argsn :expression
Output:
#Function Definiton
square=lambda x1: x1*x1
#Calling square as a function
print "Square of number is",square(10)
Output:
>>>
Square of number is 100
>>>
Difference between Normal Functions and Anonymous Function:
Have a look over two examples:
Eg:
Normal function:
#Function Definiton
def square(x):
return x*x
#Calling square function
print "Square of number is",square(10)
Anonymous function:
#Function Definiton
square=lambda x1: x1*x1
#Calling square as a function
print "Square of number is",square(10)
Explanation:
Anonymous is created without using def keyword.
lambda keyword is used to create anonymous function.
It returns the evaluated expression.
Scope of Variable:
Scope of a variable can be determined by the part in which variable is defined. Each variable cannot be accessed in each part of a program. There are two types of variables based on Scope:
1) Local Variable.
2) Global Variable.
1) Local Variables:
Variables declared inside a function body is known as Local Variable. These have a local access thus these variables cannot be accessed outside the function body in which they are declared.
Eg:
def msg():
a=10
print "Value of a is",a
return
msg()
print a #it will show error since variable is local
Output:
>>>
Value of a is 10
Traceback (most recent call last):
File "C:/Python27/lam.py", line 7, in <module>
print a #it will show error since variable is local
NameError: name 'a' is not defined
>>>
</module>
b) Global Variable:
Variable defined outside the function is called Global Variable. Global variable is accessed all over program thus global variable have widest accessibility.
Eg:
b=20
def msg():
a=10
print "Value of a is",a
print "Value of b is",b
return
msg()
print b
Output:
>>>
Value of a is 10
Value of b is 20
20
>>>
Python Input And Output
Python can be used to read and write data. Also it supports reading and writing data to Files.
"print" statement:
"print" statement is used to print the output on the screen.
print statement is used to take string as input and place that string to standard output.
Whatever you want to display on output place that expression inside the inverted commas. The expression whose value is to printed place it without inverted commas.
Syntax:
print "expression" or print expression.
eg:
a=10
print "Welcome to the world of Python"
print a
Output:
>>>
Welcome to the world of Python
10
>>>
Input from Keyboard:
Python offers two in-built functions for taking input from user. They are:
1) input()
2) raw_input()
1) input() functioninput() function is used to take input from the user. Whatever expression is given by the user, it is evaluated and result is returned back.
Syntax:
input("Expression")
eg:
n=input("Enter your expression ");
print "The evaluated expression is ", n
Output:
>>>
Enter your expression 10*2
The evaluated expression is 20
>>>
2) raw_input()raw_input() function is used to take input from the user. It takes the input from the Standard input in the form of a string and reads the data from a line at once.
Syntax:
raw_input(?statement?)
eg:
n=raw_input("Enter your name ");
print "Welcome ", n
Output:
>>>
Enter your name Rajat
Welcome Rajat
>>>
raw_input() function returns a string. Hence in case an expression is to be evaluated, then it has to be type casted to its following data type. Some of the examples are given below:
Program to calculate Simple Interest.
prn=int(raw_input("Enter Principal"))
r=int(raw_input("Enter Rate"))
t=int(raw_input("Enter Time"))
si=(prn*r*t)/100
print "Simple Interest is ",si
Output:
>>>
Enter Principal1000
Enter Rate10
Enter Time2
Simple Interest is 200
>>>
Program to enter details of an user and print them.
name=raw_input("Enter your name ")
math=float(raw_input("Enter your marks in Math"))
physics=float(raw_input("Enter your marks in Physics"))
chemistry=float(raw_input("Enter your marks in Chemistry"))
rollno=int(raw_input("Enter your Roll no"))
print "Welcome ",name
print "Your Roll no is ",rollno
print "Marks in Maths is ",math
print "Marks in Physics is ",physics
print "Marks in Chemistry is ",chemistry
print "Average marks is ",(math+physics+chemistry)/3
Output:
>>>
Enter your name rajat
Enter your marks in Math76.8
Enter your marks in Physics71.4
Enter your marks in Chemistry88.4
Enter your Roll no0987645672
Welcome rajat
Your Roll no is 987645672
Marks in Maths is 76.8
Marks in Physics is 71.4
Marks in Chemistry is 88.4
Average marks is 78.8666666667
>>>
File Handling:
Python provides the facility of working on Files. A File is an external storage on hard disk from where data can be stored and retrieved.
Operations on Files:
1) Opening a File: Before working with Files you have to open the File. To open a File, Python built in function open() is used. It returns an object of File which is used with other functions. Having opened the file now you can perform read, write, etc. operations on the File.
Syntax:
obj=open(filename , mode , buffer)
here,
filename:It is the name of the file which you want to access.
mode:It specifies the mode in which File is to be opened.There are many types of mode. Mode depends the operation to be performed on File. Default access mode is read.
2) Closing a File:Once you are finished with the operations on File at the end you need to close the file. It is done by the close() method. close() method is used to close a File.
Syntax:
fileobject.close()
3) Writing to a File:write() method is used to write a string into a file.
Syntax:
fileobject.write(string str)
4) Reading from a File:read() method is used to read data from the File.
Syntax:
fileobject.read(value)
here, value is the number of bytes to be read. In case, no value is given it reads till end of file is reached.
Program to read and write data from a file.
obj=open("abcd.txt","w")
obj.write("Welcome to the world of Python")
obj.close()
obj1=open("abcd.txt","r")
s=obj1.read()
print s
obj1.close()
obj2=open("abcd.txt","r")
s1=obj2.read(20)
print s1
obj2.close()
Output:
>>>
Welcome to the world of Python
Welcome to the world
>>>
Attributes of File:
There are following File attributes.
Attribute | Description |
Name | Returns the name of the file. |
Mode | Returns the mode in which file is being opened. |
Closed | Returns Boolean value. True, in case if file is closed else false. |
Eg:
obj = open("data.txt", "w")
print obj.name
print obj.mode
print obj.closed
Output:
>>>
data.txt
w
False
>>>
Modes of File:
There are different modes of file in which it can be opened. They are mentioned in the following table.
A File can be opened in two modes:
1) Text Mode.
2) Binary Mode.
Mode | Description |
R | It opens in Reading mode. It is default mode of File. Pointer is at beginning of the file. |
rb | It opens in Reading mode for binary format. It is the default mode. Pointer is at beginning of file. |
r+ | Opens file for reading and writing. Pointer is at beginning of file. |
rb+ | Opens file for reading and writing in binary format. Pointer is at beginning of file. |
W | Opens file in Writing mode. If file already exists, then overwrite the file else create a new file. |
wb | Opens file in Writing mode in binary format. If file already exists, then overwrite the file else create a new file. |
w+ | Opens file for reading and writing. If file already exists, then overwrite the file else create a new file. |
wb+ | Opens file for reading and writing in binary format. If file already exists, then overwrite the file else create a new file. |
a | Opens file in Appending mode. If file already exists, then append the data at the end of existing file, else create a new file. |
ab | Opens file in Appending mode in binary format. If file already exists, then append the data at the end of existing file, else create a new file. |
a+ | Opens file in reading and appending mode. If file already exists, then append the data at the end of existing file, else create a new file. |
ab+ | Opens file in reading and appending mode in binary format. If file already exists, then append the data at the end of existing file, else create a new file. |
Methods:
There are many methods related to File Handling. They are given in the following table:
There is a module "os" defined in Python that provides various functions which are used to perform various operations on Files. To use these functions 'os' needs to be imported.
Method | Description |
rename() | It is used to rename a file. It takes two arguments, existing_file_name and new_file_name. |
remove() | It is used to delete a file. It takes one argument. Pass the name of the file which is to be deleted as the argument of method. |
mkdir() | It is used to create a directory. A directory contains the files. It takes one argument which is the name of the directory. |
chdir() | It is used to change the current working directory. It takes one argument which is the name of the directory. |
getcwd() | It gives the current working directory. |
rmdir() | It is used to delete a directory. It takes one argument which is the name of the directory. |
tell() | It is used to get the exact position in the file. |
1) rename():
Syntax:
os.rename(existing_file_name, new_file_name)
eg:
import os
os.rename('mno.txt','pqr.txt')
2) remove():
Syntax:
os.remove(file_name)
eg:
import os
os.remove('mno.txt')
3) mkdir()
Syntax:
os.mkdir("file_name")
eg:
import os
os.mkdir("new")
4) chdir()
Syntax:
os.chdir("file_name")
eg:
import os
os.chdir("new")
5) getcwd()
Syntax:
os.getcwd()
eg:
import os
print os.getcwd()
6) rmdir()
Syntax:
os.rmdir("directory_name)
eg:
import os
os.rmdir("new")
NOTE: In order to delete a directory, it should be empty. In case directory is not empty first delete the files.
Python Moudule
Modules are used to categorize code in Python into smaller part. A module is simply a file, where classes, functions and variables are defined. Grouping similar code into a single file makes it easy to access.
Have a look over example:
If the content of a book is not indexed or categorized into individual chapters, then the book might have turned boring and hectic. Hence, dividing book into chapters made it easy to understand.
In the same sense python modules are the files which have similar code. Thus module is simplify a python code where classes, variables and functions are defined.
Advantage:
Python provides the following advantages for using module:
1) Reusability: Module can be used in some other python code. Hence it provides the facility of code reusability.
2) Categorization: Similar type of attributes can be placed in one module.
Importing a Module:
There are different ways by which you we can import a module. These are as follows:
1) Using import statement:
"import" statement can be used to import a module.
Syntax:
import <file_name1, file_name2,...file_name(n)="">
</file_name1,>
Have a look over an example:
eg:
def add(a,b):
c=a+b
print c
return
Save the file by the name addition.py. To import this file "import" statement is used.
import addition
addition.add(10,20)
addition.add(30,40)
Create another python file in which you want to import the former python file. For that, import statement is used as given in the above example. The corresponding method can be used by file_name.method (). (Here, addition. add (), where addition is the python file and add () is the method defined in the file addition.py)
Output:
>>>
30
70
>>>
NOTE: You can access any function which is inside a module by module name and function name separated by dot. It is also known as period. Whole notation is known as dot notation.
Example of importing multiple modules:
Eg:
1) msg.py:
def msg_method():
print "Today the weather is rainy"
return
2) display.py:
def display_method():
print "The weather is Sunny"
return
3) multiimport.py:
import msg,display
msg.msg_method()
display.display_method()
Output:
>>>
Today the weather is rainy
The weather is Sunny
>>>
2) Using from.. import statement:
from..import statement is used to import particular attribute from a module. In case you do not want whole of the module to be imported then you can use from ?import statement.
Syntax:
from <module_name> import <attribute1,attribute2,attribute3,...attributen>
</attribute1,attribute2,attribute3,...attributen></module_name>
Have a look over the example:
1) area.py
Eg:
def circle(r):
print 3.14*r*r
return
def square(l):
print l*l
return
def rectangle(l,b):
print l*b
return
def triangle(b,h):
print 0.5*b*h
return
2) area1.py
from area import square,rectangle
square(10)
rectangle(2,5)
Output:
>>>
100
10
>>>
3) To import whole module:
You can import whole of the module using "from? import *"
Syntax:
from <module_name> import *
</module_name>
Using the above statement all the attributes defined in the module will be imported and hence you can access each attribute.
1) area.py
Same as above example
2) area1.py
from area import *
square(10)
rectangle(2,5)
circle(5)
triangle(10,20)
Output:
>>>
100
10
78.5
100.0
>>>
Built in Modules in Python:
There are many built in modules in Python. Some of them are as follows:
math, random , threading , collections , os , mailbox , string , time , tkinter etc..
Each module has a number of built in functions which can be used to perform various functions.
Let?s have a look over each module:
1) math:
Using math module , you can use different built in mathematical functions.
Functions:
Function | Description |
ceil(n) | Returns the next integer number of the given number |
sqrt(n) | Returns the Square root of the given number. |
exp(n) | Returns the natural logarithm e raised to the given number |
floor(n) | Returns the previous integer number of the given number. |
log(n,baseto) | Returns the natural logarithm of the number. |
pow(baseto, exp) | Returns baseto raised to the exp power. |
sin(n) | Returns sine of the given radian. |
cos(n) | Returns cosine of the given radian. |
tan(n) | Returns tangent of the given radian. |
Useful Example of math module:
Eg:
import math
a=4.6
print math.ceil(a)
print math.floor(a)
b=9
print math.sqrt(b)
print math.exp(3.0)
print math.log(2.0)
print math.pow(2.0,3.0)
print math.sin(0)
print math.cos(0)
print math.tan(45)
Output:
>>>
5.0
4.0
3.0
20.0855369232
0.69314718056
8.0
0.0
1.0
1.61977519054
>>>
Constants:
The math module provides two constants for mathematical Operations:
Constants | Descriptions |
Pi | Returns constant ? = 3.14159... |
ceil(n) | Returns constant e= 2.71828... |
Eg:
import math
print math.pi
print math.e
Output:
>>>
3.14159265359
2.71828182846
>>>
2) random:
The random module is used to generate the random numbers. It provides the following two built in functions:
Function | Description |
random() | It returns a random number between 0.0 and 1.0 where 1.0 is exclusive. |
randint(x,y) | It returns a random number between x and y where both the numbers are inclusive. |
Eg:
import random
print random.random()
print random.randint(2,8)
Output:
>>>
0.797473843839
7
>>>
Other modules will be covered in their respective topics.
Package
A Package is simply a collection of similar modules, sub-packages etc..
Steps to create and import Package:
1) Create a directory, say Info
2) Place different modules inside the directory. We are placing 3 modules msg1.py, msg2.py and msg3.py respectively and place corresponding codes in respective modules. Let us place msg1() in msg1.py, msg2() in msg2.py and msg3() in msg3.py.
3) Create a file __init__.py which specifies attributes in each module.
4) Import the package and use the attributes using package.
Have a look over the example:
1) Create the directory:
import os
os.mkdir("Info")
2) Place different modules in package: (Save different modules inside the Info package)
msg1.py
def msg1():
print "This is msg1"
msg2.py
def msg2():
print "This is msg2"
msg3.py
def msg3():
print "This is msg3"
3) Create __init__.py file:
from msg1 import msg1
from msg2 import msg2
from msg3 import msg3
4)Import package and use the attributes:
import Info
Info.msg1()
Info.msg2()
Info.msg3()
Output:
>>>
This is msg1
This is msg2
This is msg3
>>>
What is __init__.py file? __init__.py is simply a file that is used to consider the directories on the disk as the package of the Python. It is basically used to initialize the python packages.
EXCEPTION HANDLING
Exception can be said to be any abnormal condition in a program resulting to the disruption in the flow of the program.
Whenever an exception occurs the program halts the execution and thus further code is not executed. Thus exception is that error which python script is unable to tackle with.
Exception in a code can also be handled. In case it is not handled, then the code is not executed further and hence execution stops when exception occurs.
Hierarchy Of Exception:
ZeroDivisionError: Occurs when a number is divided by zero.
NameError: It occurs when a name is not found. It may be local or global.
IndentationError: If incorrect indentation is given.
IOError: It occurs when Input Output operation fails.
EOFError: It occurs when end of file is reached and yet operations are being performed
etc..
Exception Handling:
The suspicious code can be handled by using the try block. Enclose the code which raises an exception inside the try block. The try block is followed except statement. It is then further followed by statements which are executed during exception and in case if exception does not occur.
Syntax:
try:
malicious code
except Exception1:
execute code
except Exception2:
execute code
....
....
except ExceptionN:
execute code
else:
In case of no exception, execute the else block code.
eg:
try:
a=10/0
print a
except ArithmeticError:
print "This statement is raising an exception"
else:
print "Welcome"
Output:
>>>
This statement is raising an exception
>>>
Explanation:
The malicious code (code having exception) is enclosed in the try block.
Try block is followed by except statement. There can be multiple except statement with a single try block.
Except statement specifies the exception which occurred. In case that exception is occurred, the corresponding statement will be executed.
At the last you can provide else statement. It is executed when no exception is occurred.
Except with no Exception:
Except statement can also be used without specifying Exception.
Syntax:
try:
code
except:
code to be executed in case exception occurs.
else:
code to be executed in case exception does not occur.
eg:
try:
a=10/0;
except:
print "Arithmetic Exception"
else:
print "Successfully Done"
Output:
>>>
Arithmetic Exception
>>>
Declaring Multiple Exception
Multiple Exceptions can be declared using the same except statement:
Syntax:
try:
code
except Exception1,Exception2,Exception3,..,ExceptionN
execute this code in case any Exception of these occur.
else:
execute code in case no exception occurred.
eg:
try:
a=10/0;
except ArithmeticError,StandardError:
print "Arithmetic Exception"
else:
print "Successfully Done"
Output:
>>>
Arithmetic Exception
>>>
Finally Block:
In case if there is any code which the user want to be executed, whether exception occurs or not then that code can be placed inside the finally block. Finally block will always be executed irrespective of the exception.
Syntax:
try:
Code
finally:
code which is must to be executed.
eg:
try:
a=10/0;
print "Exception occurred"
finally:
print "Code to be executed"
Output:
>>>
Code to be executed
Traceback (most recent call last):
File "C:/Python27/noexception.py", line 2, in <module>
a=10/0;
ZeroDivisionError: integer division or modulo by zero
>>>
In the above example finally block is executed. Since exception is not handled therefore exception occurred and execution is stopped.
Raise an Exception:
You can explicitly throw an exception in Python using ?raise? statement. raise will cause an exception to occur and thus execution control will stop in case it is not handled.
Syntax:
raise Exception_class,<value>
eg:
try:
a=10
print a
raise NameError("Hello")
except NameError as e:
print "An exception occurred"
print e
Output:
>>>
10
An exception occurred
Hello
>>>
Explanation:
i) To raise an exception, raise statement is used. It is followed by exception class name.
ii) Exception can be provided with a value that can be given in the parenthesis. (here, Hello)
iii) To access the value "as" keyword is used. "e" is used as a reference variable which stores the value of the exception.
Custom Exception:
Refer to this section after visiting Class and Object section:
Creating your own Exception class or User Defined Exceptions are known as Custom Exception.
eg:
class ErrorInCode(Exception):
def __init__(self, data):
self.data = data
def __str__(self):
return repr(self.data)
try:
raise ErrorInCode(2000)
except ErrorInCode as ae:
print "Received error:", ae.data
Output:
>>>
Received error : 2000
>>>
Date and Time
Python is very useful in case of Date and Time. We can easily retrieve current date and time using Python.
Retrieve Time
To retrieve current time a predefined function localtime() is used. localtime() receives a parameter time.time() . Here,
time is a module,
time() is a function that returns the current system time in number of ticks since 12:00 am , January 1,1970. It is known as epoch.
Tick is simply a floating point number in seconds since epoch.
eg:
import time;
localtime = time.localtime(time.time())
print "Current Time is :", localtime
Output:
>>>
Current Time is :time.struct_time(tm_year=2014, tm_mon=6, tm_mday=18, tm_hour=12,
tm_min=35, tm_sec=44, tm_wday=2, tm_yday=169, tm_isdst=0)
>>>
Explanation:
The time returned is a time structure which includes 9 attributes. These are summoned in the table given below.
Attribute | Description |
tm_year | Returns the current year |
tm_mon | Returns the current month |
tm_mday | Returns the current month day |
tm_hour | Returns the current hour. |
tm_min | Returns the current minute |
tm_sec | Returns current seconds |
tm_wday | Returns the week day |
tm_yday | Returns the year day. |
tm_isdst | It returns -1,0 or 1. |
Formatted Time
Python also support formatted time. Proceed as follows:
Pass the time structure in a predefined function asctime(). It is a function defined in time module.
It returns a formatted time which includes Day ,month, date, time and year.
Print the formatted time.
eg:
import time;
localtime = time.asctime( time.localtime(time.time()) )
print "Formatted time :", localtime
Output:
>>>
Formatted time : Sun Jun 22 18:54:20 2014
>>>
time module:
There are many built in functions defined in time module which are used to work with time.
Methods | Description |
time() | Returns floating point value in seconds since epoch i.e.,12:00am, January 1, 1970 |
asctime(time) | It takes the tuple returned by localtime() as parameter. It returns a 24 character string. |
sleep(time) | The execution will be stopped for the given interval of time. |
strptime(String,format) | It returns an tuple with 9 time attributes. It receives an String of date and a format. |
gtime()/gtime(sec) | It returns struct_time which contains 9 time attributes. In case seconds are not specified it takes current second from epoch. |
mktime() | Returns second in floating point since epoch. |
strftime(format)/strftime(format,time) | Returns time in particular format. If time is not given, current time in seconds is fetched. |
time()
eg:
import time
printtime.time()
Output:
>>>
1403700740.39
>>>
asctime(time)
import time
t = time.localtime()
printtime.asctime(t)
Output:
>>>
Wed Jun 25 18:30:25 2014
>>>
sleep(time)
Eg:
import time
localtime = time.asctime( time.localtime(time.time()) )
printlocaltime
time.sleep( 10 )
localtime = time.asctime( time.localtime(time.time()) )
printlocaltime
Output:
>>>
Wed Jun 25 18:15:30 2014
Wed Jun 25 18:15:40 2014
>>>
strptime(String str,format f)
Eg:
import time
timerequired = time.strptime("26 Jun 14", "%d %b %y")
printtimerequired
Output:
>>>
time.struct_time(tm_year=2014, tm_mon=6, tm_mday=26, tm_hour=0, tm_min=0,
tm_sec=0, tm_wday=3, tm_yday=177, tm_isdst=-1)
>>>
Explanation:
The strptime() takes a String and format as argument. The format refers to String passed as an argument. "%a %b %d %H:%M:%S %Y" are the default directives. There are many other directives which can be used. In the given example we have used three directives: %d%b%y which specifies day of the month, month in abbreviated form and year without century respectively. Some of them are given as:
%a | weekday name. |
%b | month name |
%c | date and time |
%e | day of a month |
%m | month in digit. |
%n | new line character. |
%S | second |
%t | tab character |
etc...
gtime()
Eg:
import time
printtime.gmtime()
Output:
>>>
time.struct_time(tm_year=2014, tm_mon=6, tm_mday=28, tm_hour=9, tm_min=38, tm_sec=0,
tm_wday=5, tm_yday=179, tm_isdst=0)
>>>
mktime()
Eg:
import time
t = (2014, 2, 17, 17, 3, 38, 1, 48, 0)
second = time.mktime( t )
print second
Output:
>>>
1392636818.0
>>>
strftime()
Eg:
import time
t = (2014, 6, 26, 17, 3, 38, 1, 48, 0)
t = time.mktime(t)
printtime.strftime("%b %d %Y %H:%M:%S", time.gmtime(t))
Output:
>>>
Jun 26 2014 11:33:38
>>>
Calendar
Python provides calendar module to display Calendar.
Eg:
import calendar
print "Current month is:"
cal = calendar.month(2014, 6)
printcal
Output:
>>>
Current month is:
June 2014
Mo TuWe ThFr Sa Su
1
2 3 4 5 6 7 8
9 10 11 12 1314 15
16 1718 19 2021 22
2324 25 26 27 28 29
30
>>>
Calendar module:
Python provides calendar module which provides many functions and methods to work on calendar. A list of methods and function used is given below:
Methods | Description |
prcal(year) | Prints the whole calendar of the year. |
firstweekday() | Returns the first week day. It is by default 0 which specifies Monday |
isleap(year) | Returns a Boolean value i.e., true or false. True in case given year is leap else false. |
monthcalendar(year,month) | Returns the given month with each week as one list. |
leapdays(year1,year2) | Return number of leap days from year1 to year2 |
prmonth(year,month) | Print the given month of the given year |
prcal(year)
Eg:
import calendar
calendar.prcal(2014)
Output:
>>> ================================ RESTART ================================
>>>
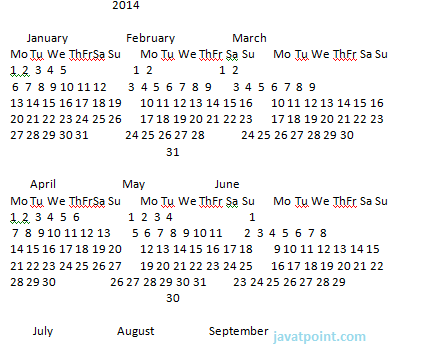
firstweekday()
Eg:
import calendar
printcalendar.firstweekday()
Output:
>>>
0
>>>
isleap(year)
Eg:
import calendar
printcalendar.isleap(2000)
Output:
>>>
True
>>>
monthcalendar(year,month)
Eg:
import calendar
printcalendar.monthcalendar(2014,6)
Output:
>>>
[[0, 0, 0, 0, 0, 0, 1], [2, 3, 4, 5, 6, 7, 8], [9, 10, 11, 12, 13, 14, 15],
[16, 17, 18, 19, 20, 21, 22],
[23, 24, 25, 26, 27, 28, 29], [30, 0, 0, 0, 0, 0, 0]]
>>>
prmonth(year,month)
Eg:
import calendar
printcalendar.prmonth(2014,6)
Output:
>>>
June 2014
Mo Tu We ThFrSa Su
1
2 3 4 5 6 7 8
9 10 11 12 13 14 15
16 17 18 19 20 21 22
23 24 25 26 27 28 29
30
None
>>>
Python Programs
There can be various python programs on many topics like basic python programming, conditions and loops, functions and native data types. A list of top python programs are given below which are widely asked by interviewer.
Basic Python programs
Python programs with conditions and loops
Python Function Programs
Python Native Data Type Programs
n
Python is a general purpose, dynamic, high level and interpreted programming language. It supports Object Oriented programming approach to develop applications. It is simple and easy to learn and provides lots of high-level data structures.
Python is easy to learn yet powerful and versatile scripting language which makes it attractive for Application Development.
Python's syntax and dynamic typing with its interpreted nature, makes it an ideal language for scripting and rapid application development.
Python supports multiple programming pattern, including object oriented, imperative and functional or procedural programming styles.
Python is not intended to work on special area such as web programming. That is why it is known as multipurpose because it can be used with web, enterprise, 3D CAD etc.
We don't need to use data types to declare variable because it is dynamically typed so we can write a=10 to assign an integer value in an integer variable.
Python makes the development and debugging fast because there is no compilation step included in python development and edit-test-debug cycle is very fast.
Python Features
Python provides lots of features that are listed below.
1) Easy to Learn and Use
Python is easy to learn and use. It is developer-friendly and high level programming language.
2) Expressive Language
Python language is more expressive means that it is more understandable and readable.
3) Interpreted Language
Python is an interpreted language i.e. interpreter executes the code line by line at a time. This makes debugging easy and thus suitable for beginners.
4) Cross-platform Language
Python can run equally on different platforms such as Windows, Linux, Unix and Macintosh etc. So, we can say that Python is a portable language.
5) Free and Open Source
Python language is freely available at offical web address.The source-code is also available. Therefore it is open source.
6) Object-Oriented Language
Python supports object oriented language and concepts of classes and objects come into existence.
7) Extensible
It implies that other languages such as C/C++ can be used to compile the code and thus it can be used further in our python code.
8) Large Standard Library
Python has a large and broad library and prvides rich set of module and functions for rapid application development.
9) GUI Programming Support
Graphical user interfaces can be developed using Python.
10) Integrated
It can be easily integrated with languages like C, C++, JAVA etc.
Python History
Python laid its foundation in the late 1980s.
The implementation of Python was started in the December 1989 by Guido Van Rossum at CWI in Netherland.
In February 1991, van Rossum published the code (labeled version 0.9.0) to alt.sources.
In 1994, Python 1.0 was released with new features like: lambda, map, filter, and reduce.
Python 2.0 added new features like: list comprehensions, garbage collection system.
On December 3, 2008, Python 3.0 (also called "Py3K") was released. It was designed to rectify fundamental flaw of the language.
ABC programming language is said to be the predecessor of Python language which was capable of Exception Handling and interfacing with Amoeba Operating System.
Python is influenced by following programming languages:
Python Version
Python programming language is being updated regularly with new features and supports. There are lots of updations in python versions, started from 1994 to current release.
A list of python versions with its released date is given below.
Python Version | Released Date |
Python 1.0 | January 1994 |
Python 1.5 | December 31, 1997 |
Python 1.6 | September 5, 2000 |
Python 2.0 | October 16, 2000 |
Python 2.1 | April 17, 2001 |
Python 2.2 | December 21, 2001 |
Python 2.3 | July 29, 2003 |
Python 2.4 | November 30, 2004 |
Python 2.5 | September 19, 2006 |
Python 2.6 | October 1, 2008 |
Python 2.7 | July 3, 2010 |
Python 3.0 | December 3, 2008 |
Python 3.1 | June 27, 2009 |
Python 3.2 | February 20, 2011 |
Python 3.3 | September 29, 2012 |
Python 3.4 | March 16, 2014 |
Python 3.5 | September 13, 2015 |
Python 3.6 | December 23, 2016 |
Python 3.6.4 | December 19, 2017 |
Python Applications Area
Python is known for its general purpose nature that makes it applicable in almost each domain of software development. Python as a whole can be used in any sphere of development.
Here, we are specifing applications areas where python can be applied.
1) Web Applications
We can use Python to develop web applications. It provides libraries to handle internet protocols such as HTML and XML, JSON, Email processing, request, beautifulSoup, Feedparser etc. It also provides Frameworks such as Django, Pyramid, Flask etc to design and delelop web based applications. Some important developments are: PythonWikiEngines, Pocoo, PythonBlogSoftware etc.
2) Desktop GUI Applications
Python provides Tk GUI library to develop user interface in python based application. Some other useful toolkits wxWidgets, Kivy, pyqt that are useable on several platforms. The Kivy is popular for writing multitouch applications.
3) Software Development
Python is helpful for software development process. It works as a support language and can be used for build control and management, testing etc.
4) Scientific and Numeric
Python is popular and widely used in scientific and numeric computing. Some useful library and package are SciPy, Pandas, IPython etc. SciPy is group of packages of engineering, science and mathematics.
5) Business Applications
Python is used to build Bussiness applications like ERP and e-commerce systems. Tryton is a high level application platform.
6) Console Based Application
We can use Python to develop console based applications. For example: IPython.
7) Audio or Video based Applications
Python is awesome to perform multiple tasks and can be used to develop multimedia applications. Some of real applications are: TimPlayer, cplay etc.
8) 3D CAD Applications
To create CAD application Fandango is a real application which provides full features of CAD.
9) Enterprise Applications
Python can be used to create applications which can be used within an Enterprise or an Organization. Some real time applications are: OpenErp, Tryton, Picalo etc.
10) Applications for Images
Using Python several application can be developed for image. Applications developed are: VPython, Gogh, imgSeek etc.
There are several such applications which can be developed using Python
HOW TO INSTALL PYTHON
To start with Python, first make sure that the Python is installed on local computer.
To install Python, visit the official site and download Python from the download section.
To install Python on Ubuntu operating system, visit our installation section where we have provided detailed installation process.
For Windows operating system, the installation process is given below.
1. To install Python, firstly download the Python distribution from www.python.org/download.
2. After downloading the Python distribution, double click on the downloaded software to execute it. Follow the following installtion steps.
Click the Finish button and Python will be installed on your system.
SETTING PATH IN PYTHON
Before starting working with Python, a specific path is to set.
Your Python program and executable code can reside in any directory of your system, therefore Operating System provides a specific search path that index the directories Operating System should search for executable code.
The Path is set in the Environment Variable of My Computer properties:
To set path follow the steps:
Right click on My Computer ->Properties ->Advanced System setting ->Environment Variable ->New
In Variable name write path and in Variable value copy path up to C://Python(i.e., path where Python is installed). Click Ok ->Ok.
Path will be set for executing Python programs.
1. Right click on My Computer and click on properties.
2. Click on Advanced System settings
3. Click on Environment Variable tab.
4. Click on new tab of user variables.
5. Write path in variable name
6. Copy the path of Python folder
7. Paste path of Python in variable value.
8. Click on Ok button:
9. Click on Ok button:
Python Example
Python is easy to learn and code and can be execute with python interpreter. We can also use Python interactive shell to test python code immediately.
A simple hello world example is given below. Write below code in a file and save with .py extension. Python source file has .pyextension.
hello.py
print("hello world by python!")
Execute this example by using following command.
Python3 hello.py
After executing, it produces the following output to the screen.
Output
hello world by python!
Python Example using Interactive Shell
Python interactive shell is used to test the code immediately and does not require to write and save code in file.
Python code is simple and easy to run. Here is a simple Python code that will print "Welcome to Python".
A simple python example is given below.
>>> a="Welcome To Python"
>>> print a
Welcome To Python
>>>
Explanation:
Here we are using IDLE to write the Python code. Detail explanation to run code is given in Execute Python section.
A variable is defined named "a" which holds "Welcome To Python".
"print" statement is used to print the content. Therefore "print a" statement will print the content of the variable. Therefore, the output "Welcome To Python" is produced.
Python 3.4 Example
In python 3.4 version, you need to add parenthesis () in a string code to print it.
>>> a=("Welcome To Python Example")
>>> print a
Welcome To Python Example
>>>
How to execute python
To execute Python code, we can use any approach that are given below.
1) Interactive Mode
Python provides Interactive Shell to execute code immediatly and produce output instantly. To get into this shell, write python in the command prompt and start working with Python.
Press Enter key and the Command Prompt will appear like:
Now we can execute our Python commands.
Eg:
2) Script Mode
Using Script Mode, we can write our Python code in a separate file of any editor in our Operating System.
Save it by .py extension.
Now open Command prompt and execute it by :
NOTE: Path in the command prompt should be location of saved file.where you have saved your file. In the above case file should be saved at desktop.
3) Using IDE (Integrated Development Environment)
We can execute our Python code using a Graphical User Interface (GUI).
All you need to do is:
Click on Start button -> All Programs -> Python -> IDLE(Python GUI)
We can use both Interactive as well as Script mode in IDE.
1) Using Interactive mode:
Execute our Python code on the Python prompt and it will display result simultaneously.
2) Using Script Mode:
i) Click on Start button -> All Programs -> Python -> IDLE(Python GUI)
ii) Python Shell will be opened. Now click on File -> New Window.
A new Editor will be opened. Write our Python code here.
Click on file -> save as
Run code by clicking on Run in the Menu bar.
Run -> Run Module
Result will be displayed on a new Python shell as:
Next TopicPython Variables
Python Variables
Variable is a name which is used to refer memory location. Variable also known as identifier and used to hold value.
In Python, we don't need to specify the type of variable because Python is a type infer language and smart enough to get variable type.
Variable names can be a group of both letters and digits, but they have to begin with a letter or an underscore.
It is recomended to use lowercase letters for variable name. Rahul and rahul both are two different variables.
Note - Variable name should not be a keyword.
Declaring Variable and Assigning Values
Python does not bound us to declare variable before using in the application. It allows us to create variable at required time.
We don't need to declare explicitly variable in Python. When we assign any value to the variable that variable is declared automatically.
The equal (=) operator is used to assign value to a variable.
Eg:
Output:
>>>
10
ravi
20000.67
>>>
Multiple Assignment
Python allows us to assign a value to multiple variables in a single statement which is also known as multiple assignment.
We can apply multiple assignments in two ways either by assigning a single value to multiple variables or assigning multiple values to multiple variables. Lets see given examples.
1. Assigning single value to multiple variables
Eg:
x=y=z=50
print iple
print y
print z
Output:
>>>
50
50
50
>>>
2.Assigning multiple values to multiple variables:
Eg:
a,b,c=5,10,15
print a
print b
print c
Output:
>>>
5
10
15
>>>
The values will be assigned in the order in which variables appears.
Basic Fundamentals:
This section contains the basic fundamentals of Python like :
i)Tokens and their types.
ii) Comments
a)Tokens:
Tokens can be defined as a punctuator mark, reserved words and each individual word in a statement.
Token is the smallest unit inside the given program.
There are following tokens in Python:
Keywords.
Identifiers.
Literals.
Operators.
Tuples:
Tuple is another form of collection where different type of data can be stored.
It is similar to list where data is separated by commas. Only the difference is that list uses square bracket and tuple uses parenthesis.
Tuples are enclosed in parenthesis and cannot be changed.
Eg:
>>> tuple=('rahul',100,60.4,'deepak')
>>> tuple1=('sanjay',10)
>>> tuple
('rahul', 100, 60.4, 'deepak')
>>> tuple[2:]
(60.4, 'deepak')
>>> tuple1[0]
'sanjay'
>>> tuple+tuple1
('rahul', 100, 60.4, 'deepak', 'sanjay', 10)
>>>
Dictionary:
Dictionary is a collection which works on a key-value pair.
It works like an associated array where no two keys can be same.
Dictionaries are enclosed by curly braces ({}) and values can be retrieved by square bracket([]).
Eg:
>>> dictionary={'name':'charlie','id':100,'dept':'it'}
>>> dictionary
{'dept': 'it', 'name': 'charlie', 'id': 100}
>>> dictionary.keys()
['dept', 'name', 'id']
>>> dictionary.values()
['it', 'charlie', 100]
>>>
Python Keywords
Python Keywords are special reserved words which convey a special meaning to the compiler/interpreter. Each keyword have a special meaning and a specific operation. These keywords can't be used as variable. Following is the List of Python Keywords.
True | False | None | and | as |
asset | def | class | continue | break |
else | finally | elif | del | except |
global | for | if | from | import |
raise | try | or | return | pass |
nonlocal | in | not | is | lambda |
Identifiers are the names given to the fundamental building blocks in a program.
These can be variables ,class ,object ,functions , lists , dictionaries etc.
There are certain rules defined for naming i.e., Identifiers.
I. An identifier is a long sequence of characters and numbers.
II.No special character except underscore ( _ ) can be used as an identifier.
III.Keyword should not be used as an identifier name.
IV.Python is case sensitive. So using case is significant.
V.First character of an identifier can be character, underscore ( _ ) but not digit.
Python Literals
Literals can be defined as a data that is given in a variable or constant.
Python support the following literals:
I. String literals:
String literals can be formed by enclosing a text in the quotes. We can use both single as well as double quotes for a String.
Eg:
"Aman" , '12345'
Types of Strings:
There are two types of Strings supported in Python:
a).Single line String- Strings that are terminated within a single line are known as Single line Strings.
Eg:
>>> text1='hello'
b).Multi line String- A piece of text that is spread along multiple lines is known as Multiple line String.
There are two ways to create Multiline Strings:
1). Adding black slash at the end of each line.
Eg:
>>> text1='hello\
user'
>>> text1
'hellouser'
>>>
2).Using triple quotation marks:-
Eg:
>>> str2='''''welcome
to
SSSIT'''
>>> print str2
welcome
to
SSSIT
>>>
II.Numeric literals:
Numeric Literals are immutable. Numeric literals can belong to following four different numerical types.
Int(signed integers) | Long(long integers) | float(floating point) | Complex(complex) |
Numbers( can be both positive and negative) with no fractional part.eg: 100 | Integers of unlimited size followed by lowercase or uppercase L eg: 87032845L | Real numbers with both integer and fractional part eg: -26.2 | In the form of a+bj where a forms the real part and b forms the imaginary part of complex number. eg: 3.14j |
III. Boolean literals:
A Boolean literal can have any of the two values: True or False.
IV. Special literals.
Python contains one special literal i.e., None.
None is used to specify to that field that is not created. It is also used for end of lists in Python.
Eg:
>>> val1=10
>>> val2=None
>>> val1
10
>>> val2
>>> print val2
None
>>>
V.Literal Collections.
Collections such as tuples, lists and Dictionary are used in Python.
List:
List contain items of different data types. Lists are mutable i.e., modifiable.
The values stored in List are separated by commas(,) and enclosed within a square brackets([]). We can store different type of data in a List.
Value stored in a List can be retrieved using the slice operator([] and [:]).
The plus sign (+) is the list concatenation and asterisk(*) is the repetition operator.
Eg:
>>> list=['aman',678,20.4,'saurav']
>>> list1=[456,'rahul']
>>> list
['aman', 678, 20.4, 'saurav']
>>> list[1:3]
[678, 20.4]
>>> list+list1
['aman', 678, 20.4, 'saurav', 456, 'rahul']
>>> list1*2
[456, 'rahul', 456, 'rahul']
>>>
Python Operators
Operators are particular symbols that are used to perform operations on operands. It returns result that can be used in application.
Example
4 + 5 = 9
Here 4 and 5 are Operands and (+) , (=) signs are the operators. This expression produces the output 9.
Types of Operators
Python supports the following operators
Arithmetic Operators.
Relational Operators.
Assignment Operators.
Logical Operators.
Membership Operators.
Identity Operators.
Bitwise Operators.
Arithmetic Operators
The following table contains the arithmetic operators that are used to perform arithmetic operations.
Operators | Description |
// | Perform Floor division(gives integer value after division) |
+ | To perform addition |
- | To perform subtraction |
* | To perform multiplication |
/ | To perform division |
% | To return remainder after division(Modulus) |
** | Perform exponent(raise to power) |
Example
>>> 10+20
30
>>> 20-10
10
>>> 10*2
20
>>> 10/2
5
>>> 10%3
1
>>> 2**3
8
>>> 10//3
3
>>>
Relational Operators
The following table contains the relational operators that are used to check relations.
Operators | Description |
< | Less than |
> | Greater than |
<= | Less than or equal to |
>= | Greater than or equal to |
== | Equal to |
!= | Not equal to |
<> | Not equal to(similar to !=) |
eg:
>>> 10<20
True
>>> 10>20
False
>>> 10<=10
True
>>> 20>=15
True
>>> 5==6
False
>>> 5!=6
True
>>> 10<>2
True
>>>
Assignment Operators
The following table contains the assignment operators that are used to assign values to the variables.
Operators | Description |
= | Assignment |
/= | Divide and Assign |
+= | Add and assign |
-= | Subtract and Assign |
*= | Multiply and assign |
%= | Modulus and assign |
**= | Exponent and assign |
//= | Floor division and assign |
Example
>>> c=10
>>> c
10
>>> c+=5
>>> c
15
>>> c-=5
>>> c
10
>>> c*=2
>>> c
20
>>> c/=2
>>> c
10
>>> c%=3
>>> c
1
>>> c=5
>>> c**=2
>>> c
25
>>> c//=2
>>> c
12
>>>
Logical Operators
The following table contains the arithmetic operators that are used to perform arithmetic operations.
Operators | Description |
and | Logical AND(When both conditions are true output will be true) |
or | Logical OR (If any one condition is true output will be true) |
not | Logical NOT(Compliment the condition i.e., reverse) |
Example
a=5>4 and 3>2
print a
b=5>4 or 3<2
print b
c=not(5>4)
print c
Output:
>>>
True
True
False
>>>
Membership Operators
The following table contains the membership operators.
Operators | Description |
in | Returns true if a variable is in sequence of another variable, else false. |
not in | Returns true if a variable is not in sequence of another variable, else false. |
Example
a=10
b=20
list=[10,20,30,40,50];
if (a in list):
print "a is in given list"
else:
print "a is not in given list"
if(b not in list):
print "b is not given in list"
else:
print "b is given in list"
Output:
>>>
a is in given list
b is given in list
>>>
Identity Operators
The following table contains the identity operators.
Operators | Description |
is | Returns true if identity of two operands are same, else false |
is not | Returns true if identity of two operands are not same, else false. |
Example
a=20
b=20
if( a is b):
print a,b have same identity
else:
print a, b are different
b=10
if( a is not b):
print a,b have different identity
else:
print a,b have same identity
Output
>>>
a,b have same identity
a,b have different identity
>>>
Python Comments
Python supports two types of comments:
1) Single lined comment:
In case user wants to specify a single line comment, then comment must start with ?#?
Eg:
# This is single line comment.
2) Multi lined Comment:
Multi lined comment can be given inside triple quotes.
eg:
''''' This
Is
Multipline comment'''
eg:
#single line comment
print "Hello Python"
'''''This is
multiline comment'''
Python If Statements
The Python if statement is a statement which is used to test specified condition. We can use if statement to perform conditional operations in our Python application.
The if statement executes only when specified condition is true. We can pass any valid expression into the if parentheses.
There are various types of if statements in Python.
if statement
if-else statement
nested if statement
Python If Statement Syntax
if(condition):
statements
Python If statement flow chart
Python If Statement Example
a=10
if a==10:
print "Welcome to javatpoint"
Output:
Hello User
Python If Else Statements
The If statement is used to test specified condition and if the condition is true, if block executes, otherwise else block executes.
The else statement executes when the if statement is false.
Python If Else Syntax
if(condition): False
statements
else: True
statements
Example-
year=2000
if year%4==0:
print "Year is Leap"
else:
print "Year is not Leap"
Output:
Year is Leap
Python Nested If Else Statement
In python, we can use nested If Else to check multiple conditions. Python provides elif keyword to make nested If statement.
This statement is like executing a if statement inside a else statement.
Python Nested If Else Syntax
If statement:
Body
elif statement:
Body
else:
Body
Python Nested If Else Example
a=10
if a>=20:
print "Condition is True"
else:
if a>=15:
print "Checking second value"
else:
print "All Conditions are false"
Output:
All Conditions are false.
For Loop
Python for loop is used to iterate the elements of a collection in the order that they appear. This collection can be a sequence(list or string).
Python For Loop Syntax
for <variable> in <sequence>:
Output:
1
7
9
Explanation:
Firstly, the first value will be assigned in the variable.
Secondly all the statements in the body of the loop are executed with the same value.
Thirdly, once step second is completed then variable is assigned the next value in the sequence and step second is repeated.
Finally, it continues till all the values in the sequence are assigned in the variable and processed.
Python For Loop Simple Example
num=2
for a in range (1,6):
print num * a
Output:
2
4
6
8
10
Python Example to Find Sum of 10 Numbers
sum=0
for n in range(1,11):
sum+=n
print sum
Output:
55
Python Nested For Loops
Loops defined within another Loop are called Nested Loops. Nested loops are used to iterate matrix elements or to perform complex computation.
When an outer loop contains an inner loop in its body it is called Nested Looping.
Python Nested For Loop Syntax
for <expression>:
for <expression>:
Body
Python Nested For Loop Example
for i in range(1,6):
for j in range (1,i+1):
print i,
print
Output:
>>>
1
2 2
3 3 3
4 4 4 4
5 5 5 5 5
>>>
Explanation:
For each value of Outer loop the whole inner loop is executed.
For each value of inner loop the Body is executed each time.
Python Nested Loop Example 2
for i in range (1,6):
for j in range (5,i-1,-1):
print "*",
print
Output:
>>>
* * * * *
* * * *
* * *
* *
*
Python While Loop
In Python, while loop is used to execute number of statements or body till the specified condition is true. Once the condition is false, the control will come out of the loop.
Python While Loop Syntax
while <expression>:
Body
Here, loop Body will execute till the expression passed is true. The Body may be a single statement or multiple statement.
Python While Loop Example 1
a=10
while a>0:
print "Value of a is",a
a=a-2
print "Loop is Completed"
Output:
>>>
Value of a is 10
Value of a is 8
Value of a is 6
Value of a is 4
Value of a is 2
Loop is Completed
>>>
Explanation:
Firstly, the value in the variable is initialized.
Secondly, the condition/expression in the while is evaluated. Consequently if condition is true, the control enters in the body and executes all the statements . If the condition/expression passed results in false then the control exists the body and straight away control goes to next instruction after body of while.
Thirdly, in case condition was true having completed all the statements, the variable is incremented or decremented. Having changed the value of variable step second is followed. This process continues till the expression/condition becomes false.
Finally Rest of code after body is executed.
Python While Loop Example 2
n=153
sum=0
while n>0:
r=n%10
sum+=r
n=n/10
print sum
Output:
>>>
9
>>>
Python Break
Break statement is a jump statement which is used to transfer execution control. It breaks the current execution and in case of inner loop, inner loop terminates immediately.
When break statement is applied the control points to the line following the body of the loop, hence applying break statement makes the loop to terminate and controls goes to next line pointing after loop body.
Python Break Example 1
for i in [1,2,3,4,5]:
if i==4:
print "Element found"
break
print i,
Output:
>>>
1 2 3 Element found
>>>
Python Break Example 2
for letter in 'Python3':
if letter == 'o':
break
print (letter)
Output:
P
y
t
h
Python Continue Statement
Python Continue Statement is a jump statement which is used to skip execution of current iteration. After skipping, loop continue with next iteration.
We can use continue statement with for as well as while loop in Python.
Python Continue Statement Example
a=0
while a<=5:
a=a+1
if a%2==0:
continue
print a
print "End of Loop"
Output:
>>>
1
3
5
End of Loop
>>>
Python Continue Statement Flow chart
Python Pass
In Python, pass keyword is used to execute nothing; it means, when we don't want to execute code, the pass can be used to execute empty. It is same as the name refers to. It just makes the control to pass by without executing any code. If we want to bypass any code pass statement can be used.
Python Pass Syntax
pass
Python Pass Example
for i in [1,2,3,4,5]:
if i==3:
pass
print "Pass when value is",i
print i,
Output:
>>>
1 2 Pass when value is 3
3 4 5
>>>
Python OOPs Concepts
Python is an object-oriented programming language. You can easily create and use classes and objects in Python.
Major principles of object-oriented programming system are given below:
Object
Class
Method
Inheritance
Polymorphism
Data Abstraction
Encapsulation
Object
Object is an entity that has state and behavior. It may be anything. It may be physical and logical. For example: mouse, keyboard, chair, table, pen etc.
Everything in Python is an object, and almost everything has attributes and methods. All functions have a built-in attribute __doc__, which returns the doc string defined in the function source code.
Class
Class can be defined as a collection of objects. It is a logical entity that has some specific attributes and methods. For example: if you have an employee class then it should contain an attribute and method i.e. an email id, name, age, salary etc.
Syntax:
class ClassName:
<statement-1>
.
.
.
<statement-N>
Method
Method is a function that is associated with an object. In Python, method is not unique to class instances. Any object type can have methods.
Inheritance
Inheritance is a feature of object-oriented programming. It specifies that one object acquires all the properties and behaviors of parent object. By using inheritance you can define a new class with a little or no changes to the existing class. The new class is known as derived class or child class and from which it inherits the properties is called base class or parent class.
It provides re-usability of the code.
Polymorphism
Polymorphism is made by two words "poly" and "morphs". Poly means many and Morphs means form, shape. It defines that one task can be performed in different ways. For example: You have a class animal and all animals talk. But they talk differently. Here, the "talk" behavior is polymorphic in the sense and totally depends on the animal. So, the abstract "animal" concept does not actually "talk", but specific animals (like dogs and cats) have a concrete implementation of the action "talk".
Encapsulation
Encapsulation is also the feature of object-oriented programming. It is used to restrict access to methods and variables. In encapsulation, code and data are wrapped together within a single unit from being modified by accident.
Data Abstraction
Data abstraction and encapsulation both are often used as synonyms. Both are nearly synonym because data abstraction is achieved through encapsulation.
Abstraction is used to hide internal details and show only functionalities. Abstracting something means to give names to things, so that the name captures the core of what a function or a whole program does.
Object-oriented vs Procedure-oriented Programming languages
Index | Object-oriented Programming | Procedural Programming |
1. | Object-oriented programming is an approach to problem solving where computation is done by using objects. | Procedural programming uses a list of instructions to do computation step by step. |
2. | It makes development and maintenance easier. | In procedural programming, It is not easy to maintain the codes when project becomes lengthy. |
3. | It simulates the real world entity. So real world problems can be easily solved through oops. | It doesn't simulate the real world. It works on step by step instructions divided in small parts called functions. |
4. | It provides data hiding. so it is more secure than procedural languages. You cannot access private data from anywhere. | Procedural language doesn't provide any proper way for data binding so it is less secure. |
5. | Example of object-oriented programming languages are: C++, Java, .Net, Python, C# etc. | Example of procedural languages are: C, Fortran, Pascal, VB etc. |
Python Object
Python is an object oriented programming language. So its main focus is on objects unlike procedure oriented programming languages which mainly focuses on functions.
In object oriented programming language, object is simply a collection of data (variables) and methods (functions) that act on those data.
Python Class
A class is a blueprint for the object. Let's understand it by an example:
Suppose a class is a prototype of a building. A building contains all the details about the floor, doors, windows, etc. we can make another buildings (as many as we want) based on these details. So building is a class and we can create many objects from a class.
An object is also called an instance of a class and the process of creating this object is known as instantiation.
Python classes contain all the standard features of Object Oriented Programming. A python class is a mixture of class mechanism of C++ and Modula-3.
Define a class in Python
In Python, a class is defined by using a keyword class like a function definition begins with the keyword def.
Syntax of a class definition:
class ClassName:
<statement-1>
.
.
.
<statement-N>
A class creates a new local namespace to define its all attribute. These attributes may be data or functions.
See this example:
There are also some special attributes that begins with double underscore (__). For example: __doc__ attribute. It is used to fetch the docstring of that class. When we define a class, a new class object is created with the same class name. This new class object provides a facility to access the different attributes as well as to instantiate new objects of that class.
See this example:
Create an Object in Python
We can create new object instances of the classes. The procedure to create an object is similar to a function call.
Let's take an example to create a new instance object "ob". We can access attributes of objects by using the object name prefix.
See this example:
Here, attributes may be data or method. Method of an object is corresponding functions of that class. For example: MyClass.func is a function object and ob.func is a method object.
Python Object Class Example
class Student:
def __init__(self, rollno, name):
self.rollno = rollno
self.name = name
def displayStudent(self):
print "rollno : ", self.rollno, ", name: ", self.name
emp1 = Student(121, "Ajeet")
emp2 = Student(122, "Sonoo")
emp1.displayStudent()
emp2.displayStudent()
Output:
rollno : 121 , name: Ajeet
rollno : 122 , name: Sonoo
Python Constructors
A constructor is a special type of method (function) that is called when it instantiates an object using the definition found in your class. The constructors are normally used to initialize (assign values) to the instance variables. Constructors also verify that there are enough resources for the object to perform any start-up task.
Creating a constructor:
A constructor is a class function that begins with double underscore (_). The name of the constructor is always the same __init__().
While creating an object, a constructor can accept arguments if necessary. When you create a class without a constructor, Python automatically creates a default constructor that doesn't do anything.
Every class must have a constructor, even if it simply relies on the default constructor.
Let's take an example:
Let's create a class named ComplexNumber, having two functions __init__() function to initialize the variable and getData() to display the number properly.
See this example:
You can create a new attribute for an object and read it well at the time of defining the values. But you can't create the attribute for already defined objects.
See this example:
Inheritance in Python
What is Inheritance
Inheritance is used to specify that one class will get most or all of its features from its parent class. It is a feature of Object Oriented Programming. It is a very powerful feature which facilitates users to create a new class with a few or more modification to an existing class. The new class is called child class or derived class and the main class from which it inherits the properties is called base class or parent class.
The child class or derived class inherits the features from the parent class, adding new features to it. It facilitates re-usability of code.
Image representation:
Syntax 1:
class DerivedClassName(BaseClassName):
<statement-1>
.
.
.
<statement-N>
Syntax 2:
class DerivedClassName(modulename.BaseClassName):
<statement-1>
.
.
.
<statement-N>
Parameter explanation:
The name BaseClassName must be defined in a scope containing the derived class definition. You can also use other arbitrary expressions in place of a base class name. This is used when the base class is defined in another module.
Python Inheritance Example
Let's see a simple python inheritance example where we are using two classes: Animal and Dog. Animal is the parent or base class and Dog is the child class.
Here, we are defining eat() method in Animal class and bark() method in Dog class. In this example, we are creating instance of Dog class and calling eat() and bark() methods by the instance of child class only. Since, parent properties and behaviors are inherited to child object automatically, we can call parent and child class methods by the child instance only.
class Animal:
def eat(self):
print 'Eating...'
class Dog(Animal):
def bark(self):
print 'Barking...'
d=Dog()
d.eat()
d.bark()
Output:
Eating...
Barking...
Multilevel Inheritance in Python
Multilevel inheritance is also possible in Python unlike other programming languages. You can inherit a derived class from another derived class. This is known as multilevel inheritance. In Python, multilevel inheritance can be done at any depth.
Image representation:
Python Multilevel Inheritance Example
class Animal:
def eat(self):
print 'Eating...'
class Dog(Animal):
def bark(self):
print 'Barking...'
class BabyDog(Dog):
def weep(self):
print 'Weeping...'
d=BabyDog()
d.eat()
d.bark()
d.weep()
Output:
Eating...
Barking...
Weeping
Multiple Inheritance in Python
Python supports multiple inheritance also. You can derive a child class from more than one base (parent) class.
Image representation:
The multiderived class inherits the properties of both class base1 and base2.
Let's see the syntax of multiple inheritance in Python.
Syntax:
class DerivedClassName(Base1, Base2, Base3):
<statement-1>
.
.
.
<statement-N>
Or
class Base1:
pass
class Base2:
pass
class MultiDerived(Base1, Base2):
pass
Example:
class First(object):
def __init__(self):
super(First, self).__init__()
print("first")
class Second(object):
def __init__(self):
super(Second, self).__init__()
print("second")
class Third(Second, First):
def __init__(self):
super(Third, self).__init__()
print("third")
Third();
Output:
first
second
third
Why super () keyword
The most commonly super() is used with __init__ function in base classes. This is usually the only place where you need to do some things in a child then complete the initialization in the parent.
See this example:
class Child(Parent):
def __init__(self, stuff):
self.stuff = stuff
super(Child, self).__init__()
Composition in Python
Composition is used to do the same thing which can be done by inheritance.
PYTHON STRINGS
Strings are the simplest and easy to use in Python.
String pythons are immutable.
We can simply create Python String by enclosing a text in single as well as double quotes. Python treat both single and double quotes statements same.
Accessing Strings:
In Python, Strings are stored as individual characters in a contiguous memory location.
The benefit of using String is that it can be accessed from both the directions in forward and backward.
Both forward as well as backward indexing are provided using Strings in Python.
Forward indexing starts with 0,1,2,3,....
Backward indexing starts with -1,-2,-3,-4,....
eg:
str[0]='P'=str[-6] , str[1]='Y' = str[-5] , str[2] = 'T' = str[-4] , str[3] = 'H' = str[-3]
str[4] = 'O' = str[-2] , str[5] = 'N' = str[-1].
Simple program to retrieve String in reverse as well as normal form.
name="Rajat"
length=len(name)
i=0
for n in range(-1,(-length-1),-1):
print name[i],"\t",name[n]
i+=1
Output:
>>>
R t
a a
j j
a a
t R
>>>
Strings Operators
There are basically 3 types of Operators supported by String:
Basic Operators.
Membership Operators.
Relational Operators.
Basic Operators:
There are two types of basic operators in String. They are "+" and "*".
String Concatenation Operator :(+)
The concatenation operator (+) concatenate two Strings and forms a new String.
eg:
>>> "ratan" + "jaiswal"
Output:
'ratanjaiswal'
>>>
Expression | Output |
'10' + '20' | '1020' |
"s" + "007" | 's007' |
'abcd123' + 'xyz4' | 'abcd123xyz4' |
NOTE: Both the operands passed for concatenation must be of same type, else it will show an error.
Eg:
'abc' + 3
>>>
output:
Traceback (most recent call last):
File "", line 1, in
'abc' + 3
TypeError: cannot concatenate 'str' and 'int' objects
>>>
Replication Operator: (*)
Replication operator uses two parameter for operation. One is the integer value and the other one is the String.
The Replication operator is used to repeat a string number of times. The string will be repeated the number of times which is given by the integer value.
Eg:
>>> 5*"Vimal"
Output:
'VimalVimalVimalVimalVimal'
Expression | Output |
"soono"*2 | 'soonosoono' |
3*'1' | '111' |
'$'*5 | '$$$$$' |
NOTE: We can use Replication operator in any way i.e., int * string or string * int. Both the parameters passed cannot be of same type.
Membership Operators
Membership Operators are already discussed in the Operators section. Let see with context of String.
There are two types of Membership operators:
1) in:"in" operator return true if a character or the entire substring is present in the specified string, otherwise false.
2) not in:"not in" operator return true if a character or entire substring does not exist in the specified string, otherwise false.
Eg:
>>> str1="javatpoint"
>>> str2='sssit'
>>> str3="seomount"
>>> str4='java'
>>> st5="it"
>>> str6="seo"
>>> str4 in str1
True
>>> str5 in str2
>>> st5 in str2
True
>>> str6 in str3
True
>>> str4 not in str1
False
>>> str1 not in str4
True
Relational Operators:
All the comparison operators i.e., (<,><=,>=,==,!=,<>) are also applicable to strings. The Strings are compared based on the ASCII value or Unicode(i.e., dictionary Order).
Eg:
>>> "RAJAT"=="RAJAT"
True
>>> "afsha">='Afsha'
True
>>> "Z"<>"z"
True
Explanation:
The ASCII value of a is 97, b is 98, c is 99 and so on. The ASCII value of A is 65,B is 66,C is 67 and so on. The comparison between strings are done on the basis on ASCII value.
Slice Notation:
String slice can be defined as substring which is the part of string. Therefore further substring can be obtained from a string.
There can be many forms to slice a string. As string can be accessed or indexed from both the direction and hence string can also be sliced from both the direction that is left and right.
Syntax:
<string_name>[startIndex:endIndex],
<string_name>[:endIndex],
<string_name>[startIndex:]
Example:
>>> str="Nikhil"
>>> str[0:6]
'Nikhil'
>>> str[0:3]
'Nik'
>>> str[2:5]
'khi'
>>> str[:6]
'Nikhil'
>>> str[3:]
'hil'
Note: startIndex in String slice is inclusive whereas endIndex is exclusive.
String slice can also be used with Concatenation operator to get whole string.
Eg:
>>> str="Mahesh"
>>> str[:6]+str[6:]
'Mahesh'
//here 6 is the length of the string.
String Functions and Methods:
There are many predefined or built in functions in String. They are as follows:
capitalize() | It capitalizes the first character of the String. |
count(string,begin,end) | Counts number of times substring occurs in a String between begin and end index. |
endswith(suffix ,begin=0,end=n) | Returns a Boolean value if the string terminates with given suffix between begin and end. |
find(substring ,beginIndex, endIndex) | It returns the index value of the string where substring is found between begin index and end index. |
index(subsring, beginIndex, endIndex) | Same as find() except it raises an exception if string is not found. |
isalnum() | It returns True if characters in the string are alphanumeric i.e., alphabets or numbers and there is at least 1 character. Otherwise it returns False. |
isalpha() | It returns True when all the characters are alphabets and there is at least one character, otherwise False. |
isdigit() | It returns True if all the characters are digit and there is at least one character, otherwise False. |
islower() | It returns True if the characters of a string are in lower case, otherwise False. |
isupper() | It returns False if characters of a string are in Upper case, otherwise False. |
isspace() | It returns True if the characters of a string are whitespace, otherwise false. |
len(string) | len() returns the length of a string. |
lower() | Converts all the characters of a string to Lower case. |
upper() | Converts all the characters of a string to Upper Case. |
startswith(str ,begin=0,end=n) | Returns a Boolean value if the string starts with given str between begin and end. |
swapcase() | Inverts case of all characters in a string. |
lstrip() | Remove all leading whitespace of a string. It can also be used to remove particular character from leading. |
rstrip() | Remove all trailing whitespace of a string. It can also be used to remove particular character from trailing. |
Examples:
1) capitalize()
>>> 'abc'.capitalize()
Output:
'Abc'
2) count(string)
msg = "welcome to sssit";
substr1 = "o";
print msg.count(substr1, 4, 16)
substr2 = "t";
print msg.count(substr2)
Output:
>>>
2
2
>>>
3) endswith(string)
string1="Welcome to SSSIT";
substring1="SSSIT";
substring2="to";
substring3="of";
print string1.endswith(substring1);
print string1.endswith(substring2,2,16);
print string1.endswith(substring3,2,19);
print string1.endswith(substring3);
Output:
>>>
True
False
False
False
>>>
4) find(string)
str="Welcome to SSSIT";
substr1="come";
substr2="to";
print str.find(substr1);
print str.find(substr2);
print str.find(substr1,3,10);
print str.find(substr2,19);
Output:
>>>
3
8
3
-1
>>>
5) index(string)
str="Welcome to world of SSSIT";
substr1="come";
substr2="of";
print str.index(substr1);
print str.index(substr2);
print str.index(substr1,3,10);
print str.index(substr2,19);
Output:
>>>
3
17
3
Traceback (most recent call last):
File "C:/Python27/fin.py", line 7, in
print str.index(substr2,19);
ValueError: substring not found
>>>
6) isalnum()
str="Welcome to sssit";
print str.isalnum();
str1="Python47";
print str1.isalnum();
Output:
>>>
False
True
>>>
7) isalpha()
string1="HelloPython"; # Even space is not allowed
print string1.isalpha();
string2="This is Python2.7.4"
print string2.isalpha();
Output:
>>>
True
False
>>>
8) isdigit()
string1="HelloPython";
print string1.isdigit();
string2="98564738"
print string2.isdigit();
Output:
>>>
False
True
>>>
9) islower()
string1="Hello Python";
print string1.islower();
string2="welcome to "
print string2.islower();
Output:
>>>
False
True
>>>
10) isupper()
string1="Hello Python";
print string1.isupper();
string2="WELCOME TO"
print string2.isupper();
Output:
>>>
False
True
>>>
11) isspace()
string1=" ";
print string1.isspace();
string2="WELCOME TO WORLD OF PYT"
print string2.isspace();
Output:
>>>
True
False
>>>
12) len(string)
string1=" ";
print len(string1);
string2="WELCOME TO SSSIT"
print len(string2);
Output:
>>>
4
16
>>>
13) lower()
string1="Hello Python";
print string1.lower();
string2="WELCOME TO SSSIT"
print string2.lower();
Output:
>>>
hello python
welcome to sssit
>>>
14) upper()
string1="Hello Python";
print string1.upper();
string2="welcome to SSSIT"
print string2.upper();
Output:
>>>
HELLO PYTHON
WELCOME TO SSSIT
>>>
15) startswith(string)
string1="Hello Python";
print string1.startswith('Hello');
string2="welcome to SSSIT"
print string2.startswith('come',3,7);
Output:
>>>
True
True
>>>
16) swapcase()
string1="Hello Python";
print string1.swapcase();
string2="welcome to SSSIT"
print string2.swapcase();
Output:
>>>
hELLO pYTHON
WELCOME TO sssit
>>>
17) lstrip()
string1=" Hello Python";
print string1.lstrip();
string2="@@@@@@@@welcome to SSSIT"
print string2.lstrip('@');
Output:
>>>
Hello Python
welcome to world to SSSIT
>>>
18) rstrip()
string1=" Hello Python ";
print string1.rstrip();
string2="@welcome to SSSIT!!!"
print string2.rstrip('!');
Output:
>>>
Hello Python
@welcome to SSSIT
>>>
Python List
1).Python lists are the data structure that is capable of holding different type of data.
2).Python lists are mutable i.e., Python will not create a new list if we modify an element in the list.
3).It is a container that holds other objects in a given order. Different operation like insertion and deletion can be performed on lists.
4).A list can be composed by storing a sequence of different type of values separated by commas.
5).A python list is enclosed between square([]) brackets.
6).The elements are stored in the index basis with starting index as 0.
eg:
data1=[1,2,3,4];
data2=['x','y','z'];
data3=[12.5,11.6];
data4=['raman','rahul'];
data5=[];
data6=['abhinav',10,56.4,'a'];
Accessing Lists
A list can be created by putting the value inside the square bracket and separated by comma.
Syntax:
<list_name>=[value1,value2,value3,...,valuen];
For accessing list :
<list_name>[index]
Different ways to access list:
Eg:
data1=[1,2,3,4];
data2=['x','y','z'];
print data1[0]
print data1[0:2]
print data2[-3:-1]
print data1[0:]
print data2[:2]
Output:
>>>
>>>
1
[1, 2]
['x', 'y']
[1, 2, 3, 4]
['x', 'y']
>>>
Elements in a Lists:
Data=[1,2,3,4,5];
Data[0]=1=Data[-5] , Data[1]=2=Data[-4] , Data[2]=3=Data[-3] ,
=4=Data[-2] , Data[4]=5=Data[-1].
Note: Internal Memory Organization:
List do not store the elements directly at the index. In fact a reference is stored at each index which subsequently refers to the object stored somewhere in the memory. This is due to the fact that some objects may be large enough than other objects and hence they are stored at some other memory location.
List Operations:
Various Operations can be performed on List. Operations performed on List are given as:
a) Adding Lists:
Lists can be added by using the concatenation operator(+) to join two lists.
Eg:
list1=[10,20]
list2=[30,40]
list3=list1+list2
print list3
Output:
>>>
[10, 20, 30, 40]
>>>
Note: '+'operator implies that both the operands passed must be list else error will be shown.
Eg:
list1=[10,20]
list1+30
print list1
Output:
Traceback (most recent call last):
File "C:/Python27/lis.py", line 2, in <module>
list1+30
b) Replicating lists:
Replicating means repeating . It can be performed by using '*' operator by a specific number of time.
Eg:
list1=[10,20]
print list1*1
Output:
>>>
[10, 20]
>>>
c) List slicing:
A subpart of a list can be retrieved on the basis of index. This subpart is known as list slice.
Eg:
list1=[1,2,4,5,7]
print list1[0:2]
print list1[4]
list1[1]=9
print list1
Output:
>>>
[1, 2]
7
[1, 9, 4, 5, 7]
>>>
Note: If the index provided in the list slice is outside the list, then it raises an IndexError exception.
Other Operations:
Apart from above operations various other functions can also be performed on List such as Updating, Appending and Deleting elements from a List:
a) Updating elements in a List:
To update or change the value of particular index of a list, assign the value to that particular index of the List.
Syntax:
<list_name>[index]=<value>
Eg:
data1=[5,10,15,20,25]
print "Values of list are: "
print data1
data1[2]="Multiple of 5"
print "Values of list are: "
print data1
Output:
>>>
Values of list are:
[5, 10, 15, 20, 25]
Values of list are:
[5, 10, 'Multiple of 5', 20, 25]
>>>
b) Appending elements to a List:
append() method is used to append i.e., add an element at the end of the existing elements.
Syntax:
<list_name>.append(item)
Eg:
list1=[10,"rahul",'z']
print "Elements of List are: "
print list1
list1.append(10.45)
print "List after appending: "
print list1
Output:
>>>
Elements of List are:
[10, 'rahul', 'z']
List after appending:
[10, 'rahul', 'z', 10.45]
>>>
c) Deleting Elements from a List:
del statement can be used to delete an element from the list. It can also be used to delete all items from startIndex to endIndex.
Eg:
list1=[10,'rahul',50.8,'a',20,30]
print list1
del list1[0]
print list1
del list1[0:3]
print list1
Output:
>>>
[10, 'rahul', 50.8, 'a', 20, 30]
['rahul', 50.8, 'a', 20, 30]
[20, 30]
>>>
Functions and Methods of Lists:
There are many Built-in functions and methods for Lists. They are as follows:
There are following List functions:
Function | Description |
min(list) | Returns the minimum value from the list given. |
max(list) | Returns the largest value from the given list. |
len(list) | Returns number of elements in a list. |
cmp(list1,list2) | Compares the two list. |
list(sequence) | Takes sequence types and converts them to lists. |
1) min(list):
Eg:
list1=[101,981,'abcd','xyz','m']
list2=['aman','shekhar',100.45,98.2]
print "Minimum value in List1: ",min(list1)
print "Minimum value in List2: ",min(list2)
Output:
>>>
Minimum value in List1: 101
Minimum value in List2: 98.2
>>>
2) max(list):
Eg:
list1=[101,981,'abcd','xyz','m']
list2=['aman','shekhar',100.45,98.2]
print "Maximum value in List : ",max(list1)
print "Maximum value in List : ",max(list2)
Output:
>>>
Maximum value in List : xyz
Maximum value in List : shekhar
>>>
3) len(list):
Eg:
list1=[101,981,'abcd','xyz','m']
list2=['aman','shekhar',100.45,98.2]
print "No. of elements in List1: ",len(list1)
print "No. of elements in List2: ",len(list2)
Output:
>>>
No. of elements in List1 : 5
No. of elements in List2 : 4
>>>
4) cmp(list1,list2):
Explanation: If elements are of the same type, perform the comparison and return the result. If elements are different types, check whether they are numbers.
If numbers, perform comparison.
If either element is a number, then the other element is returned.
Otherwise, types are sorted alphabetically .
If we reached the end of one of the lists, the longer list is "larger." If both list are same it returns 0.
Eg:
list1=[101,981,'abcd','xyz','m']
list2=['aman','shekhar',100.45,98.2]
list3=[101,981,'abcd','xyz','m']
print cmp(list1,list2)
print cmp(list2,list1)
print cmp(list3,list1)
Output:
>>>
-1
1
0
>>>
5) list(sequence):
Eg:
seq=(145,"abcd",'a')
data=list(seq)
print "List formed is : ",data
Output:
>>>
List formed is : [145, 'abcd', 'a']
>>>
There are following built-in methods of List:
Methods | Description |
index(object) | Returns the index value of the object. |
count(object) | It returns the number of times an object is repeated in list. |
pop()/pop(index) | Returns the last object or the specified indexed object. It removes the popped object. |
insert(index,object) | Insert an object at the given index. |
extend(sequence) | It adds the sequence to existing list. |
remove(object) | It removes the object from the given List. |
reverse() | Reverse the position of all the elements of a list. |
sort() | It is used to sort the elements of the List. |
1) index(object):
Eg:
data = [786,'abc','a',123.5]
print "Index of 123.5:", data.index(123.5)
print "Index of a is", data.index('a')
Output:
>>>
Index of 123.5 : 3
Index of a is 2
>>>
2) count(object):
Eg:
data = [786,'abc','a',123.5,786,'rahul','b',786]
print "Number of times 123.5 occured is", data.count(123.5)
print "Number of times 786 occured is", data.count(786)
Output:
>>>
Number of times 123.5 occured is 1
Number of times 786 occured is 3
>>>
3) pop()/pop(int):
Eg:
data = [786,'abc','a',123.5,786]
print "Last element is", data.pop()
print "2nd position element:", data.pop(1)
print data
Output:
>>>
Last element is 786
2nd position element:abc
[786, 'a', 123.5]
>>>
4) insert(index,object):
Eg:
data=['abc',123,10.5,'a']
data.insert(2,'hello')
print data
Output:
>>>
['abc', 123, 'hello', 10.5, 'a']
>>>
5) extend(sequence):
Eg:
data1=['abc',123,10.5,'a']
data2=['ram',541]
data1.extend(data2)
print data1
print data2
Output:
>>>
['abc', 123, 10.5, 'a', 'ram', 541]
['ram', 541]
>>>
6) remove(object):
Eg:
data1=['abc',123,10.5,'a','xyz']
data2=['ram',541]
print data1
data1.remove('xyz')
print data1
print data2
data2.remove('ram')
print data2
Output:
>>>
['abc', 123, 10.5, 'a', 'xyz']
['abc', 123, 10.5, 'a']
['ram', 541]
[541]
>>>
7) reverse():
Eg:
list1=[10,20,30,40,50]
list1.reverse()
print list1
Output:
>>>
[50, 40, 30, 20, 10]
>>>
8) sort():
Eg:
list1=[10,50,13,'rahul','aakash']
list1.sort()
print list1
Output:
>>>
[10, 13, 50, 'aakash', 'rahul']
>>>
Python Tuple
A tuple is a sequence of immutable objects, therefore tuple cannot be changed.
The objects are enclosed within parenthesis and separated by comma.
Tuple is similar to list. Only the difference is that list is enclosed between square bracket, tuple between parenthesis and List have mutable objects whereas Tuple have immutable objects.
eg:
>>> data=(10,20,'ram',56.8)
>>> data2="a",10,20.9
>>> data
(10, 20, 'ram', 56.8)
>>> data2
('a', 10, 20.9)
>>>
NOTE: If Parenthesis is not given with a sequence, it is by default treated as Tuple.
There can be an empty Tuple also which contains no object.
eg:
tuple1=()
For a single valued tuple, there must be a comma at the end of the value.
eg:
Tuple1=(10,)
Tuples can also be nested.
eg:
tupl1='a','mahesh',10.56
tupl2=tupl1,(10,20,30)
print tupl1
print tupl2
Output:
>>>
('a', 'mahesh', 10.56)
(('a', 'mahesh', 10.56), (10, 20, 30))
>>>
Accessing Tuple
Tuple can be accessed in the same way as List.
Some examples are given below:
eg:
data1=(1,2,3,4)
data2=('x','y','z')
print data1[0]
print data1[0:2]
print data2[-3:-1]
print data1[0:]
print data2[:2]
Output:
>>>
1
(1, 2)
('x', 'y')
(1, 2, 3, 4)
('x', 'y')
>>>
Elements in a Tuple
Data=(1,2,3,4,5,10,19,17)
Data[0]=1=Data[-8] , Data[1]=2=Data[-7] , Data[2]=3=Data[-6] ,
Data[3]=4=Data[-5] , Data[4]=5=Data[-4] , Data[5]=10=Data[-3],
Data[6]=19=Data[-2],Data[7]=17=Data[-1]
Tuple Operations
Various Operations can be performed on Tuple. Operations performed on Tuple are given as:
a) Adding Tuple:
Tuple can be added by using the concatenation operator(+) to join two tuples.
eg:
data1=(1,2,3,4)
data2=('x','y','z')
data3=data1+data2
print data1
print data2
print data3
Output:
>>>
(1, 2, 3, 4)
('x', 'y', 'z')
(1, 2, 3, 4, 'x', 'y', 'z')
>>>
Note: The new sequence formed is a new Tuple.
b) Replicating Tuple:
Replicating means repeating. It can be performed by using '*' operator by a specific number of time.
Eg:
tuple1=(10,20,30);
tuple2=(40,50,60);
print tuple1*2
print tuple2*3
Output:
>>>
(10, 20, 30, 10, 20, 30)
(40, 50, 60, 40, 50, 60, 40, 50, 60)
>>>
c) Tuple slicing:
A subpart of a tuple can be retrieved on the basis of index. This subpart is known as tuple slice.
Eg:
data1=(1,2,4,5,7)
print data1[0:2]
print data1[4]
print data1[:-1]
print data1[-5:]
print data1
Output:
>>>
(1, 2)
7
(1, 2, 4, 5)
(1, 2, 4, 5, 7)
(1, 2, 4, 5, 7)
>>>
Note: If the index provided in the Tuple slice is outside the list, then it raises an IndexError exception.
Other Operations:
a) Updating elements in a List:
Elements of the Tuple cannot be updated. This is due to the fact that Tuples are immutable. Whereas the Tuple can be used to form a new Tuple.
Eg:
data=(10,20,30)
data[0]=100
print data
Output:
>>>
Traceback (most recent call last):
File "C:/Python27/t.py", line 2, in
data[0]=100
TypeError: 'tuple' object does not support item assignment
>>>
Creating a new Tuple from existing:
Eg:
data1=(10,20,30)
data2=(40,50,60)
data3=data1+data2
print data3
Output:
>>>
(10, 20, 30, 40, 50, 60)
>>>
b) Deleting elements from Tuple:
Deleting individual element from a tuple is not supported. However the whole of the tuple can be deleted using the del statement.
Eg:
data=(10,20,'rahul',40.6,'z')
print data
del data #will delete the tuple data
print data #will show an error since tuple data is already deleted
Output:
>>>
(10, 20, 'rahul', 40.6, 'z')
Traceback (most recent call last):
File "C:/Python27/t.py", line 4, in
print data
NameError: name 'data' is not defined
>>>
Functions of Tuple:
There are following in-built Type Functions:
Function | Description |
min(tuple) | Returns the minimum value from a tuple. |
max(tuple) | Returns the maximum value from the tuple. |
len(tuple) | Gives the length of a tuple |
cmp(tuple1,tuple2) | Compares the two Tuples. |
tuple(sequence) | Converts the sequence into tuple. |
1) min(tuple):
Eg:
data=(10,20,'rahul',40.6,'z')
print min(data)
Output:
>>>
10
>>>
2) max(tuple):
Eg:
data=(10,20,'rahul',40.6,'z')
print max(data)
Output:
>>>
z
>>>
3) len(tuple):
Eg:
data=(10,20,'rahul',40.6,'z')
print len(data)
Output:
>>>
5
>>>
4) cmp(tuple1,tuple2):
Explanation:If elements are of the same type, perform the comparison and return the result. If elements are different types, check whether they are numbers.
If numbers, perform comparison.
If either element is a number, then the other element is returned.
Otherwise, types are sorted alphabetically .
If we reached the end of one of the lists, the longer list is "larger." If both list are same it returns 0.
Eg:
data1=(10,20,'rahul',40.6,'z')
data2=(20,30,'sachin',50.2)
print cmp(data1,data2)
print cmp(data2,data1)
data3=(20,30,'sachin',50.2)
print cmp(data2,data3)
Output:
>>>
-1
1
0
>>>
5) tuple(sequence):
Eg:
dat=[10,20,30,40]
data=tuple(dat)
print data
Output:
>>>
(10, 20, 30, 40)
>>>
Why Use Tuple?
Processing of Tuples are faster than Lists.
It makes the data safe as Tuples are immutable and hence cannot be changed.
Tuples are used for String formatting.
Python Dictionary
Dictionary is an unordered set of key and value pair.
It is an container that contains data, enclosed within curly braces.
The pair i.e., key and value is known as item.
The key passed in the item must be unique.
The key and the value is separated by a colon(:). This pair is known as item. Items are separated from each other by a comma(,). Different items are enclosed within a curly brace and this forms Dictionary.
eg:
data={100:'Ravi' ,101:'Vijay' ,102:'Rahul'}
print data
Output:
>>>
{100: 'Ravi', 101: 'Vijay', 102: 'Rahul'}
>>>
Dictionary is mutable i.e., value can be updated.
Key must be unique and immutable. Value is accessed by key. Value can be updated while key cannot be changed.
Dictionary is known as Associative array since the Key works as Index and they are decided by the user.
eg:
plant={}
plant[1]='Ravi'
plant[2]='Manoj'
plant['name']='Hari'
plant[4]='Om'
print plant[2]
print plant['name']
print plant[1]
print plant
Output:
>>>
Manoj
Hari
Ravi
{1: 'Ravi', 2: 'Manoj', 4: 'Om', 'name': 'Hari'}
>>>
Accessing Values
Since Index is not defined, a Dictionaries value can be accessed by their keys.
Syntax:
[key]
Eg:
data1={'Id':100, 'Name':'Suresh', 'Profession':'Developer'}
data2={'Id':101, 'Name':'Ramesh', 'Profession':'Trainer'}
print "Id of 1st employer is",data1['Id']
print "Id of 2nd employer is",data2['Id']
print "Name of 1st employer:",data1['Name']
print "Profession of 2nd employer:",data2['Profession']
Output:
>>>
Id of 1st employer is 100
Id of 2nd employer is 101
Name of 1st employer is Suresh
Profession of 2nd employer is Trainer
>>>
Updation
The item i.e., key-value pair can be updated. Updating means new item can be added. The values can be modified.
Eg:
data1={'Id':100, 'Name':'Suresh', 'Profession':'Developer'}
data2={'Id':101, 'Name':'Ramesh', 'Profession':'Trainer'}
data1['Profession']='Manager'
data2['Salary']=20000
data1['Salary']=15000
print data1
print data2
Output:
>>>
{'Salary': 15000, 'Profession': 'Manager','Id': 100, 'Name': 'Suresh'}
{'Salary': 20000, 'Profession': 'Trainer', 'Id': 101, 'Name': 'Ramesh'}
>>>
Deletion
del statement is used for performing deletion operation.
An item can be deleted from a dictionary using the key.
Syntax:
del [key]
Whole of the dictionary can also be deleted using the del statement.
Eg:
data={100:'Ram', 101:'Suraj', 102:'Alok'}
del data[102]
print data
del data
print data #will show an error since dictionary is deleted.
Output:
>>>
{100: 'Ram', 101: 'Suraj'}
Traceback (most recent call last):
File "C:/Python27/dict.py", line 5, in
print data
NameError: name 'data' is not defined
>>>
Functions and Methods
Python Dictionary supports the following Functions:
Dictionary Functions:
Functions | Description |
len(dictionary) | Gives number of items in a dictionary. |
cmp(dictionary1,dictionary2) | Compares the two dictionaries. |
str(dictionary) | Gives the string representation of a string. |
Dictionary Methods:
Methods | Description |
keys() | Return all the keys element of a dictionary. |
values() | Return all the values element of a dictionary. |
items() | Return all the items(key-value pair) of a dictionary. |
update(dictionary2) | It is used to add items of dictionary2 to first dictionary. |
clear() | It is used to remove all items of a dictionary. It returns an empty dictionary. |
fromkeys(sequence,value1)/ fromkeys(sequence) | It is used to create a new dictionary from the sequence where sequence elements forms the key and all keys share the values ?value1?. In case value1 is not give, it set the values of keys to be none. |
copy() | It returns an ordered copy of the data. |
has_key(key) | It returns a boolean value. True in case if key is present in the dictionary ,else false. |
get(key) | Returns the value of the given key. If key is not present it returns none. |
Functions:
1) len(dictionary):
Eg:
data={100:'Ram', 101:'Suraj', 102:'Alok'}
print data
print len(data)
Output:
>>>
{100: 'Ram', 101: 'Suraj', 102: 'Alok'}
3
>>>
2) cmp(dictionary1,dictionary2):
Explanation:
The comparison is done on the basis of key and value.
If, dictionary1 == dictionary2, returns 0.
dictionary1 < dictionary2, returns -1.
dictionary1 > dictionary2, returns 1.
Eg:
data1={100:'Ram', 101:'Suraj', 102:'Alok'}
data2={103:'abc', 104:'xyz', 105:'mno'}
data3={'Id':10, 'First':'Aman','Second':'Sharma'}
data4={100:'Ram', 101:'Suraj', 102:'Alok'}
print cmp(data1,data2)
print cmp(data1,data4)
print cmp(data3,data2)
Output:
>>>
-1
0
1
>>>
3) str(dictionary):
Eg:
data1={100:'Ram', 101:'Suraj', 102:'Alok'}
print str(data1)
Output:
>>>
{100: 'Ram', 101: 'Suraj', 102: 'Alok'}
>>>
Methods:
1) keys():
Eg:
data1={100:'Ram', 101:'Suraj', 102:'Alok'}
print data1.keys()
Output:
>>>
[100, 101, 102]
>>>
2) values():
Eg:
data1={100:'Ram', 101:'Suraj', 102:'Alok'}
print data1.values()
Output:
>>>
['Ram', 'Suraj', 'Alok']
>>>
3) items():
Eg:
data1={100:'Ram', 101:'Suraj', 102:'Alok'}
print data1.items()
Output:
>>>
[(100, 'Ram'), (101, 'Suraj'), (102, 'Alok')]
>>>
4) update(dictionary2):
Eg:
data1={100:'Ram', 101:'Suraj', 102:'Alok'}
data2={103:'Sanjay'}
data1.update(data2)
print data1
print data2
Output:
>>>
{100: 'Ram', 101: 'Suraj', 102: 'Alok', 103: 'Sanjay'}
{103: 'Sanjay'}
>>>
5) clear():
Eg:
data1={100:'Ram', 101:'Suraj', 102:'Alok'}
print data1
data1.clear()
print data1
Output:
>>>
{100: 'Ram', 101: 'Suraj', 102: 'Alok'}
{}
>>>
6) fromkeys(sequence)/ fromkeys(seq,value):
Eg:
sequence=('Id' , 'Number' , 'Email')
data={}
data1={}
data=data.fromkeys(sequence)
print data
data1=data1.fromkeys(sequence,100)
print data1
Output:
>>>
{'Email': None, 'Id': None, 'Number': None}
{'Email': 100, 'Id': 100, 'Number': 100}
>>>
7) copy():
Eg:
data={'Id':100 , 'Name':'Aakash' , 'Age':23}
data1=data.copy()
print data1
Output:
>>>
{'Age': 23, 'Id': 100, 'Name': 'Aakash'}
>>>
8) has_key(key):
Eg:
data={'Id':100 , 'Name':'Aakash' , 'Age':23}
print data.has_key('Age')
print data.has_key('Email')
Output:
>>>
True
False
>>>
9) get(key):
Eg:
data={'Id':100 , 'Name':'Aakash' , 'Age':23}
print data.get('Age')
print data.get('Email')
Output:
>>>
23
None
>>>
Python Functions
A Function is a self block of code.
A Function can be called as a section of a program that is written once and can be executed whenever required in the program, thus making code reusability.
A Function is a subprogram that works on data and produce some output.
Types of Functions:
There are two types of Functions.
a) Built-in Functions: Functions that are predefined. We have used many predefined functions in Python.
b) User- Defined: Functions that are created according to the requirements.
Defining a Function:
A Function defined in Python should follow the following format:
1) Keyword def is used to start the Function Definition. Def specifies the starting of Function block.
2) def is followed by function-name followed by parenthesis.
3) Parameters are passed inside the parenthesis. At the end a colon is marked.
Syntax:
def <function_name>([parameters]):
</function_name>
eg:
def sum(a,b):
4) Before writing a code, an Indentation (space) is provided before every statement. It should be same for all statements inside the function.
5) The first statement of the function is optional. It is ?Documentation string? of function.
6) Following is the statement to be executed.
Syntax:
Invoking a Function:
To execute a function it needs to be called. This is called function calling.
Function Definition provides the information about function name, parameters and the definition what operation is to be performed. In order to execute the Function Definition it is to be called.
Syntax:
<function_name>(parameters)
</function_name>
eg:
sum(a,b)
here sum is the function and a, b are the parameters passed to the Function Definition.
Let?s have a look over an example:
eg:
#Providing Function Definition
def sum(x,y):
"Going to add x and y"
s=x+y
print "Sum of two numbers is"
print s
#Calling the sum Function
sum(10,20)
sum(20,30)
Output:
>>>
Sum of two numbers is
30
Sum of two numbers is
50
>>>
NOTE: Function call will be executed in the order in which it is called.
return Statement:
return[expression] is used to send back the control to the caller with the expression.
In case no expression is given after return it will return None.
In other words return statement is used to exit the Function definition.
Eg:
def sum(a,b):
"Adding the two values"
print "Printing within Function"
print a+b
return a+b
def msg():
print "Hello"
return
total=sum(10,20)
print ?Printing Outside: ?,total
msg()
print "Rest of code"
Output:
>>>
Printing within Function
30
Printing outside: 30
Hello
Rest of code
>>>
Argument and Parameter:
There can be two types of data passed in the function.
1) The First type of data is the data passed in the function call. This data is called ?arguments?.
2) The second type of data is the data received in the function definition. This data is called ?parameters?.
Arguments can be literals, variables and expressions.
Parameters must be variable to hold incoming values.
Alternatively, arguments can be called as actual parameters or actual arguments and parameters can be called as formal parameters or formal arguments.
Eg:
def addition(x,y):
print x+y
x=15
addition(x ,10)
addition(x,x)
y=20
addition(x,y)
Output:
>>>
25
30
35
>>>
Passing Parameters
Apart from matching the parameters, there are other ways of matching the parameters.
Python supports following types of formal argument:
1) Positional argument (Required argument).
2) Default argument.
3) Keyword argument (Named argument)
Positional/Required Arguments:
When the function call statement must match the number and order of arguments as defined in the function definition it is Positional Argument matching.
Eg:
#Function definition of sum
def sum(a,b):
"Function having two parameters"
c=a+b
print c
sum(10,20)
sum(20)
Output:
>>>
30
Traceback (most recent call last):
File "C:/Python27/su.py", line 8, in <module>
sum(20)
TypeError: sum() takes exactly 2 arguments (1 given)
>>>
</module>
Explanation:
1) In the first case, when sum() function is called passing two values i.e., 10 and 20 it matches with function definition parameter and hence 10 and 20 is assigned to a and b respectively. The sum is calculated and printed.
2) In the second case, when sum() function is called passing a single value i.e., 20 , it is passed to function definition. Function definition accepts two parameters whereas only one value is being passed, hence it will show an error.
Default Arguments
Default Argument is the argument which provides the default values to the parameters passed in the function definition, in case value is not provided in the function call.
Eg:
#Function Definition
def msg(Id,Name,Age=21):
"Printing the passed value"
print Id
print Name
print Age
return
#Function call
msg(Id=100,Name='Ravi',Age=20)
msg(Id=101,Name='Ratan')
Output:
>>>
100
Ravi
20
101
Ratan
21
>>>
Explanation:
1) In first case, when msg() function is called passing three different values i.e., 100 , Ravi and 20, these values will be assigned to respective parameters and thus respective values will be printed.
2) In second case, when msg() function is called passing two values i.e., 101 and Ratan, these values will be assigned to Id and Name respectively. No value is assigned for third argument via function call and hence it will retain its default value i.e, 21.
Keyword Arguments:
Using the Keyword Argument, the argument passed in function call is matched with function definition on the basis of the name of the parameter.
Eg:
def msg(id,name):
"Printing passed value"
print id
print name
return
msg(id=100,name='Raj')
msg(name='Rahul',id=101)
Output:
>>>
100
Raj
101
Rahul
>>>
Explanation:
1) In the first case, when msg() function is called passing two values i.e., id and name the position of parameter passed is same as that of function definition and hence values are initialized to respective parameters in function definition. This is done on the basis of the name of the parameter.
2) In second case, when msg() function is called passing two values i.e., name and id, although the position of two parameters is different it initialize the value of id in Function call to id in Function Definition. same with name parameter. Hence, values are initialized on the basis of name of the parameter.
Anonymous Function:
Anonymous Functions are the functions that are not bond to name.
Anonymous Functions are created by using a keyword "lambda".
Lambda takes any number of arguments and returns an evaluated expression.
Lambda is created without using the def keyword.
Syntax:
lambda arg1,args2,args3,?,argsn :expression
Output:
#Function Definiton
square=lambda x1: x1*x1
#Calling square as a function
print "Square of number is",square(10)
Output:
>>>
Square of number is 100
>>>
Difference between Normal Functions and Anonymous Function:
Have a look over two examples:
Eg:
Normal function:
#Function Definiton
def square(x):
return x*x
#Calling square function
print "Square of number is",square(10)
Anonymous function:
#Function Definiton
square=lambda x1: x1*x1
#Calling square as a function
print "Square of number is",square(10)
Explanation:
Anonymous is created without using def keyword.
lambda keyword is used to create anonymous function.
It returns the evaluated expression.
Scope of Variable:
Scope of a variable can be determined by the part in which variable is defined. Each variable cannot be accessed in each part of a program. There are two types of variables based on Scope:
1) Local Variable.
2) Global Variable.
1) Local Variables:
Variables declared inside a function body is known as Local Variable. These have a local access thus these variables cannot be accessed outside the function body in which they are declared.
Eg:
def msg():
a=10
print "Value of a is",a
return
msg()
print a #it will show error since variable is local
Output:
>>>
Value of a is 10
Traceback (most recent call last):
File "C:/Python27/lam.py", line 7, in <module>
print a #it will show error since variable is local
NameError: name 'a' is not defined
>>>
</module>
b) Global Variable:
Variable defined outside the function is called Global Variable. Global variable is accessed all over program thus global variable have widest accessibility.
Eg:
b=20
def msg():
a=10
print "Value of a is",a
print "Value of b is",b
return
msg()
print b
Output:
>>>
Value of a is 10
Value of b is 20
20
>>>
Python Input And Output
Python can be used to read and write data. Also it supports reading and writing data to Files.
"print" statement:
"print" statement is used to print the output on the screen.
print statement is used to take string as input and place that string to standard output.
Whatever you want to display on output place that expression inside the inverted commas. The expression whose value is to printed place it without inverted commas.
Syntax:
print "expression" or print expression.
eg:
a=10
print "Welcome to the world of Python"
print a
Output:
>>>
Welcome to the world of Python
10
>>>
Input from Keyboard:
Python offers two in-built functions for taking input from user. They are:
1) input()
2) raw_input()
1) input() functioninput() function is used to take input from the user. Whatever expression is given by the user, it is evaluated and result is returned back.
Syntax:
input("Expression")
eg:
n=input("Enter your expression ");
print "The evaluated expression is ", n
Output:
>>>
Enter your expression 10*2
The evaluated expression is 20
>>>
2) raw_input()raw_input() function is used to take input from the user. It takes the input from the Standard input in the form of a string and reads the data from a line at once.
Syntax:
raw_input(?statement?)
eg:
n=raw_input("Enter your name ");
print "Welcome ", n
Output:
>>>
Enter your name Rajat
Welcome Rajat
>>>
raw_input() function returns a string. Hence in case an expression is to be evaluated, then it has to be type casted to its following data type. Some of the examples are given below:
Program to calculate Simple Interest.
prn=int(raw_input("Enter Principal"))
r=int(raw_input("Enter Rate"))
t=int(raw_input("Enter Time"))
si=(prn*r*t)/100
print "Simple Interest is ",si
Output:
>>>
Enter Principal1000
Enter Rate10
Enter Time2
Simple Interest is 200
>>>
Program to enter details of an user and print them.
name=raw_input("Enter your name ")
math=float(raw_input("Enter your marks in Math"))
physics=float(raw_input("Enter your marks in Physics"))
chemistry=float(raw_input("Enter your marks in Chemistry"))
rollno=int(raw_input("Enter your Roll no"))
print "Welcome ",name
print "Your Roll no is ",rollno
print "Marks in Maths is ",math
print "Marks in Physics is ",physics
print "Marks in Chemistry is ",chemistry
print "Average marks is ",(math+physics+chemistry)/3
Output:
>>>
Enter your name rajat
Enter your marks in Math76.8
Enter your marks in Physics71.4
Enter your marks in Chemistry88.4
Enter your Roll no0987645672
Welcome rajat
Your Roll no is 987645672
Marks in Maths is 76.8
Marks in Physics is 71.4
Marks in Chemistry is 88.4
Average marks is 78.8666666667
>>>
File Handling:
Python provides the facility of working on Files. A File is an external storage on hard disk from where data can be stored and retrieved.
Operations on Files:
1) Opening a File: Before working with Files you have to open the File. To open a File, Python built in function open() is used. It returns an object of File which is used with other functions. Having opened the file now you can perform read, write, etc. operations on the File.
Syntax:
obj=open(filename , mode , buffer)
here,
filename:It is the name of the file which you want to access.
mode:It specifies the mode in which File is to be opened.There are many types of mode. Mode depends the operation to be performed on File. Default access mode is read.
2) Closing a File:Once you are finished with the operations on File at the end you need to close the file. It is done by the close() method. close() method is used to close a File.
Syntax:
fileobject.close()
3) Writing to a File:write() method is used to write a string into a file.
Syntax:
fileobject.write(string str)
4) Reading from a File:read() method is used to read data from the File.
Syntax:
fileobject.read(value)
here, value is the number of bytes to be read. In case, no value is given it reads till end of file is reached.
Program to read and write data from a file.
obj=open("abcd.txt","w")
obj.write("Welcome to the world of Python")
obj.close()
obj1=open("abcd.txt","r")
s=obj1.read()
print s
obj1.close()
obj2=open("abcd.txt","r")
s1=obj2.read(20)
print s1
obj2.close()
Output:
>>>
Welcome to the world of Python
Welcome to the world
>>>
Attributes of File:
There are following File attributes.
Attribute | Description |
Name | Returns the name of the file. |
Mode | Returns the mode in which file is being opened. |
Closed | Returns Boolean value. True, in case if file is closed else false. |
Eg:
obj = open("data.txt", "w")
print obj.name
print obj.mode
print obj.closed
Output:
>>>
data.txt
w
False
>>>
Modes of File:
There are different modes of file in which it can be opened. They are mentioned in the following table.
A File can be opened in two modes:
1) Text Mode.
2) Binary Mode.
Mode | Description |
R | It opens in Reading mode. It is default mode of File. Pointer is at beginning of the file. |
rb | It opens in Reading mode for binary format. It is the default mode. Pointer is at beginning of file. |
r+ | Opens file for reading and writing. Pointer is at beginning of file. |
rb+ | Opens file for reading and writing in binary format. Pointer is at beginning of file. |
W | Opens file in Writing mode. If file already exists, then overwrite the file else create a new file. |
wb | Opens file in Writing mode in binary format. If file already exists, then overwrite the file else create a new file. |
w+ | Opens file for reading and writing. If file already exists, then overwrite the file else create a new file. |
wb+ | Opens file for reading and writing in binary format. If file already exists, then overwrite the file else create a new file. |
a | Opens file in Appending mode. If file already exists, then append the data at the end of existing file, else create a new file. |
ab | Opens file in Appending mode in binary format. If file already exists, then append the data at the end of existing file, else create a new file. |
a+ | Opens file in reading and appending mode. If file already exists, then append the data at the end of existing file, else create a new file. |
ab+ | Opens file in reading and appending mode in binary format. If file already exists, then append the data at the end of existing file, else create a new file. |
Methods:
There are many methods related to File Handling. They are given in the following table:
There is a module "os" defined in Python that provides various functions which are used to perform various operations on Files. To use these functions 'os' needs to be imported.
Method | Description |
rename() | It is used to rename a file. It takes two arguments, existing_file_name and new_file_name. |
remove() | It is used to delete a file. It takes one argument. Pass the name of the file which is to be deleted as the argument of method. |
mkdir() | It is used to create a directory. A directory contains the files. It takes one argument which is the name of the directory. |
chdir() | It is used to change the current working directory. It takes one argument which is the name of the directory. |
getcwd() | It gives the current working directory. |
rmdir() | It is used to delete a directory. It takes one argument which is the name of the directory. |
tell() | It is used to get the exact position in the file. |
1) rename():
Syntax:
os.rename(existing_file_name, new_file_name)
eg:
import os
os.rename('mno.txt','pqr.txt')
2) remove():
Syntax:
os.remove(file_name)
eg:
import os
os.remove('mno.txt')
3) mkdir()
Syntax:
os.mkdir("file_name")
eg:
import os
os.mkdir("new")
4) chdir()
Syntax:
os.chdir("file_name")
eg:
import os
os.chdir("new")
5) getcwd()
Syntax:
os.getcwd()
eg:
import os
print os.getcwd()
6) rmdir()
Syntax:
os.rmdir("directory_name)
eg:
import os
os.rmdir("new")
NOTE: In order to delete a directory, it should be empty. In case directory is not empty first delete the files.
Python Moudule
Modules are used to categorize code in Python into smaller part. A module is simply a file, where classes, functions and variables are defined. Grouping similar code into a single file makes it easy to access.
Have a look over example:
If the content of a book is not indexed or categorized into individual chapters, then the book might have turned boring and hectic. Hence, dividing book into chapters made it easy to understand.
In the same sense python modules are the files which have similar code. Thus module is simplify a python code where classes, variables and functions are defined.
Advantage:
Python provides the following advantages for using module:
1) Reusability: Module can be used in some other python code. Hence it provides the facility of code reusability.
2) Categorization: Similar type of attributes can be placed in one module.
Importing a Module:
There are different ways by which you we can import a module. These are as follows:
1) Using import statement:
"import" statement can be used to import a module.
Syntax:
import <file_name1, file_name2,...file_name(n)="">
</file_name1,>
Have a look over an example:
eg:
def add(a,b):
c=a+b
print c
return
Save the file by the name addition.py. To import this file "import" statement is used.
import addition
addition.add(10,20)
addition.add(30,40)
Create another python file in which you want to import the former python file. For that, import statement is used as given in the above example. The corresponding method can be used by file_name.method (). (Here, addition. add (), where addition is the python file and add () is the method defined in the file addition.py)
Output:
>>>
30
70
>>>
NOTE: You can access any function which is inside a module by module name and function name separated by dot. It is also known as period. Whole notation is known as dot notation.
Example of importing multiple modules:
Eg:
1) msg.py:
def msg_method():
print "Today the weather is rainy"
return
2) display.py:
def display_method():
print "The weather is Sunny"
return
3) multiimport.py:
import msg,display
msg.msg_method()
display.display_method()
Output:
>>>
Today the weather is rainy
The weather is Sunny
>>>
2) Using from.. import statement:
from..import statement is used to import particular attribute from a module. In case you do not want whole of the module to be imported then you can use from ?import statement.
Syntax:
from <module_name> import <attribute1,attribute2,attribute3,...attributen>
</attribute1,attribute2,attribute3,...attributen></module_name>
Have a look over the example:
1) area.py
Eg:
def circle(r):
print 3.14*r*r
return
def square(l):
print l*l
return
def rectangle(l,b):
print l*b
return
def triangle(b,h):
print 0.5*b*h
return
2) area1.py
from area import square,rectangle
square(10)
rectangle(2,5)
Output:
>>>
100
10
>>>
3) To import whole module:
You can import whole of the module using "from? import *"
Syntax:
from <module_name> import *
</module_name>
Using the above statement all the attributes defined in the module will be imported and hence you can access each attribute.
1) area.py
Same as above example
2) area1.py
from area import *
square(10)
rectangle(2,5)
circle(5)
triangle(10,20)
Output:
>>>
100
10
78.5
100.0
>>>
Built in Modules in Python:
There are many built in modules in Python. Some of them are as follows:
math, random , threading , collections , os , mailbox , string , time , tkinter etc..
Each module has a number of built in functions which can be used to perform various functions.
Let?s have a look over each module:
1) math:
Using math module , you can use different built in mathematical functions.
Functions:
Function | Description |
ceil(n) | Returns the next integer number of the given number |
sqrt(n) | Returns the Square root of the given number. |
exp(n) | Returns the natural logarithm e raised to the given number |
floor(n) | Returns the previous integer number of the given number. |
log(n,baseto) | Returns the natural logarithm of the number. |
pow(baseto, exp) | Returns baseto raised to the exp power. |
sin(n) | Returns sine of the given radian. |
cos(n) | Returns cosine of the given radian. |
tan(n) | Returns tangent of the given radian. |
Useful Example of math module:
Eg:
import math
a=4.6
print math.ceil(a)
print math.floor(a)
b=9
print math.sqrt(b)
print math.exp(3.0)
print math.log(2.0)
print math.pow(2.0,3.0)
print math.sin(0)
print math.cos(0)
print math.tan(45)
Output:
>>>
5.0
4.0
3.0
20.0855369232
0.69314718056
8.0
0.0
1.0
1.61977519054
>>>
Constants:
The math module provides two constants for mathematical Operations:
Constants | Descriptions |
Pi | Returns constant ? = 3.14159... |
ceil(n) | Returns constant e= 2.71828... |
Eg:
import math
print math.pi
print math.e
Output:
>>>
3.14159265359
2.71828182846
>>>
2) random:
The random module is used to generate the random numbers. It provides the following two built in functions:
Function | Description |
random() | It returns a random number between 0.0 and 1.0 where 1.0 is exclusive. |
randint(x,y) | It returns a random number between x and y where both the numbers are inclusive. |
Eg:
import random
print random.random()
print random.randint(2,8)
Output:
>>>
0.797473843839
7
>>>
Other modules will be covered in their respective topics.
Package
A Package is simply a collection of similar modules, sub-packages etc..
Steps to create and import Package:
1) Create a directory, say Info
2) Place different modules inside the directory. We are placing 3 modules msg1.py, msg2.py and msg3.py respectively and place corresponding codes in respective modules. Let us place msg1() in msg1.py, msg2() in msg2.py and msg3() in msg3.py.
3) Create a file __init__.py which specifies attributes in each module.
4) Import the package and use the attributes using package.
Have a look over the example:
1) Create the directory:
import os
os.mkdir("Info")
2) Place different modules in package: (Save different modules inside the Info package)
msg1.py
def msg1():
print "This is msg1"
msg2.py
def msg2():
print "This is msg2"
msg3.py
def msg3():
print "This is msg3"
3) Create __init__.py file:
from msg1 import msg1
from msg2 import msg2
from msg3 import msg3
4)Import package and use the attributes:
import Info
Info.msg1()
Info.msg2()
Info.msg3()
Output:
>>>
This is msg1
This is msg2
This is msg3
>>>
What is __init__.py file? __init__.py is simply a file that is used to consider the directories on the disk as the package of the Python. It is basically used to initialize the python packages.
EXCEPTION HANDLING
Exception can be said to be any abnormal condition in a program resulting to the disruption in the flow of the program.
Whenever an exception occurs the program halts the execution and thus further code is not executed. Thus exception is that error which python script is unable to tackle with.
Exception in a code can also be handled. In case it is not handled, then the code is not executed further and hence execution stops when exception occurs.
Hierarchy Of Exception:
ZeroDivisionError: Occurs when a number is divided by zero.
NameError: It occurs when a name is not found. It may be local or global.
IndentationError: If incorrect indentation is given.
IOError: It occurs when Input Output operation fails.
EOFError: It occurs when end of file is reached and yet operations are being performed
etc..
Exception Handling:
The suspicious code can be handled by using the try block. Enclose the code which raises an exception inside the try block. The try block is followed except statement. It is then further followed by statements which are executed during exception and in case if exception does not occur.
Syntax:
try:
malicious code
except Exception1:
execute code
except Exception2:
execute code
....
....
except ExceptionN:
execute code
else:
In case of no exception, execute the else block code.
eg:
try:
a=10/0
print a
except ArithmeticError:
print "This statement is raising an exception"
else:
print "Welcome"
Output:
>>>
This statement is raising an exception
>>>
Explanation:
The malicious code (code having exception) is enclosed in the try block.
Try block is followed by except statement. There can be multiple except statement with a single try block.
Except statement specifies the exception which occurred. In case that exception is occurred, the corresponding statement will be executed.
At the last you can provide else statement. It is executed when no exception is occurred.
Except with no Exception:
Except statement can also be used without specifying Exception.
Syntax:
try:
code
except:
code to be executed in case exception occurs.
else:
code to be executed in case exception does not occur.
eg:
try:
a=10/0;
except:
print "Arithmetic Exception"
else:
print "Successfully Done"
Output:
>>>
Arithmetic Exception
>>>
Declaring Multiple Exception
Multiple Exceptions can be declared using the same except statement:
Syntax:
try:
code
except Exception1,Exception2,Exception3,..,ExceptionN
execute this code in case any Exception of these occur.
else:
execute code in case no exception occurred.
eg:
try:
a=10/0;
except ArithmeticError,StandardError:
print "Arithmetic Exception"
else:
print "Successfully Done"
Output:
>>>
Arithmetic Exception
>>>
Finally Block:
In case if there is any code which the user want to be executed, whether exception occurs or not then that code can be placed inside the finally block. Finally block will always be executed irrespective of the exception.
Syntax:
try:
Code
finally:
code which is must to be executed.
eg:
try:
a=10/0;
print "Exception occurred"
finally:
print "Code to be executed"
Output:
>>>
Code to be executed
Traceback (most recent call last):
File "C:/Python27/noexception.py", line 2, in <module>
a=10/0;
ZeroDivisionError: integer division or modulo by zero
>>>
In the above example finally block is executed. Since exception is not handled therefore exception occurred and execution is stopped.
Raise an Exception:
You can explicitly throw an exception in Python using ?raise? statement. raise will cause an exception to occur and thus execution control will stop in case it is not handled.
Syntax:
raise Exception_class,<value>
eg:
try:
a=10
print a
raise NameError("Hello")
except NameError as e:
print "An exception occurred"
print e
Output:
>>>
10
An exception occurred
Hello
>>>
Explanation:
i) To raise an exception, raise statement is used. It is followed by exception class name.
ii) Exception can be provided with a value that can be given in the parenthesis. (here, Hello)
iii) To access the value "as" keyword is used. "e" is used as a reference variable which stores the value of the exception.
Custom Exception:
Refer to this section after visiting Class and Object section:
Creating your own Exception class or User Defined Exceptions are known as Custom Exception.
eg:
class ErrorInCode(Exception):
def __init__(self, data):
self.data = data
def __str__(self):
return repr(self.data)
try:
raise ErrorInCode(2000)
except ErrorInCode as ae:
print "Received error:", ae.data
Output:
>>>
Received error : 2000
>>>
Date and Time
Python is very useful in case of Date and Time. We can easily retrieve current date and time using Python.
Retrieve Time
To retrieve current time a predefined function localtime() is used. localtime() receives a parameter time.time() . Here,
time is a module,
time() is a function that returns the current system time in number of ticks since 12:00 am , January 1,1970. It is known as epoch.
Tick is simply a floating point number in seconds since epoch.
eg:
import time;
localtime = time.localtime(time.time())
print "Current Time is :", localtime
Output:
>>>
Current Time is :time.struct_time(tm_year=2014, tm_mon=6, tm_mday=18, tm_hour=12,
tm_min=35, tm_sec=44, tm_wday=2, tm_yday=169, tm_isdst=0)
>>>
Explanation:
The time returned is a time structure which includes 9 attributes. These are summoned in the table given below.
Attribute | Description |
tm_year | Returns the current year |
tm_mon | Returns the current month |
tm_mday | Returns the current month day |
tm_hour | Returns the current hour. |
tm_min | Returns the current minute |
tm_sec | Returns current seconds |
tm_wday | Returns the week day |
tm_yday | Returns the year day. |
tm_isdst | It returns -1,0 or 1. |
Formatted Time
Python also support formatted time. Proceed as follows:
Pass the time structure in a predefined function asctime(). It is a function defined in time module.
It returns a formatted time which includes Day ,month, date, time and year.
Print the formatted time.
eg:
import time;
localtime = time.asctime( time.localtime(time.time()) )
print "Formatted time :", localtime
Output:
>>>
Formatted time : Sun Jun 22 18:54:20 2014
>>>
time module:
There are many built in functions defined in time module which are used to work with time.
Methods | Description |
time() | Returns floating point value in seconds since epoch i.e.,12:00am, January 1, 1970 |
asctime(time) | It takes the tuple returned by localtime() as parameter. It returns a 24 character string. |
sleep(time) | The execution will be stopped for the given interval of time. |
strptime(String,format) | It returns an tuple with 9 time attributes. It receives an String of date and a format. |
gtime()/gtime(sec) | It returns struct_time which contains 9 time attributes. In case seconds are not specified it takes current second from epoch. |
mktime() | Returns second in floating point since epoch. |
strftime(format)/strftime(format,time) | Returns time in particular format. If time is not given, current time in seconds is fetched. |
time()
eg:
import time
printtime.time()
Output:
>>>
1403700740.39
>>>
asctime(time)
import time
t = time.localtime()
printtime.asctime(t)
Output:
>>>
Wed Jun 25 18:30:25 2014
>>>
sleep(time)
Eg:
import time
localtime = time.asctime( time.localtime(time.time()) )
printlocaltime
time.sleep( 10 )
localtime = time.asctime( time.localtime(time.time()) )
printlocaltime
Output:
>>>
Wed Jun 25 18:15:30 2014
Wed Jun 25 18:15:40 2014
>>>
strptime(String str,format f)
Eg:
import time
timerequired = time.strptime("26 Jun 14", "%d %b %y")
printtimerequired
Output:
>>>
time.struct_time(tm_year=2014, tm_mon=6, tm_mday=26, tm_hour=0, tm_min=0,
tm_sec=0, tm_wday=3, tm_yday=177, tm_isdst=-1)
>>>
Explanation:
The strptime() takes a String and format as argument. The format refers to String passed as an argument. "%a %b %d %H:%M:%S %Y" are the default directives. There are many other directives which can be used. In the given example we have used three directives: %d%b%y which specifies day of the month, month in abbreviated form and year without century respectively. Some of them are given as:
%a | weekday name. |
%b | month name |
%c | date and time |
%e | day of a month |
%m | month in digit. |
%n | new line character. |
%S | second |
%t | tab character |
etc...
gtime()
Eg:
import time
printtime.gmtime()
Output:
>>>
time.struct_time(tm_year=2014, tm_mon=6, tm_mday=28, tm_hour=9, tm_min=38, tm_sec=0,
tm_wday=5, tm_yday=179, tm_isdst=0)
>>>
mktime()
Eg:
import time
t = (2014, 2, 17, 17, 3, 38, 1, 48, 0)
second = time.mktime( t )
print second
Output:
>>>
1392636818.0
>>>
strftime()
Eg:
import time
t = (2014, 6, 26, 17, 3, 38, 1, 48, 0)
t = time.mktime(t)
printtime.strftime("%b %d %Y %H:%M:%S", time.gmtime(t))
Output:
>>>
Jun 26 2014 11:33:38
>>>
Calendar
Python provides calendar module to display Calendar.
Eg:
import calendar
print "Current month is:"
cal = calendar.month(2014, 6)
printcal
Output:
>>>
Current month is:
June 2014
Mo TuWe ThFr Sa Su
1
2 3 4 5 6 7 8
9 10 11 12 1314 15
16 1718 19 2021 22
2324 25 26 27 28 29
30
>>>
Calendar module:
Python provides calendar module which provides many functions and methods to work on calendar. A list of methods and function used is given below:
Methods | Description |
prcal(year) | Prints the whole calendar of the year. |
firstweekday() | Returns the first week day. It is by default 0 which specifies Monday |
isleap(year) | Returns a Boolean value i.e., true or false. True in case given year is leap else false. |
monthcalendar(year,month) | Returns the given month with each week as one list. |
leapdays(year1,year2) | Return number of leap days from year1 to year2 |
prmonth(year,month) | Print the given month of the given year |
prcal(year)
Eg:
import calendar
calendar.prcal(2014)
Output:
>>> ================================ RESTART ================================
>>>
firstweekday()
Eg:
import calendar
printcalendar.firstweekday()
Output:
>>>
0
>>>
isleap(year)
Eg:
import calendar
printcalendar.isleap(2000)
Output:
>>>
True
>>>
monthcalendar(year,month)
Eg:
import calendar
printcalendar.monthcalendar(2014,6)
Output:
>>>
[[0, 0, 0, 0, 0, 0, 1], [2, 3, 4, 5, 6, 7, 8], [9, 10, 11, 12, 13, 14, 15],
[16, 17, 18, 19, 20, 21, 22],
[23, 24, 25, 26, 27, 28, 29], [30, 0, 0, 0, 0, 0, 0]]
>>>
prmonth(year,month)
Eg:
import calendar
printcalendar.prmonth(2014,6)
Output:
>>>
June 2014
Mo Tu We ThFrSa Su
1
2 3 4 5 6 7 8
9 10 11 12 13 14 15
16 17 18 19 20 21 22
23 24 25 26 27 28 29
30
None
>>>
Python Programs
There can be various python programs on many topics like basic python programming, conditions and loops, functions and native data types. A list of top python programs are given below which are widely asked by interviewer.
Basic Python programs
Python programs with conditions and loops
Python Function Programs
Python Native Data Type Programs


