Node.js MongoDB Tutorial with Examples

Share:

In previous tutorials, you would have seen callback functions which are used for Asynchronous events. But sometimes callback functions can become a nightmare when they start becoming nested, and the program starts to become long and complex.

In this tutorial, you will learn-

What are promises?

Before we start with promises, let’s first revisit what are “callback” functions in Node.js. We have seen these callback functions a lot in the previous chapters, so let’s quickly go through one of them.

The example below shows a code snippet, which is used to connect to a MongoDB database and perform an update operation on one of the records in the database.

Node.js Promise Tutorial

  1. In the above code, the part of the function(err,db) is known as the declaration of an anonymous or callback function. When the MongoClient creates a connection to the MongoDB database, it will return to the callback function once the connection operation is completed. So in a sense, the connection operations happen in the background, and when it is done, it calls our callback function. Remember that this is one of the key points of Node.js to allow many operations to happen concurrently and thus not block any user from performing an operation.
  2. The second code block is what gets executed when the callback function is actually called. The callback function just updates one record in our MongoDB database.

So what is a promise then? Well, a promise is just an enhancement to callback functions in Node.js. During the development lifecycle, there may be an instance where you would need to nest multiple callback functions together. This can get kind of messy and difficult to maintain at a certain point in time. In short, a promise is an enhancement to callbacks that looks towards alleviating these problems.

The basic syntax of a promise is shown below;

var promise = doSomethingAync()
promise.then(onFulfilled, onRejected)
  • “doSomethingAync” is any callback or asynchronous function which does some sort of processing.
  • This time, when defining the callback, there is a value which is returned called a “promise.”
  • When a promise is returned, it can have 2 outputs. This is defined by the ‘then clause’. Either the operation can be a success which is denoted by the ‘onFulfilled’ parameter. Or it can have an error which is denoted by the ‘onRejected’ parameter.

Note: So the key aspect of a promise is the return value. There is no concept of a return value when working with normal callbacks in Node.js. Because of the return value, we have more control of how the callback function can be defined.

In the next topic, we will see an example of promises and how they benefit from callbacks.

Callbacks to promises

Now let’s look at an example of how we can use “promises” from within a Node.js application. In order to use promises in a Node.js application, the ‘promise’ module must first be downloaded and installed.

We will then modify our code as shown below, which updates an Employeename in the ‘Employee’ collection by using promises.

Step 1) Installing the NPM Modules

To use Promises from within a Node JS application, the promise module is required. To install the promise module, run the below command

npm install promise

Step 2) Modify the code to include promises

Node.js Promise Tutorial

var Promise = require('promise');
var MongoClient = require('mongodb').MongoClient;
var url = 'mongodb://localhost/EmployeeDB';

MongoClient.connect(url)
    .then(function(err, db) {
        db.collection('Employee').updateOne({
            "EmployeeName": "Martin"
        }, {
            $set: {
                "EmployeeName": "Mohan"
            }
        });
    }); 

Code Explanation:-

  1. The first part is to include the ‘promise’ module which will allow us to use the promise functionality in our code.
  2. We can now append the ‘then’ function to our MongoClient.connect function. So what this does is that when the connection is established to the database, we need to execute the code snippet defined thereafter.
  3. Finally, we define our code snippet which does the work of updating EmployeeName of the employee with the name of “Martin” to “Mohan”.

Note:-

If you now check the contents of your MongoDB database, you will find that if a record with EmployeeName of “Martin” exists, it will be updated to “Mohan.”

To check that the data has been properly inserted in the database, you need to execute the following commands in MongoDB

  1. Use EmployeeDB
  2. db.Employee.find({EmployeeName :Mohan })

The first statement ensures that you are connected to the EmployeeDb database. The second statement searches for the record which has the employee name of “Mohan”.

Dealing with nested promises

When defining promises, it needs to be noted that the “then” method itself returns a promise. So in a sense, promises can be nested or chained to each other.

In the example below, we use chaining to define 2 callback functions, both of which insert a record into the MongoDB database.

(Note: Chaining is a concept used to link execution of methods to one another. Suppose if your application had 2 methods called ‘methodA’ and ‘methodB.’ And the logic was such that ‘methodB’ should be called after ‘methodA,’ then you would chain the execution in such a way that ‘methodB’ gets called directly after ‘methodA.’)

The key thing to note in this example is that the code becomes cleaner, readable and maintainable by using nested promises.

Node.js Promise Tutorial

var Promise = require('promise');
var MongoClient = require('mongodb').MongoClient;
var url = 'mongodb://localhost/EmployeeDB';
MongoClient.connect(url)

.then(function(db) {
    db.collection('Employee').insertOne({
        Employeeid: 4,
        EmployeeName: "NewEmployee"
    })

    .then(function(db1) {
        db1.collection('Employee').insertOne({
            Employeeid: 5,
            EmployeeName: "NewEmployee1"
        })
    })
});

Code Explanation:-

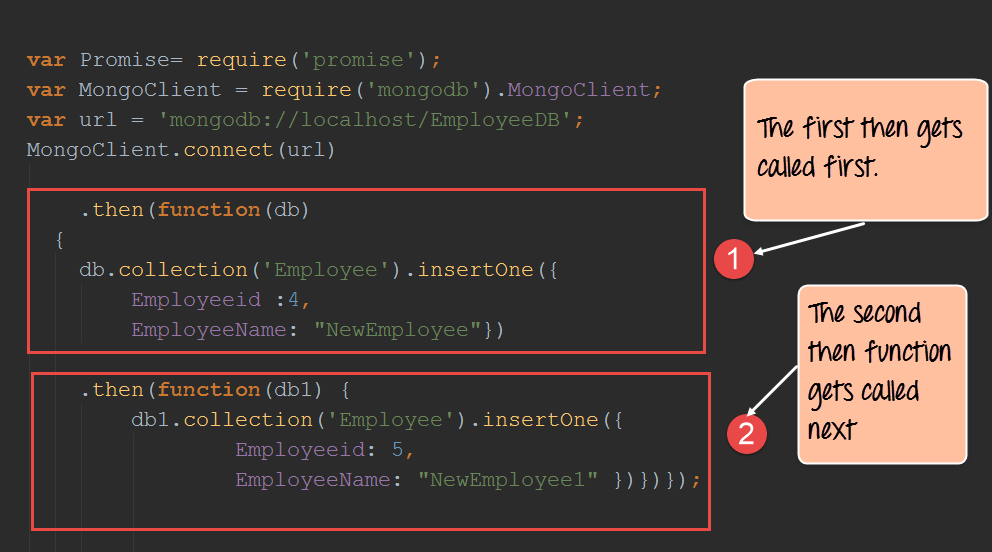
  1. We are now defining 2 “then” clauses which get executed one after the other. In the first then clause, we are passing the ‘db’ parameter which contains our database connection. We are then using the collection property of the ‘db’ connection to insert records into the ‘Employee’ collection. The ‘insertOne’ method is used to insert the actual document into the Employee collection.
  2. We are then using the 2nd then clause also to insert another record into the database.

If you now check the contents of your MongoDB database, you will find the 2 record’s inserted into the MongoDB database.

Creating a custom promise

A custom promise can be created by using a node module called ‘q.’ The ‘q’ library needs to be downloaded and installed using the node package manager. After using the ‘q’ library, the method “denodeify” can be called which will cause any function to become a function which returns a promise.

In the example below, we will create a simple function called “Add” which will add 2 numbers. We will convert this function into a function to return a promise.

Once that is done, we will use the promise returned by the Add function to display a message in the console.log.

Let’s follow the below steps to creating our custom function to return a promise.

Step 1) Installing the NPM Modules

To use ‘q’ from within a Node JS application, the ‘q’ module is required. To install the ‘q’ module, run the below command

npm install q

Step 2) Define the following code which will be used to create the custom promise.

Node.js Promise Tutorial

Code Explanation:-

  1. The first bit is to include the ‘q’ library by using the require keyword. By using this library, we will be able to define any function to return a callback.
  2. We are creating a function called Add which will add 2 numbers defined in variables a and b. The sum of these values will be stored in variable c.
  3. We are then using the q library to denodeify ( the method used to convert any function into a function that would return a promise) our Add function or in otherwise convert our Add function to a function which returns a promise.
  4. We now call our “Add” function and are able to get a return promise value because of the prior step we performed of denodeify the Add function.
  5. The ‘then’ keyword is used specify that if the function is executed successfully then display the string “Addition function completed” in the console.log.

When the above code is run, the output “Addition function completed” will be displayed in the console.log as shown below.

Node.js Promise Tutorial

Summary

  • Using callback functions in Node.js does have its disadvantages. Sometimes during the process of development, the nested use of callback functions can make the code messier and difficult to maintain.
  • Most of the issues with nested callback functions can be mitigated with the use of promises and generators in node.js
  • A Promise is a value returned by an asynchronous function to indicate the completion of the processing carried out by the asynchronous function.
  • Promises can be nested within each other to make code look better and easier to maintain when an asynchronous function need to be called after another asynchronous function
Share:

node js questions and answers

Node.js is a Server side scripting which is used to build scalable programs. Its multiple advantages over other server side languages, the prominent being non-blocking I/O.

2) How node.js works?

Node.js works on a v8 environment, it is a virtual machine that utilizes JavaScript as its scripting language and achieves high output via non-blocking I/O and single threaded event loop.

3) What do you mean by the term I/O?

I/O is the shorthand for input and output, and it will access anything outside of your application. It will be loaded into the machine memory to run the program, once the application is started.

Node.js

4) What does event-driven programming mean?

In computer programming, event driven programming is a programming paradigm in which the flow of the program is determined by events like messages from other programs or threads. It is an application architecture technique divided into two sections 1) Event Selection 2) Event Handling.


5) Where can we use node.js?

Node.js can be used for the following purposes.

  • Web applications ( especially real-time web apps )
  • Network applications
  • Distributed systems
  • General purpose applications

6) What is the advantage of using node.js?

  • It provides an easy way to build scalable network programs
  • Generally fast
  • Great concurrency
  • Asynchronous everything
  • Almost never blocks

7) What are the two types of API functions in Node.js?

The two types of API functions in Node.js are

  • Asynchronous, non-blocking functions
  • Synchronous, blocking functions

8) What is control flow function?

A generic piece of code which runs in between several asynchronous function calls is known as control flow function.

9) Explain the steps how “Control Flow” controls the functions calls?

  • Control the order of execution
  • Collect data
  • Limit concurrency
  • Call the next step in program

10) Why Node.js is single threaded?

For async processing, Node.js was created explicitly as an experiment. It is believed that more performance and scalability can be achieved by doing async processing on a single thread under typical web loads than the typical thread based implementation.


11) Does node run on windows?

Yes – it does. Download the MSI installer from https://nodejs.org/download/

12) Can you access DOM in node?

No, you cannot access DOM in node.

13) Using the event loop what are the tasks that should be done asynchronously?

  • I/O operations
  • Heavy computation
  • Anything requiring blocking

14) Why node.js is quickly gaining attention from JAVA programmers?

Node.js is quickly gaining attention as it is a loop based server for JavaScript. Node.js gives user the ability to write the JavaScript on the server, which has access to things like HTTP stack, file I/O, TCP and databases.

15) What are the two arguments that async.queue takes?

The two arguments that async.queue takes

  • Task function
  • Concurrency value

16) What is an event loop in Node.js?

To process and handle external events and to convert them into callback invocations an event loop is used. So, at I/O calls, node.js can switch from one request to another.


17) Mention the steps by which you can async in Node.js?

By following steps you can async Node.js

  • First class functions
  • Function composition
  • Callback Counters
  • Event loops

18) What are the pros and cons of Node.js?

Pros:

  • If your application does not have any CPU intensive computation, you can build it in Javascript top to bottom, even down to the database level if you use JSON storage object DB like MongoDB.
  • Crawlers receive a full-rendered HTML response, which is far more SEO friendly rather than a single page application or a websockets app run on top of Node.js.

Cons:

  • Any intensive CPU computation will block node.js responsiveness, so a threaded platform is a better approach.
  • Using relational database with Node.js is considered less favourable.

19) How Node.js overcomes the problem of blocking of I/O operations?

Node.js solves this problem by putting the event based model at its core, using an event loop instead of threads.

20) What is the difference between Node.js vs Ajax?

The difference between Node.js and Ajax is that, Ajax (short for Asynchronous Javascript and XML) is a client side technology, often used for updating the contents of the page without refreshing it. While,Node.js is Server Side Javascript, used for developing server software. Node.js does not execute in the browser but by the server.

21) What are the Challenges with Node.js?

Emphasizing on the technical side, it’s a bit of challenge in Node.js to have one process with one thread to scale up on multi core server.

22) What does it mean “non-blocking” in node.js?

In node.js “non-blocking” means that its IO is non-blocking. Node uses “libuv” to handle its IO in a platform-agnostic way. On windows, it uses completion ports for unix it uses epoll or kqueue etc. So, it makes a non-blocking request and upon a request, it queues it within the event loop which call the JavaScript ‘callback’ on the main JavaScript thread.

23) What is the command that is used in node.js to import external libraries?

Command “require” is used for importing external libraries, for example, “var http=require (“http”)”. This will load the http library and the single exported object through the http variable.

24) Mention the framework most commonly used in node.js?

“Express” is the most common framework used in node.js.

25) What is ‘Callback’ in node.js?

Callback function is used in node.js to deal with multiple requests made to the server. Like if you have a large file which is going to take a long time for a server to read and if you don’t want a server to get engage in reading that large file while dealing with other requests, call back function is used. Call back function allows the server to deal with pending request first and call a function when it is finished.


Share:

Node.js Vs Python: What’s the Difference?

What is Node.js?

Node.js is a server-side platform built on Google Chrome’s JavaScript Engine. It uses a non-blocking, event-driven I/O model. It allows developers to create data-intensive real-time applications that run across distributed devices. Its applications are written in JavaScript. It can be run on OS X, Microsoft Windows, and Linux operating systems. It is widely used to run real-time server applications.

What is Python?

Python is an object-oriented, high level, dynamic and multipurpose programming language. Python’s syntax and dynamic typing with interpreted nature, make it an ideal language for scripting.

It supports multiple programming patterns, including object-oriented programming, functional programming, or procedural styles. Moreover, it an interpreted language which means it cannot convert to computer-readable code before its runs at runtime.

In this comparison between Python vs NodeJS, we will cover:

Features of Node js

  • It uses a single threaded model with event looping. This type of event mechanism benefits the server to respond in a non-blocking way.
  • It is built on V8 JavaScript Engine makes it fastest code execution library.
  • There is no buffering in Node.js as applications output the data in pieces.

Features of Python

  • It allows low-level modules inclusion to the Python interpreter. These modules allow programmers to add or customize their tools.
  • It provides interfaces to all major commercial databases.
  • It supports functional and structured programming methods as well as OOP.
  • It offers high-level dynamic data types and supports dynamic type checking.
  • It can be easily integrated with C, C++, COM, ActiveX, CORBA, and Java.

Difference between NodeJS and Python

Difference between NodeJS and Python

KEY DIFFERENCE

  • Node.Js is a server-side platform built on Google Chrome Javascript Engine whereas Python is an object-oriented, high level, dynamic and multipurpose programming language.
  • Node is better for web applications and website development whereas Python is best suitable for back-end applications, numerical computations and machine learning.
  • Nodejs utilize JavaScript interpreter whereas Python uses CPython as an interpreter.
  • Node programming language is best suited for asynchronous programming whereas Python is not the best option for asynchronous programming.
  • Node.Js is best suited for small projects while Python is best suited for developing large projects.
  • Comparing Node.js vs Python, Node is best for memory-intensive activities whereas Python is not advisable for memory-intensive activities.

Node.JS Vs. Python

Below is the main difference between NodeJS vs Python:

Node.JSPython
Node.js is best suited for asynchronous programmingPython is not exactly the best option for asynchronous programming.
Node.js is pure JavaScript, so its basics remain simple for the developers to learn.The biggest advantage of using Python is that developers need to write fewer lines of code.
Node.js lacks the clean coding standards. That’s why it cannot be recommended for larger projects.It is ideal for a large project as it can do anything that can be done using PHP code.
Node.js is an ideal platform available right now to deal with real-time web applications.Not an ideal platform to deal with real-time web applications.
It best suited for small projects to enable functionality which needs less amount of scripting.Python is suited for developing larger projects.
Best for memory intensive activities.Not advisable for memory intensive activities.
Node.js is a better choice if your focus is on web applications and website development.Python is an ideal platform to do multiple things – web applications, integration with back-end applications, numerical computations, machine learning, and network programming.
Node.js utilizes JavaScript interpreter.Python uses CPython as an interpreter.
Node.js supports callback. Its programming is based on event/callback that makes it process
Faster.
It supports generators which makes it much simpler.

Selecting a development platform is significant steps in the app development phase. Node JS vs Python is certainly a highly discussed topic nowadays. Let’s see where we can use Node JS and when to use python.

When to use Node js?

As Node.js is a platform built on Chrome’s JavaScript runtime it helps to develop building scalable network applications. It uses an event-driven, non-blocking I/O model which makes it an ideal option for developing for data-intensive real-time applications.

Comparing Node vs Python, Node.js offers greater performance and speed. It is an ideal solution for developing messaging or chatting applications. It is also useful for developing heavy-load applications and e-commerce sites that depend on the speed of processing.

Apps best suited with Node JS:

Apps best suited with Node JS

Apps best suited with Node JS

  • I/O bound Applications
  • Data Streaming Applications
  • Data Intensive Real-time Applications (DIRT)
  • JSON APIs based Applications
  • Single Page Applications

When to use Python?

Python has a library of open source data analysis tools, web frameworks, and testing instruments. Therefore, its ecosystem one of the largest out of any programming community.

Python is a most accessible language for new programmers as community provides many introductory resources. The language is also taught in universities and used for working with beginner-friendly devices such as the Raspberry Pi.

Comparing Python vs Node.js, Python features consistency, stability, and easiness of use. It is highly preferred for developing scientific applications, big data solutions, and government projects.

Apps best suited with Python

Apps best suited with Python

Apps best suited with Python

Share:

Node.js Generators & Compare with Callbacks

n this tutorial, we are going to learn about Generators and their differences with Callbacks

What are generators?

Generators have become quite famous in Node.js in recent times and that is probably because of what they are capable of doing.

  • Generators are function executions that can be suspended and resumed at a later point.
  • Generators are useful when carrying out concepts such as ‘lazy execution’. This basically means that by suspending execution and resuming at will, we are able to pull values only when we need to.

Generators have the below 2 key methods.

  1. Yield method – The yield method is called in a function to halt the execution of the function at the specific line where the yield method is called.
  2. Next method – This method is called from the main application to resume the execution of a function which has a yield method. The execution of the function will continue till the next yield method or till the end of the method.

Let’s look at an example of how generators can be used.

In our example, we are going to have a simple Add function which will add 2 numbers, but we will keep on halting the method execution at different points to showcase how generators can be used.

Node.js Generators & Compare with Callbacks

function* Add(x) {
   yield x + 1;
   var y = yield(null);
   y = 6
   return x + y;
}

var gen = Add(5);

gen.next();

gen.next(); 

Code Explanation:-

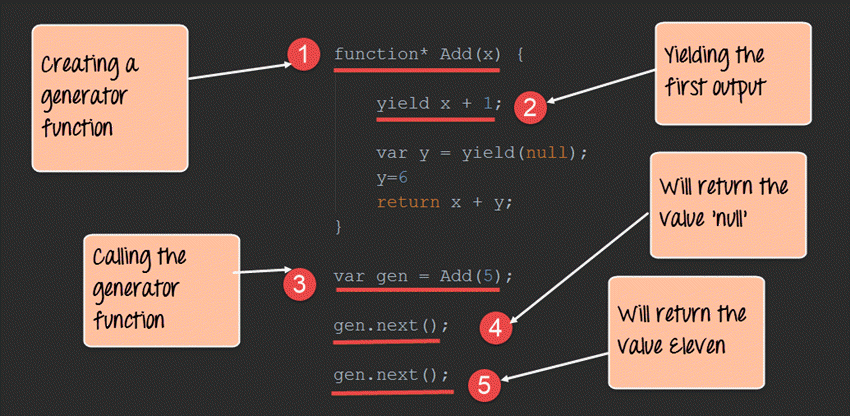
  1. The first step is to define our generator “function”. Note that this is done by adding a “*” to the function keyword. We are then defining a function called Add which takes a parameter of x.
  2. The yield keyword is a specific to generators. This makes it a powerful construct for pausing a function in the middle of anything. So here, the function execution will be halted till we invoke the next() function, which will be done in Step4. At this point, the value of x will become 6 and the execution of the function will be stopped.
  3. This is where we first call the generator function and send the value of 5 to our Add function. This value will be substituted in the x parameter of our Add function.
  4. Once we call the next() function, the Add() function will resume the execution. When the next statement var y= yield(null) will be executed, the Add() function will again stop executing.
  5. Now after calling the next() function again, the next statements will run, and the combined value of x=5 and y=6 will be added and returned.

Callbacks vs. generators

Generators are used to solve the problem of what is known as callback hell. Sometimes callback functions become so nested during the development of a Node.js application that it just becomes too complicated to use callback functions.

This is where generators are useful. One of the most common examples of this is when creating timer functions.

Let’s see the below example of how generators can prove to be useful over callbacks.

Our example will just create a simple time delay function. We would then want to call this function incorporating a delay of 1000, 2000 and 3000 ms.

Step 1) Define our callback function with the necessary time delay code.

Node.js Generators & Compare with Callbacks

function Timedelay(ptime, callback) {

setTimeout(function() {
  
    callback("Pausing for " + ptime);
    
  }, time);
}

Code Explanation:-

  1. Here we are creating a function called Timedelay with a parameter called ptime. This will take in the necessary time delay we want to introduce in our application.
  2. The next step is to just create a message, which will be displayed to the user saying that the application is going to be pause for these many numbers of milliseconds.

Step 2) Now let’s look at the code if we were incorporating callbacks. Suppose we wanted to incorporate callbacks based on the value of 1000, 2000 and 3000 milliseconds, the below code shows how we would need to implement these using callbacks.

Node.js Generators & Compare with Callbacks

Timedelay(1000, function(message) {
  
  console.log(msg);
  Timedelay(2000, function(message) {
    
    console.log(msg);
    Timedelay(3000, function(message) {
      
      console.log(msg);
  })
  })
})

Code Explanation:-

  1. We are calling the Timedelay as a callback with 1000 as the value.
  2. Next we want to call the Timedelay function again with 2000 as the value.
  3. Finally, we want to call the Timedelay function again with 3000 as the value.

From the above code, you can see that it becomes messier as we want to start calling the function multiple times.

Step 3) Now let’s see how to implement the same code using generators. From the below code you can now see how simple it has become to implement the Timedelay function using generators.

Node.js Generators & Compare with Callbacks

function* Messages() {
  console,log(yield(Timedelay(1000, function(){})));
  console,log(yield(Timedelay(2000, function(){})));
  console,log(yield(Timedelay(3000, function(){})));
}

Code Explanation:-

  1. We are first defining a generator function which will be used to call our Timedelay function.
  2. We are calling the Yield function along with the Timedelay function with 1000 as the parameter value.
  3. We are then calling the Yield function along with the Timedelay function with 2000 as the parameter value.
  4. Finally, we are calling the Yield function along with the Timedelay function with 3000 as the parameter value.

Summary

Generators can also be used to alleviate the problems with nested callbacks and assist in removing what is known as the callback hell. Generators are used to halt the processing of a function. This is accomplished by usage of the ‘yield’ method in the asynchronous function.

Share:

Bluebird Promises Tutorial | Bluebird JS with NPM Example

What is Bluebird JS?

Bluebird JS is a fully-featured Promise library for JavaScript. The strongest feature of Bluebird is that it allows you to “promisify” other Node modules in order to use them asynchronously. Promisify is a concept applied to callback functions. This concept is used to ensure that every callback function which is called returns some value.

So if a NodeJS module contains a callback function which does not return a value, and if we Promisify the node module, all the function’s in that specific node module would automatically be modified to ensure that it returns a value.

So you can use BlueBird to make the MongoDB module run asynchronously. This just adds another level of ease when writing Node.js applications.

We will look at an example of how to use the bluebird module.

Our example will first establish a connection to the “Employee collection” in the “EmployeeDB” database. If “then” connection is established, then it will get all of the records in the collection and display them in the console accordingly.

How to Generate Promises with Bluebird JS Library

Here is the step by step example to generate promises with Bluebird JS library:

Step 1) Installing the NPM Modules

To use Bluebird from within a Node application, the Bluebird module is required. To install the Bluebird module, run the below command

npm install bluebird

Step 2) Include Bluebird modules

The next step is to include the bluebird module in your code and promisify the entire MongoDB module. By promisify, we mean that bluebird will ensure that each and every method defined in the MongoDB library returns a promise.

Bluebird JS Promises Example

Code Explanation:-

  1. The require command is used to include the Bluebird library.
  2. Use Bluebird’s .promisifyAll() method to create an async version of every method the MongoDB module provides. This ensures that each method of the MongoDB module will run in the background and ensure that a promise is returned for each method call in the MongoDB library.

Step 3) Connect to the Database

The final step is to connect to our database, retrieve all the records in our collection and display them in our console log.

Bluebird JS Promises Example

Code Explanation:-

  1. You will notice that we are using the “connectAsync” method instead of the normal connection method for connecting to the database. Bluebird actually adds the Async keyword to each method in the MongoDB library to distinguish those calls which return promises and those which don’t. So there is no guarantee that methods without the Async word will return a value.
  2. Similar to the connectAsync method, we are now using the findAsync method to return all of the records in the mongoDB ‘Employee’ collection.
  3. Finally, if the findAsync returns a successful promise we then define a block of code to iterate through each record in the collection and display them in the console log.

If the above steps are carried out properly, all of the documents in the Employee collection will be displayed in the console as shown in the output below.

Example of Bluebird JS Promises

Here is the code for your reference:

var Promise = require('bluebird');

var mongoClient = Promise.promisifyAll(require('mongodb')).MongoClient;

var url = 'mongodb://localhost/EmployeeDB';
mongoClient.connectAsync('mongodb://localhost/EmployeeDB')

.then(function(db) {
        return db.collection('Employee').findAsync({})

    })
    .then(function(cursor) {
        cursor.each(function(err, doc) {
            console.log(doc);
        })
    });
Share:

Node.js Express FrameWork Tutorial – Learn in 10 Minutes

In this tutorial, we will study the Express framework. This framework is built in such a way that it acts as a minimal and flexible Node.js web application framework, providing a robust set of features for building single and multipage, and hybrid web application.

In this tutorial, you will learn-

What is Express.js?

Express.js is a Node js web application server framework, which is specifically designed for building single-page, multi-page, and hybrid web applications.

It has become the standard server framework for node.js. Express is the backend part of something known as the MEAN stack.

The MEAN is a free and open-source JavaScript software stack for building dynamic web sites and web applications which has the following components;

1) MongoDB – The standard NoSQL database

2) Express.js – The default web applications framework

3) Angular.js – The JavaScript MVC framework used for web applications

4) Node.js – Framework used for scalable server-side and networking applications.

The Express.js framework makes it very easy to develop an application which can be used to handle multiple types of requests like the GET, PUT, and POST and DELETE requests.

Installing and using Express

Express gets installed via the Node Package Manager. This can be done by executing the following line in the command line

npm install express

The above command requests the Node package manager to download the required express modules and install them accordingly.

Let’s use our newly installed Express framework and create a simple “Hello World” application.

Our application is going to create a simple server module which will listen on port number 3000. In our example, if a request is made through the browser on this port number, then server application will send a ‘Hello’ World’ response to the client.

Node.js Express FrameWork Tutorial - Learn in 10 Minutes

var express=require('express');
var app=express();
app.get('/',function(req,res)
{
res.send('Hello World!');
});
var server=app.listen(3000,function() {});

Code Explanation:

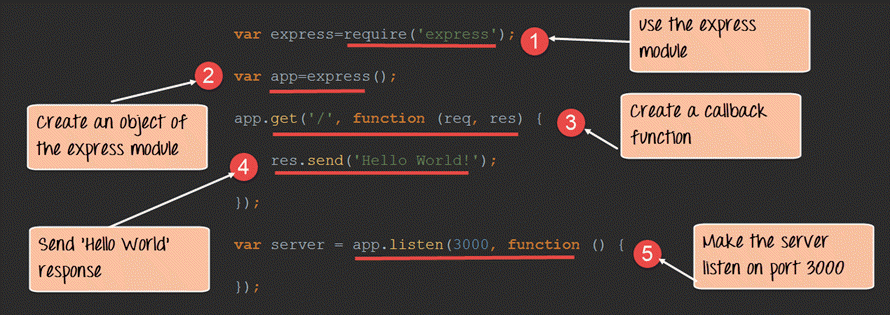
  1. In our first line of code, we are using the require function to include the “express module.”
  2. Before we can start using the express module, we need to make an object of it.
  3. Here we are creating a callback function. This function will be called whenever anybody browses to the root of our web application which is http://localhost:3000 . The callback function will be used to send the string ‘Hello World’ to the web page.
  4. In the callback function, we are sending the string “Hello World” back to the client. The ‘res’ parameter is used to send content back to the web page. This ‘res’ parameter is something that is provided by the ‘request’ module to enable one to send content back to the web page.
  5. We are then using the listen to function to make our server application listen to client requests on port no 3000. You can specify any available port over here.

If the command is executed successfully, the following Output will be shown when you run your code in the browser.

Output:

Node.js Express FrameWork Tutorial - Learn in 10 Minutes

From the output,

  • You can clearly see that we if browse to the URL of localhost on port 3000, you will see the string ‘Hello World’ displayed on the page.
  • Because in our code we have mentioned specifically for the server to listen on port no 3000, we are able to view the output when browsing to this URL.

What are Routes?

Routing determine the way in which an application responds to a client request to a particular endpoint.

For example, a client can make a GET, POST, PUT or DELETE http request for various URL such as the ones shown below;

http://localhost:3000/Books
http://localhost:3000/Students

In the above example,

  • If a GET request is made for the first URL, then the response should ideally be a list of books.
  • If the GET request is made for the second URL, then the response should ideally be a list of Students.
  • So based on the URL which is accessed, a different functionality on the webserver will be invoked, and accordingly, the response will be sent to the client. This is the concept of routing.

Each route can have one or more handler functions, which are executed when the route is matched.

The general syntax for a route is shown below

app.METHOD(PATH, HANDLER)

Wherein,

1) app is an instance of the express module

2) METHOD is an HTTP request method (GET, POST, PUT or DELETE)

3) PATH is a path on the server.

4) HANDLER is the function executed when the route is matched.

Let’s look at an example of how we can implement routes in the express. Our example will create 3 routes as

  1. A /Node route which will display the string “Tutorial on Node” if this route is accessed
  2. A /Angular route which will display the string “Tutorial on Angular” if this route is accessed
  3. A default route / which will display the string “Welcome to Guru99 Tutorials.”

Our basic code will remain the same as previous examples. The below snippet is an add-on to showcase how routing is implemented.

Node.js Express FrameWork Tutorial - Learn in 10 Minutes

var express = require('express');
var app = express();
app.route('/Node').get(function(req,res)
{
    res.send("Tutorial on Node");
});
app.route('/Angular').get(function(req,res)
{
    res.send("Tutorial on Angular");
});
app.get('/',function(req,res){
    res.send('Welcome to Guru99 Tutorials');
}));

Code Explanation:

  1. Here we are defining a route if the URL http://localhost:3000/Node is selected in the browser. To the route, we are attaching a callback function which will be called when we browse to the Node URL.The function has 2 parameters.
  • The main parameter we will be using is the ‘res’ parameter, which can be used to send information back to the client.
  • The ‘req’ parameter has information about the request being made. Sometimes additional parameters could be sent as part of the request being made, and hence the ‘req’ parameter can be used to find the additional parameters being sent.
  1. We are using the send function to send the string “Tutorial on Node” back to the client if the Node route is chosen.
  2. Here we are defining a route if the URL http://localhost:3000/Angular is selected in the browser. To the route, we are attaching a callback function which will be called when we browse to the Angular URL.
  3. We are using the send function to send the string “Tutorial on Angular” back to the client if the Angular route is chosen.
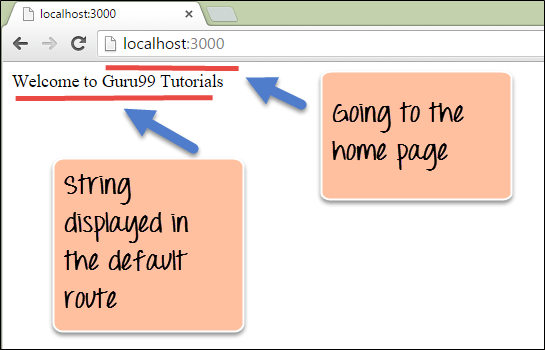
  4. This is the default route which is chosen when one browses to the route of the application – http://localhost:3000. When the default route is chosen, the message “Welcome to Guru99 Tutorials” will be sent to the client.

If the command is executed successfully, the following Output will be shown when you run your code in the browser.

Output:

Node.js Express FrameWork Tutorial - Learn in 10 Minutes

From the output,

  • You can clearly see that we if browse to the URL of localhost on port 3000, you will see the string ‘Welcome to Guru99 Tutorials’ displayed on the page.
  • Because in our code, we have mentioned that our default URL would display this message.

Node.js Express FrameWork Tutorial - Learn in 10 Minutes

From the output,

  • You can see that if the URL has been changed to /Node, the respective Node route would be chosen and the string “Tutorial On Node’ is displayed.

Node.js Express FrameWork Tutorial - Learn in 10 Minutes

From the output,

  • You can see that if the URL has been changed to /Angular, the respective Node route would be chosen and the string “Tutorial On Angular” is displayed.

Sample Web server using express.js

From our above example, we have seen how we can decide on what output to show based on routing. This sort of routing is what is used in most modern-day web applications. The other part of a web server is about using templates in Node js.

When creating quick on-the-fly Node applications, an easy and fast way is to use templates for the application. There are many frameworks available in the market for making templates. In our case, we will take the example of the jade framework for templating.

Jade gets installed via the Node Package manager. This can be done by executing the following line in the command line

npm install jade

The above command requests the Node package manager to download the required jade modules and install them accordingly.

NOTE: In the latest version of Node jade has been deprecated. Instead, use pug.

Let’s use our newly installed jade framework and create some basic templates.

Step 1) The first step is to create a jade template. Create a file called index.jade and insert the below code. Ensure to create the file in “views” folder

Node.js Express FrameWork Tutorial - Learn in 10 Minutes

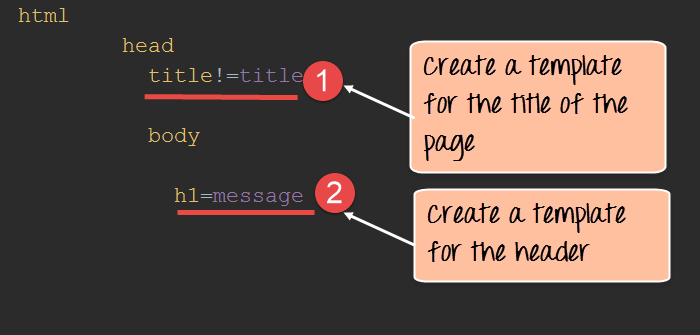
  1. Here we are specifying that the title of the page will be changed to whatever value is passed when this template gets invoked.
  2. We are also specifying that the text in the header tag will get replaced to whatever gets passed in the jade template.

Node.js Express FrameWork Tutorial - Learn in 10 Minutes

var express=require('express');
var app=express();
app.set('view engine','jade');
app.get('/',function(req,res)
{
res.render('index',
{title:'Guru99',message:'Welcome'})
});
var server=app.listen(3000,function() {});

Code Explanation:

  1. The first thing to specify in the application is “view engine” that will be used to render the templates. Since we are going to use jade to render our templates, we specify this accordingly.
  2. The render function is used to render a web page. In our example, we are rendering the template (index.jade) which was created earlier.
  3. We are passing the values of “Guru99” and “Welcome” to the parameters “title” and “message” respectively. These values will be replaced by the ‘title’, and ‘message’ parameters declared in the index.jade template.
If the command is executed successfully, the following Output will be shown when you run your code in the browser.

Output:

Node.js Express FrameWork Tutorial - Learn in 10 Minutes

From the output,

  • We can see that the title of the page gets set to “Guru99” and the header of the page gets set to “Welcome.”
  • This is because of the jade template which gets invoked in our node js application.

Summary

  • The express framework is the most common framework used for developing Node js applications. The express framework is built on top of the node.js framework and helps in fast-tracking development of server-based applications.
  • Routes are used to divert users to different parts of the web applications based on the request made. The response for each route can be varied depending on what needs to be shown to the user.
  • Templates can be used to inject content in an efficient manner. Jade is one of the most popular templating engines used in Node.js applications.
Share:

Live Chat With Us

My Blog List

Search This Blog

Locations

Training

Pages

My Blog List

Blog Archive

Privacy policy