


What is Software Testing?
Software Testing is the process of identifying the correctness and quality of software programs. The purpose is to check whether the software satisfies the specific requirements, needs, and expectations of the customer. In other words, testing is executing a system or application in order to find software bugs, defects or errors. The job of testing is to find out the reasons for application failures so that they can be corrected according to requirements.
Example: Car manufacturer tests the car for maximum speed, fuel efficiency and safety from crash.These test later become the part of advertising strategy for car sales.
Developing a new software can be much more difficult than you could ever imagine. After all, you’ll want to make sure that everything is absolutely perfect from the get-go. If you do not perform an adequate amount of testing, there is a good chance that your software is going to be released with major flaws and glitches. Software testing is more difficult than you might believe. Within this basic guide, you’re going to find suggestions for ensuring your software is tested thoroughly before it is released. Developing a new software can be much more difficult than you could ever imagine. After all, you’ll want to make sure that everything is absolutely perfect from the get-go. If you do not perform an adequate amount of testing, there is a good chance that your software is going to be released with major flaws and glitches. Software testing is more difficult than you might believe. Within this basic guide, you’re going to find suggestions for ensuring your software is tested thoroughly before it is released.
The Basics of Software Testing
First and foremost, you should figure out precisely what software testing is all about. It is nothing more than a process that should be followed to analyze the software’s effectiveness. The software testing phase will give you the opportunity to evaluate your software and determine whether or not it will satisfy the end-user. During this phase, you will be able to identify flaws in the coding. Then, you’ll be able to take steps to ensure that your software is perfected.
Importance Of Software Testing
When it comes down to it, software testing is far more important than you could ever imagine. If you’re not testing your software, there is a good chance that things are going to go awry in the near future. Your software will have flaws and that will gain your company a bad reputation. After all, nobody trusts a company that puts out software full of flaws. Releasing an unstable product could encourage customers to switch to a new program altogether. Fixing errors before the software is launched is the best way to limit the costs too. Truly, it is in your company’s best interest to test the software thoroughly. Your company’s reputation and future really depend on it.
Classic Examples Of Software Testing
The truth of the matter is that all companies are prone to software bugs. In fact, some of the most credible and well-respected companies have run into serious problems of their own. Take NASA as an example. The company’s Mars Climate Orbiter crashed because it went too low too fast. In the end, it was discovered that the agency had utilized non-metric units. Unfortunately, the software needed metric units. That simple lapse cost the company $125 million! It is hard not to remember the Y2K bug. If you remember back during the end of 1999, everyone was frightened that their computers would malfunction when it turned 2000. The bug was incredibly simple. The developer decided that it was a good idea to store years as two digits. Thankfully, the issue was ultimately fixed, but not before billions of dollars were wasted for companies in the software industry. Even those providing essay help online were forced to adjust. Suffice to say, the Y2K bug was one of the most expensive ever.
- Y2K Bug – Billions of dollars
- Mars Climate Orbiter - $125 million
The Perks Of Software Testing
At the end of the day, there are tons of perks associated with thorough software testing. Anyone who refuses to test their software in a comprehensive manner is going to regret it in the future. Software defects cost companies billions and billions of dollars each and every year. It is estimated that the costs could be reduced by as much as one third by implementing better software testing procedures. By testing thoroughly, it will be possible to find and fix mistakes during the development phase. It is also possible to reduce maintenance costs through software testing.
Software testing enables your company to know for certain that you’ve delivered the best software to your clients. That can make a huge difference in the long run.
Roles And Responsibilities Of A Tester
Many people are not completely aware of the roles and responsibilities of a software tester. Below, you’ll learn a great deal more about these roles and responsibilities.• Analyzing the SRS, System Requirement Specifications, and understanding the necessities
- Determining an estimation for the testing
- Preparing or understanding the test plan
- Putting together test cases
- Assembling test data
- Testing and finding defects in the software
- Reporting the defects immediately to make it easier for the developer to fix
- Testing again after the initial problem has been fixed
- Carrying out regression testing
- Offering suggestions for improving SDLC processes
- Delivering support to customers testing the software
- Partaking in the implementation of the software
- Providing support after the implementation is completed
The importance of software testing is immense. This is why more and more companies will continue to spend more money on software testing. In fact, it could soon become of the greatest expense that any technology company will incur. Nevertheless, it is also true that the costs will be well worth it in the long run.
Ways of Software Testing
- Manual Testing: Test Cases executed manually. Learn More
- Automation Testing: Testing performed with the help of automation tools.
Types Of Testing
There are several different types of software testing. To ensure that all errors are identified, it may be essential to utilize a couple of different methods. Below, you will learn more about the different types.
- White Box Testing: This type of testing requires the test to understand the software’ implementation and code. Then, they’ll attempt to analyze the logic of that code. In most cases, the developer will take part in white box testing.
- Black Box Testing: Black box testing looks at things from the end user’s perspective. This type of testing is carried out to determine how functional the software is and whether or not it is going to meet the client’s requirements. To ensure that this testing is carried out correctly, it is pertinent to make sure that the user does not know how the software is supposed to work internally.
- User Acceptance Testing: This type of testing is pretty straightforward. It is performed by the end user right before the product is actually released to the public. This is often done during the beta-testing stage. Be sure to get as many people involved in this testing as possible.
- GUI Testing: Finally, you’ll also want to take advantage of GUI testing. This will ensure that the look and feel of the software will satisfy the user. Again, it is pertinent to utilize all types of testing to ensure that the software is up to par.
- End To End Testing: End to end testing is another necessity. It is very similar to system testing, but there are a few differences. End to end testing will analyze the software from the starting line to the finish line to ensure that each area is working appropriately. During this phase, an environment that resembles a real time environment will be used. It is also pertinent to ensure that the software is syncing with the database correctly.
- Regression Testing: Regression testing should always be carried out after flaws and bugs have been corrected. This type of testing ensures that previous fixes were adequate and that they did not cause any further problems.
Once we develop a software component/ product, we have to analyze and inspect its features and also evaluate the component for potential errors and bugs so that when it gets delivered in the market, it is free of any bugs and errors. It is the point where we need extensive testing of the software. Software testing can be of two types: Manual and Automated. In this article, we will discuss the concepts related to manual testing of an application by covering the details under the following topics:
- What is manual testing?
- Why do we need it?
- When to do it?
- What are different types of manual testing?
- How to perform it?
- What are it's advantages/disadvantages?
- And, what is the difference between Manual and Automated testing?
What is Manual Testing?
As the name suggests, Manual testing is the one in which application testing happens manually. The test cases/scenarios are executed one by one by Testers (professional involved in software testing) manually without using any readymade tools, and then the results are verified.
So manual testing is a process in which we compare the behavior of a piece of software (it can be a component, module, feature, etc.) with the predefined, expected behavior which we set during the initial phases of SDLC.
Manual verification is the most primitive form of software testing. A novice can do it without any knowledge of any particular tool. Even a student, who has a basic understanding of the application or testing of a system, can perform manual verification. Nonetheless, it is an essential step in the software testing cycle. Any new system or applications must be tested manually before automating the testing.
Majorly, it helps in ensuring the quality of the application by ensuring the following points:
- Ensuring that the application meets the defined system requirements.
- Finding out any bugs/errors which may arise while running the application.
Before moving deep into understanding the concepts of manual testing, lets first try to understand why do we need manual verification of an application in the first place?
Why do we need manual testing?
With the changing trends in the software industry, more and more software professionals prefer automated testing, but there are still multiple reasons which justify the need for manual testing. Few of them are:
Human Perspective: The basic usability and look & feel of the application can only be gazed and evaluated by Humans. As the software is developed for humans only, so they only can do better justice of validation from a user experience perspective.
A broader perspective and variation of the System workflows: Manual verification always gives a broader perspective of the overall application. As the human mind will always be in an exploratory form, instead of a coding mechanism that executes the same steps each time. So, it will provide more expansive coverage for the system validation.
Cost of automation: Sometimes, due to the timelines or size of the project, the extended efforts for the automation are not justifiable, and we always prefer a quick manual validation over the automation testing.
Un-automatable scenarios: There can be multiple scenarios that are either not worth automating and doesn't give clear confidence of the user behavior when just testing using automation. For Example, there have been multiple scenarios on mobile devices, which need user interactions, such as "Tap & Pay", which sometimes have different behaviors when automated using tools and when a person manually validated them.
Considering all these points, manual testing has still maintained its place in the validation phase of the fast-paced software development cycle. Now, there are some specific use-cases where manual verification can be the best fit. Let's see what those are?
When to do manual testing?
So, the question remains as to when exactly we should do manual testing or which are the scenarios that compel us to opt for this type of testing? We go for such testing under the following scenarios:
- Adhoc testing: Adhoc testing, as the name suggests, is unplanned testing. It doesn't have any specific approach defined neither it has any documentation associated with it. Adhoc testing is entirely informal, and the only important factor is the knowledge and insight of the tester. Hence in such cases, manual testing is a good option. You can refer to the link "Adhoc testing" for detailed knowledge of Adhoc testing.
- Usability testing: Another scenario where manual testing is required is the case of usability testing. We perform usability testing to assess how convenient, efficient, and user-friendly the product has turned out to be for the end-users. For this assessment, we require the highest manual intervention and cannot rely on tools to assess it for us. So to evaluate the product from the end-user point of view, we opt for manual testing. You can refer to the link "Usability testing" for detailed knowledge of Usability testing.
- Exploratory testing: When the documentation of the test is poor, and we have a short time for execution, in such cases, this exploratory testing requires analytical skills and creativity of the tester and also the tester's product knowledge. When we have to perform exploratory testing, we go for manual verification as we cannot use tools with little knowledge and documentation.
Let's now understand the various types of manual testing which a QA can perform on an application.
What are the different types of manual testing?
Depending on how and when we perform the manual test, we broadly categorize it into the following types:
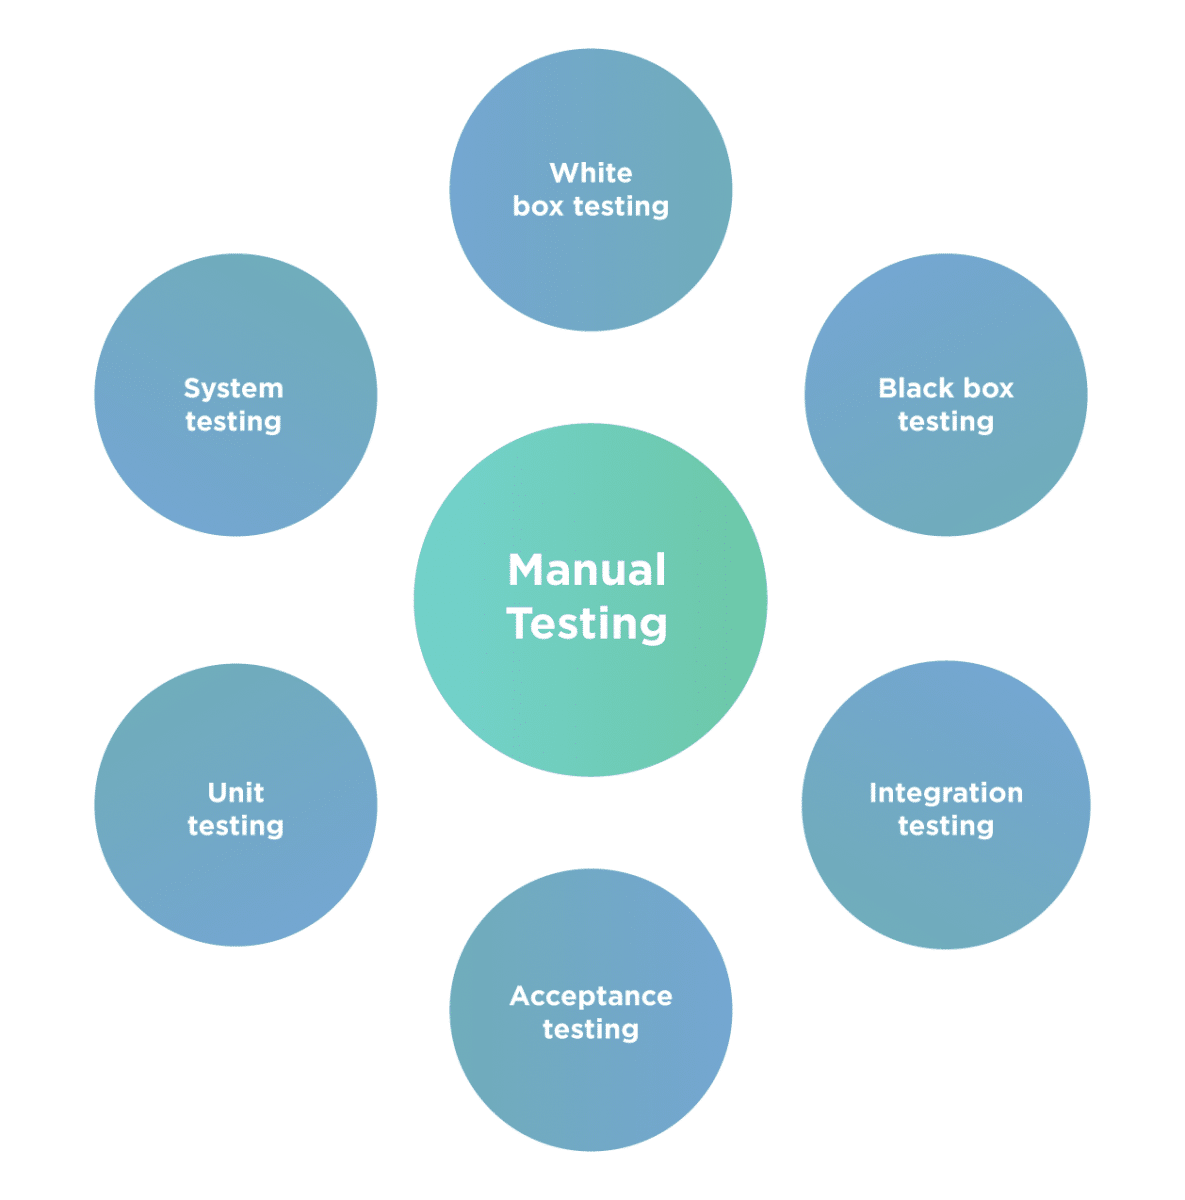
Let's understand some necessary details about all these types testings:
Unit Testing
Validation of an individual software component or module is called Unit Testing. Generally, the developers perform it and not by the QA Engineers, as it requires detailed knowledge of the internal program design and code.
Integration Testing
Integration testing is testing of a subsystem which comprises two or more integrating components. Its carried out once the individual components have been unit tested, and they are working as expected. Its carried out to find defects in the interfaces and the interactions between the integrated components.
System Testing
System Testing means testing the system in its entirety. All the developed components are unit tested and then integrated into an application. Once this finishes, we test the entire system rigorously to ensure the application meets all the quality standards.
Acceptance Testing
User Acceptance Testing – UAT is a type of testing performed by the Client to certify the system concerning the requirements that got agreed upon earlier. We perform this testing in the final phase of testing before moving the software application to the Market or Production environment. The client executes this type of testing in a separate environment (similar to the production environment) & confirm whether the system meets the requirements specifications.
Black Box Testing
In the Black Box Testing method, testing happens without knowing the internal codes and structure of the program. The testing happens from the customer's point of view, and the tester knows only about the inputs and the expected outputs of the application. The tester is not aware of how the requests are being processed by the software and giving the output results.
White Box Testing
White Box Testing is the testing method in which the tester knows the internal codes & structure of the software. The tester chooses inputs and executes the test by giving inputs to the system through the codes and determines the appropriate outputs. The main focus of White Box Testing is on strengthening the security and on improving the design and usability of the software.
Let's now understand what process we generally follow while performing a manual test of the application:
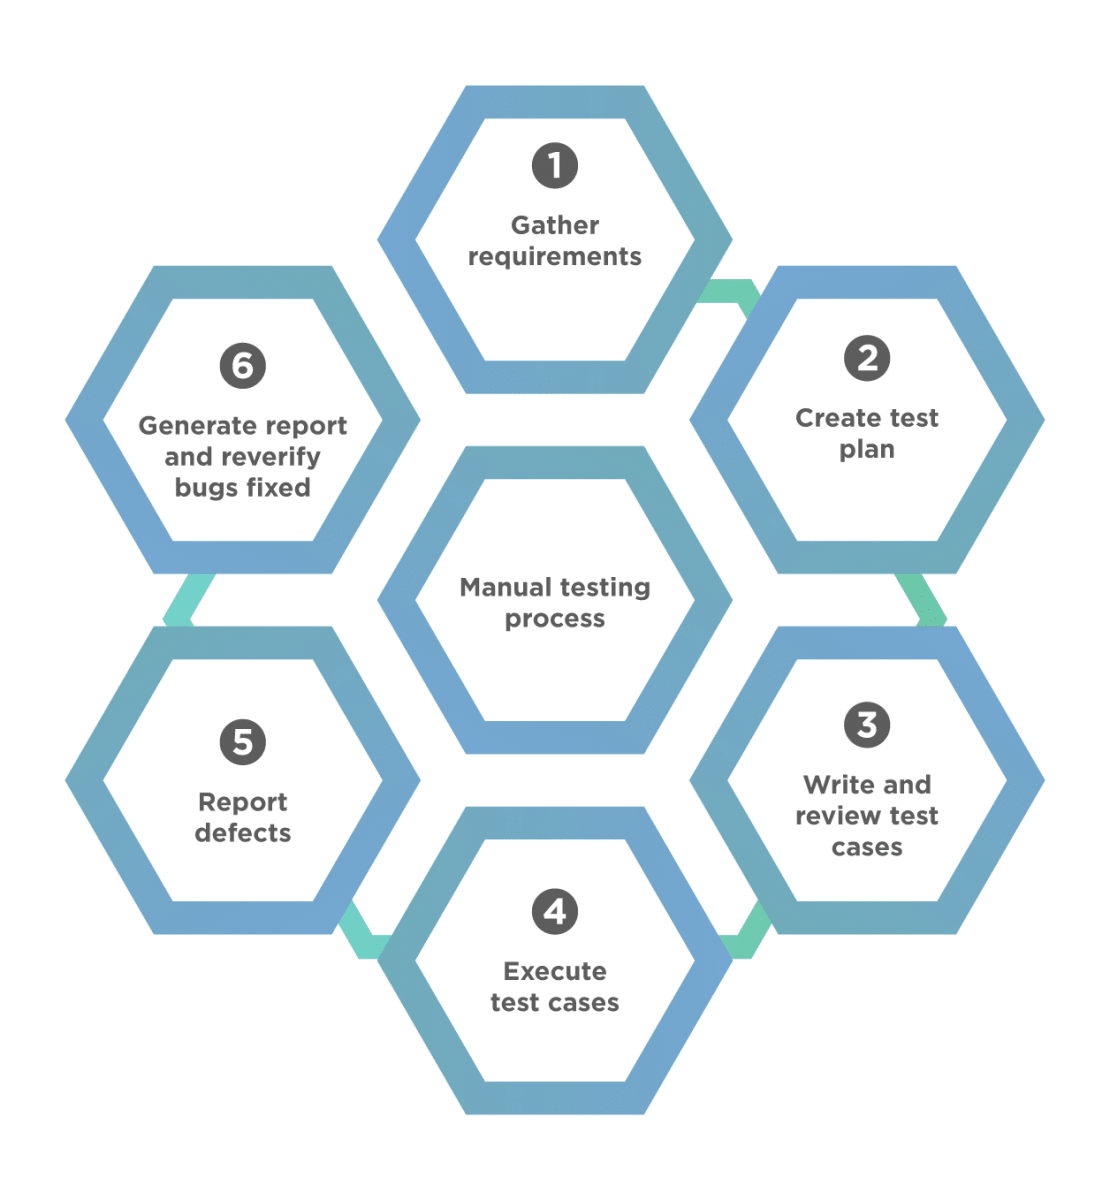
How to perform manual testing?
A complete manual testing process consists of the following steps:
Let's understand the details of all these steps:
Step 1: First, gather the requirements using the requirement analysis step. Once we gather and understand the requirements, we know what the expected behavior is and what we need to test, and when we say we have found the defect.
Step 2: Secondly, once we understand the requirements, we identify and draft the test cases that will cover all the requirements contained in the project documentation. Additionally, the test cases help us follow a sequence to test functionality and various test scenarios such that we cover the entire application and check expected results.
Step 3: Once test cases are ready, the tester has to review the test cases with the team leader and with the client if need be. By examining the test cases, we will find glitches, if any, and correct them before executing the test cases.
Step 4: Once test cases are ready, and the test environment sets, we execute the test cases one by one. Each test case will have one of the following states:
- Passed: If the scenario under test works as expected.
- Failed: If the working is not as expected.
- Skipped: If the test case cannot complete. It may be because of some limitations or unforeseen circumstances.
Step 5: As the test cases execute, we have to report the identified bugs and defects to the concerned developer and submit a bug report.
Step 6: Finally, we create a detailed test report that will include detailed information on how many defects or bugs we found, how many test cases need to be rerun, how many test cases failed, and how many we skipped. Once we fix the bugs and defects, execute the test cases that could not verify the fixed bugs.
Conclusively, when we have understood the manual testing process, let's understand what the advantages and disadvantages of performing a manual test of the application under test are:
What are the advantages/disadvantages of manual testing?
The below lists a few of the significant advantages and disadvantages of manual testing:
| Advantages | Disadvantages |
|---|---|
| Manual testing of an application identifies most of the issues, including the look and feel issues of the application. | Manual testing is time-consuming. |
| Visual components like text, layout, other components can easily be accessed by the tester, and UI and UX issues can be detected. | It isn't easy to find size difference and color combination of GUI objects using a manual test. |
| It usually has a low cost of operation as we do not use any tools or high-level skills. | Load testing and performance testing is impractical in the manual tests. |
| It is well-suited in case we make some unplanned changed to the application as it is adaptable. | When there is a large number of tests, then running tests manually is a very time-consuming job. |
| Humans can observe, judge, and also provide intuition in case of manual tests, and this is useful when it comes to user-friendliness or rich customer experience. | Regression Test cases performed using manual tests are time-consuming. |
Now, let's have a quick look at the significant differences between manual and automation testing:
What is the difference between Manual and Automated testing?
Below are a few of the significant differences between manual and automation testing:
| Comparison Parameter | Manual Testing | Automated Testing |
|---|---|---|
| Execution | Testers manually execute test cases. | Uses tools to schedule and execute the test cases. |
| Time and cost | The manual test takes up lots of time and implies a high cost. | Automated testing: since the test cases are automated, it saves time and is very low. |
| Type of application | We can manually test any application. | Automated testing is beneficial only for stable systems. |
| Nature | The process is such that it is repetitive and boring. | Since the automation tool handles the execution, the tester skips the boring part. |
| Reliability and Accuracy | Low reliability as manual verification is prone to human error | High accuracy since all test cases are automated and executed by tools |
| User interface | More user-friendly and guarantees improved customer experience | Does not guarantee user-friendliness or good customer experience. |
Key Takeaways
- Manual testing requires creative skill and imagination, using which a tester can imagine various scenarios to test a particular application.
- Additionally, the manual tester is not required to have expert software skills, but creativity and imagination are essential.
- Although nowadays, we can test almost all applications using automation, manual testing still is required as the base of testing.
- Also, we can find specific bugs only by testing the application manually.
Difference Between Error Mistake Fault Bug Failure Defect
Why is it that software system sometimes don't work correctly? We know that people make mistakes - we are fallible.
If someone makes an error or mistake in using the software, this may lead directly to a problem - the software is used incorrectly and so does not behave as we expected. However, people also design and build the software and they can make mistakes during the design and build. These mistakes mean that there are flaws in the software itself. These are called defects or sometimes bugs or faults.
When the software code has been built, it is executed and then any defects may cause the system to fail to do what it should do (or do something it shouldn't), causing a failure. Not all defects result in failures; some stay dormant in the code and we may never notice them.
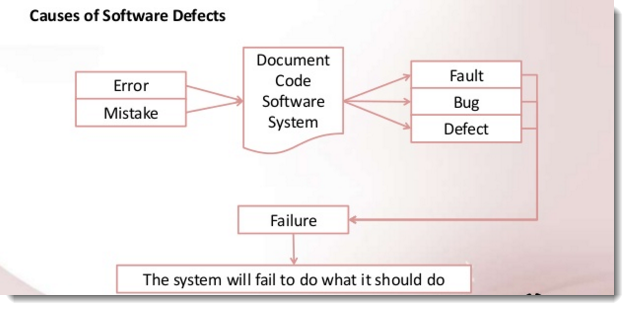
What is an Error or Mistake?
Error is a human action that produces an incorrect result. It is deviation from actual and expected value. The mistakes made by programmer is known as an ‘Error’. This could happen because of the following reasons
- Some confusion in understanding the requirement of the software
- Some miscalculation of the values
- Or/And Misinterpretation of any value, etc.
It represents mistake made by people and Mistake in the program leads to error.
What is a Bug?
A Bug is the result of a coding Error or Fault in the program which causes the program to behave in an unintended or unanticipated manner. It is an evidence of fault in the program. Bugs arise from mistakes and errors, made by people, in either a program's source code or its design. Normally, there are bugs in all useful computer programs, but well-written programs contain relatively few bugs, and these bugs typically do not prevent the program from performing its task.
What is a Defect or Fault?
A Defect is a deviation from the Requirements. A Software Defect is a condition in a software product which does not meet a software requirement (as stated in the requirement specifications) or end-user expectations. In other words, a defect is an error in coding or logic that causes a program to malfunction or to produce incorrect/unexpected result. This could be hardware, software, network, performance, format, or functionality.
What is a Failure?
Failure is a deviation of the software from its intended purpose. It is the inability of a system or a component to perform its required functions within specified performance requirements. Failure occurs when fault executes.
Conclusion:
A Bug is the result of a coding Error and A Defect is a deviation from the Requirements. A defect does not necessarily mean there is a bug in the code, it could be a function that was not implemented but defined in the requirements of the software.
What is Test Basis and How it is helps to build Test Cases?
Basis for the tests is called the Test Basis. It could be a system requirement, a technical specification, the code itself, or a business process. The test basis is the information needed in order to start the test analysis and create our Test Cases. From a testing perspective, tester looks at the test basis in order to see what could be tested. In other words, Test basis is defined as the source of information or the document that is needed to write test cases and also for test analysis.
It should be well defined and adequately structured so that one can easily identify test conditions from which test cases can be derived.
Reviewing Test Basis is a very important activity of V- Model in SDLC. It is also an activity during the phase of Test Analysis and Design in the Testing Process. As it is most likely to identify gaps and ambiguities in the specifications, as reviewer tries to identify precisely what happens at each point in the system, and this also pre-vents defects appearing in the code.
Possible Test Basis are:
- System Requirement Document (SRS)
- Functional Design Specification
- Technical Design Specification
- User Manual
- Use Cases
- Source Code
- Business Requirement Document (BRD)
est Case Specification document described detailed summary of what scenarios will be tested, how they will be tested, how often they will be tested, and so on and so forth, for a given feature. It specifies the purpose of a specific test, identifies the required inputs and expected results, provides step-by-step procedures for executing the test, and outlines the pass/fail criteria for determining acceptance.
Test Case Specification has to be done separately for each unit. Based on the approach specified in the test plan, the feature to be tested for each unit must be determined. The overall approach stated in the plan is refined into specific test techniques that should be followed and into the criteria to be used for evaluation. Based on these the test cases are specified for the testing unit.
However, a Test Plan is a collection of all Test Specifications for a given area. The Test Plan contains a high-level overview of what is tested for the given feature area.
Reason for Test Case Specification:
There are two basic reasons test cases are specified before they are used for testing:
- Testing has severe limitations and the effectiveness of testing depends heavily on the exact nature of the test case. Even for a given criterion the exact nature of the test cases affects the effectiveness of testing.
- Constructing a good Test Case that will reveal errors in programs is a very creative activity and depends on the tester. It is important to ensure that the set of test cases used is of high quality. This is the primary reason for having the test case specification in the form of a document.
The Test Case Specification is developed in the Development Phase by the organization responsible for the formal testing of the application.
What is Test Case Specification Identifiers?
The way to uniquely identify a test case is as follows:
- Test Case Objectives: Purpose of the test
- Test Items: Items (e.g., requirement specifications, design specifications, code, etc.) required to run a particular test case. This should be provided in "Notes” or “Attachment” feature. It describes the features and conditions required for testing.
- Input Specifications: Description of what is required (step-by-step) to execute the test case (e.g., input files, values that must be entered into a field, etc.). This should be provided in “Action” field.
- Output Specifications: Description of what the system should look like after the test case is run. This should be provided in the “Expected Results” field.
- Environmental Needs: Description of any special environmental needs. This includes system architectures, Hardware & Software tools, records or files, interfaces, etc
To sum up, Test Case Specification defines the exact set up and inputs for one Test Case.
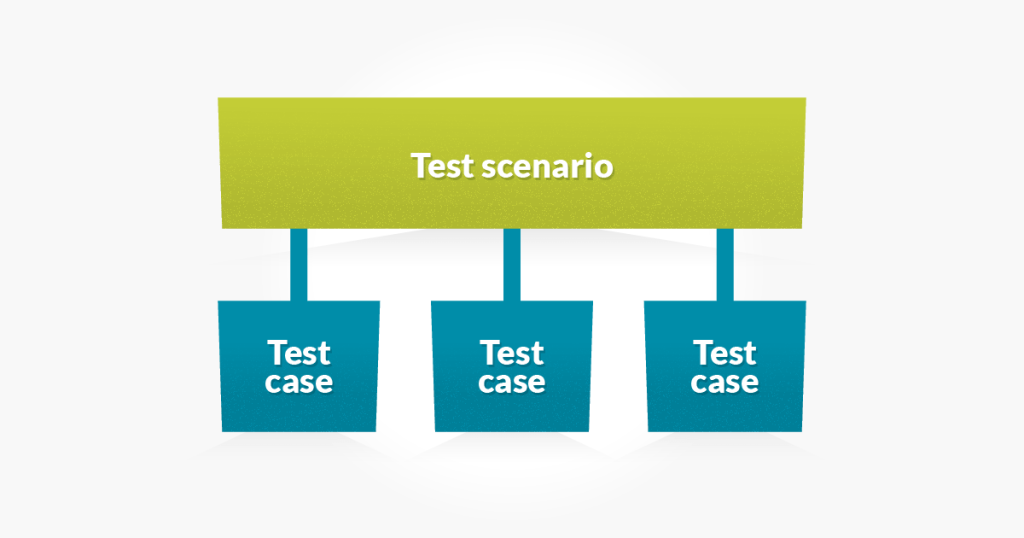
What is Test Scenario?
Test Scenario is made up of two words (Test & Scenario). Where Test means to verify or validate and Scenario means any user journey. When combined it says verify user journey. It is also called Test Condition or Test Possibility means any functionality that can be tested.
Most of the times people get confused with the term Test Scenario & Test Case. Test Scenario is what to be tested and a Test Case is how to be tested. Please take a look at the difference between Test Scenario and Test Condition.
Example
Test Scenario: Validate the login page
- Test Case 1: Enter a valid username and password
- Test Case 2: Reset your password
- Test Case 3: Enter invalid credentials
What is Scenario Testing?
The exhaustive testing is not possible due to a large number of data combinations and a large number of possible paths in the software. Scenario testing makes sure that end to end functionality of application under test is working as expected and ensures that all business flows are working as expected. As Scenarios are nothing but the User journeys, in scenario testing tester puts themselves in the end users shoes to check and perform the action as how they are using application under test.
What are the Pre-requisites for writing Test Scenarios?
The preparation of scenarios is the most important part. The tester needs to consult or take help from the Client, Business Users, BAs (Business Analyst) or Developers. Once these test scenarios are determined, test cases can be written for each scenario. Test scenarios are the high-level concept of what to test.
- Tester must have a good understanding of the business and functional requirements of the application. Scenarios are very critical to business, as test cases are derived from test scenarios. So any miss in Test Scenario would lead to missing of Test Cases as well. That is why Scenario writer plays an important role in project development. A single mistake can lead to a huge loss in terms of cost and time.
- Tester must have gone through the requirements carefully. In case of any doubts or clarification, POCs (Point of Contact) should be contacted.
- Understand the project workflow, and wireframes (if available) and relate the same to the requirement .
Things to note while writing Test Scenario:
- Test Scenarios should be reviewed by the Product Manager/Business Analyst or anyone else who understands the requirements really well.
- Domain knowledge is important to get a deeper understanding of the application.
- Test scenarios must cover the negative and out-of-the-box testing with a ‘Test to Break’ attitude.
- Scenario mapping should be done to make sure that each and every requirement is directly mapped to a number of scenarios. It helps in avoiding any miss.
- Ensure that every identified scenario is a story in itself.
During the last several years, the testing process has evolved considerably, and the testing principles that govern them have evolved as well. Software testing is a complex activity, and a tester should understand these testing principles to have a broader understanding of the testing process.
In this article, we will focus on The Seven Software Testing Principles.
What are the Software Testing Principles?
Software testing strives to achieve efficiency, and consistently evolve to make the test process effective while reducing the time and cost. We have seven basic principles in software testing. These testing principles have evolved over a period of time and widely accepted as the common guideline for all testing.
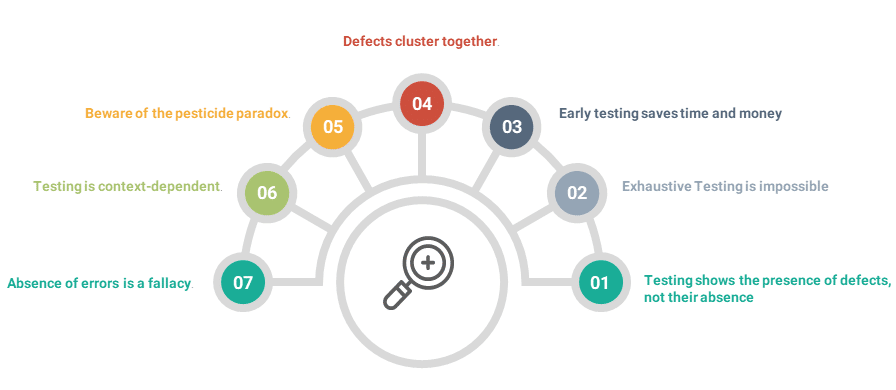
Testing shows the presence of defects, not their absence:
The purpose of software testing is to detect software failures. Software testing can prove the presence of defects, but no amount of testing can prove that the software is free of defects. Even multiple test phases and several rounds of testing cannot guarantee that the software is 100% bug-free. Efficient Testing techniques reduces the probability of undiscovered defects remaining in the software but, even if no defects are found, it is not a proof of correctness.
For example, if we see many swans swimming in a pond and observe that most of them are white. We cannot claim 'All swans are white' but as soon as we see one black swan, we can say 'Not all swans are white'. In the same way, we may execute many tests without finding a bug, but we cannot claim that 'there are no bugs'. As soon as we find a bug, we can show 'This code is not bug-free'.
Exhaustive testing is impossible:
Exhaustive testing is the process of testing the functionality of the software where all possible inputs and their combinations are run along with different preconditions.
Consider an example where you are testing a flight booking application. The source and destination fields have got three dropdowns each. The first dropdown has '10' countries. On the selection of a country, the second dropdown will populate '10' states. On the Selection of a state, the third dropdown will display '10' cities. Imagine the number of permutations that these combinations will generate (10 ^ 6).
Instead of attempting to test exhaustively, Risk Analysis and Business Prioritization should be used to minimize the test efforts which further helps in saving cost, time, resources, etc. Risk assessment helps in deciding how much testing is enough. It takes into consideration: the level of risk, including technical and business risks related to the product and project constraints such as budget and time.
Business Prioritization helps in focusing on critical areas, and test efforts can be distributed based on this prioritization
Early testing saves time and money:
To find the defect early in the software life-cycle, you must start static and dynamic test activities as early as possible as it is much cheaper to change the product at the beginning of the development life cycle than in the final stages of the project. The developer needs less time and effort to fix the defects detected in the early phases since a small part of the module needs to be modified. Once the code is written, programmers and testers often run a set of tests so that they can identify and correct defects in the software.
Defects cluster together:
Defect clustering in software testing means that a small module or functionality contains most of the errors or has the most operational failures. A phenomenon that many testers have observed is that defects tend to cluster. This can happen because one area of the code is particularly tricky and complicated, or because the change of software and other products tends to cause regression defects. Testers use this information when doing a risk assessment for the planning of the tests, and will focus on these clusters. According to the Pareto Principle (Rule 80-20), “80% of the defects come from 20% of the modules and the remaining 20% defects are distributed across the rest 80% of the modules”. So, we should emphasize the testing in 20% of the modules where we face 80% of the errors.
Defects cluster change over time, as the functionality becomes more stable. The testing team should always be on the lookout to find new clusters.
Beware of the Pesticide paradox:
The Pesticide Paradox in software testing is the process of repeating the same test cases over and again, eventually, these test cases will no longer find new defects. If we are using the same pesticides, again and again, it will no longer kill the insects. Then, to overcome this Pesticide Paradox, it is necessary to review the test cases regularly and add new test data/inputs or update them to find more defects. As the cluster for the bugs is cleaned up, we must shift our focus to another place, to the next set of risks. Over time, our focus may change from finding coding errors to looking at the requirements and design documents for defects and then improve the processes to prevent defects in the product.
Testing is context-dependent:
It means the test approach depends on the context of the software. For instance, the way you test a POS (Point of Sale) system at a brick and mortar store will be different from the way you are going to test an ATM machine. Similarly, testing a mobile application requires a different test approach than testing a desktop web application.
The risk profile of every software differs and hence the test techniques and test efforts also vary. A flight control software would have a very low appetite for open defects as compared to an e-commerce application. The flight control software cannot afford undetected defects, as it can prove to be life-threatening, and hence additional testing efforts might be required.
Absence-of-errors is a fallacy:
According to the first and second testing principle, it is impossible to run all possible tests and find all possible defects. Further, it is a mistaken belief that finding and fixing a large number of defects is key to the success of a system. For example, sometimes 99% of the bug-free software can remain unusable if the wrong requirements are incorporated into the software. The software we develop must not only have minimal defects, but it must also meet the needs of the business, otherwise, it becomes unusable.
The software test is a vital element in the Software Development Life Cycle (SDLC) and can provide excellent results if done correctly and effectively. Unfortunately, software testing is often less formal because we lack to follow best practices, methodologies, principles, standards for optimal software testing. To accomplish testing goals, the maximum implementation of testing principles in real-world software development is necessary. This can be achieved only when everyone involved in the project must be familiar with the basic principles of software testing.
The popular belief among the masses is that the testing phase completes once we finish the test execution across different test levels (Component Testing, Integration Testing, System Testing, and [UAT Testing](https://www.toolsqa.com/software-testing/user- acceptance-testing-uat/). However, testing is much more than merely moving from one test level to another. Following a defined process to close testing for a test level or overall testing takes place. Let's go in detail on the process involved for test completion.
We will focus on the following points in this article:
- What Do You Understand by Test Completion Activities?
- What are the Test Completion Work Products?
- Test Completion Criteria for Test Levels
What Do You Understand by Test Completion Activities?
Test Completion is the last stage of the software testing life cycle. It results in a report that is a Test manager or a Test lead prepares that showcases the completed data from the test execution.
Let's understand the key activities carried out in test closure.
- First is checking whether all reported defects reach a closure. The open ones should either be classified as a change request or get explicit approval from product owners that the software can go live with these open defects.
- Second is creating a test summary report & communicating it to stakeholders. It gives a high-level overview of all the testing performed and their results.
- Next comes finalizing and archiving the test environment, the test data, the test infrastructure, and other test ware for later reuse. It can include test data refresh so that other projects use this environment.
- After this, handing over the testware to the maintenance teams, other project teams, and stakeholders who could benefit from its use occurs. Once the project completes, handing over of testware like automation suite to maintenance teams happens so they can benefit from it.
- In addition to the above, analyzing lessons learned from the finished test activities to determine changes needed for future iterations, releases, and projects happens. The lessons learned could be a lack of test coverage, quality of test cases, or lack of unit test coverage.
- Moreover, using the information collected to improve test process maturity happens. It could be a test case review process with product owners. It additionally ensures that test coverage is increased based on UAT or production defect leakage.
What are the Test Completion Work Products?
Work products are the output of test activity. Now that we have learned about the different activities that execute in test completion. We will now review the work products that are the creation of these activities.
- Test summary reports: One of the critical outcomes of the Test Completion phase is the test summary report. This report is the summary of all the testing efforts which execute during the testing process. The summary report is a crucial input to the stakeholders to determine the amount of testing accomplished. In addition to that, it also analyzes the unattended risks and issues. It helps them to make informed decisions about the software (E.g., whether to take the software to production or not).
- Change Requests or Product Backlog Items: If there are defects that don't fix in a release, they push to Product Backlog. In some cases, there are defects/functionalities which went undefined in requirements. Therefore, these require considering them as Change Requests.
- Action Items for the improvement of subsequent projects or iterations: One of the essential aspects of Test Completion activities is that it offers the opportunity to evaluate and record several lessons learned from the software testing process, as well as the software development life cycle (SDLC). From discussing best practices and effective methods for eliminating various ineffective processes, considering all these for future reference becomes imperative, so the next release should not repeat the same mistakes.
- Finalized testware: Finally, in this phase, finalization & archiving of all relevant test work products and documents, such as test records, test reports, test cases, test results, test plans take place.
Test Completion Criteria for Test Levels
Usually, there is a misconception that test completion occurs when the testing phase is complete. In addition to this, it's considered that it's a final report. Which, in turn, needs to get testing sign-off before we go to production. However, test completion can occur at different project/test milestones. Let's have a look at test completion criteria at different Test Levels.
- Completion of Sprint/Agile Iteration: Once the sprint finishes, the testing of the stories planned in the sprint also needs to complete within the sprint timelines. Often, there are outstanding defects or dependencies that remain unresolved within the sprint timelines. Therefore, it leads to testing spill over to the next sprint. A test completion report at the sprint level is a concise report. This report calls out the open defects/dependencies and failed/blocked test cases that can't execute in the sprint. Based on this data, the Scrum Master decides whether to close the story (by taking exception from the product owner), or the story will carry over to the next sprint. This discussion can happen on the last day of Sprint, or as part of the Sprint retrospective meeting.
- Test Level Completion: You would already know by now that we have different test levels that are used to certify software from a testing perspective. These are Component Testing, Integration Testing, System Testing, and User Acceptance Testing. You can read our article on test levels if these are new terms for you. There is a defined process and criteria that govern whether we can move from one test level to another. Its captured as part of the test closure report for that test level.
- Component Testing: Test closure at component testing usually has a limitation of getting the unit test case coverage. Additionally, it ensures there are no critical defects that will impact component integration testing. Test strategy governs the percentage of unit test coverage, and usually, kept at greater than 80%.
- Component Integration Testing: Test closure at this level calls out the integrated components whose testing finishes (E.g., Cart with Address validation, Checkout with payment gateway, etc.). If the testing of all the integrated components completes, and there are no critical defects, then the testing moves to the next test level. This level is referred to as System testing.
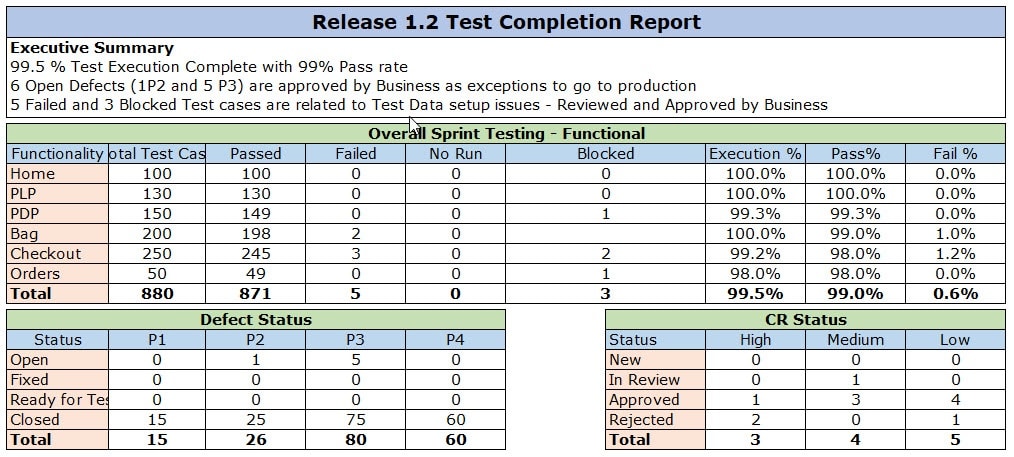
- System Testing: As system testing is the last level of testing before we give it to customers for user acceptance, the closure report is detailed. Usually, the test strategy defines the KPI (Key Performance Indicators) that needs to meet before we can exit System testing successfully. A Sample KPI looks like below.
- 100% System Test Execution
- 95% Pass Rate
- 0 P1/P2 Defects and less than 50 P3/P4
- Cross-Browser / Cross-Device testing is complete with >90% pass rate
- Accessibility Testing is complete
- Analytics Testing is complete
- Performance Testing is complete with acceptable and agreed issues
- Security testing is complete, and no major defect pending
As you can see, there are several KPI that require tracking for completion of System testing. Therefore, the test closure report is pretty comprehensive. Presenting this report to business stakeholders happens, and based on the results; they decide whether User Acceptance testing can start or not.
- User Acceptance Testing: This is the last test level before the software goes to production. The test completion report usually contains the execution status and open defects. This report determines whether the software release can happen to production.
- Maintenance Release Completion: For maintenance releases, we usually don't have comprehensive testing done, and a test completion report could call the new features added, and the corresponding testing happens for that along with open defects.
- Test Project Cancellation: In rare circumstances, a test project could get canceled or deferred, usually due to software no longer required or strategic decision by the business. In such cases, the closure report calls out the completed testing so far, and defects, and open dependencies. The completion report helps to ensure that when the project restarts, we don't have to start from scratch.
As we have seen, the test completion is an important activity. It additionally determines the readiness of software at each test level. The completion report ensures transparency with stakeholders so they can make informed decisions about the software.
The Psychology of Testing
The software is a humanistic approach that requires the involvement of human beings at every stage. Humans invariably create the software, test it, and in most cases, use and abuse it too. Thus, we require a lot of effort and understanding to be able to deal with the fact that we are fallible. In this article, we'll discuss the Psychology of Testing, that is, various psychological factors that influence testing and success. We will focus on the following given points:
- How is Human Psychology related to Testing, along with a real-life example?
- Role & Characteristics of a Software Tester
- How to improve communication and develop relationships between Testers and Developers?
Let’s learn the psychology of testing in detail.
Human Psychology and Testing
The mindset which we apply during Testing and Reviewing is different from the one that we use during Designing or Developing. It means, while building the software, we work positively towards the software with an intent to meet customer requirements. However, when we test or review the product, we lookout for defects in the product.
Let's understand Psychology of Testing with the help of an example:
Suppose you are a chef in a five-star hotel. Your job is to cook the best meal you possibly can, with the available ingredients. You bring all your experience to the table and create a meal that is flawless from your point of view. Now imagine that there is an internal quality inspector hired by the hotel who will taste your meal, and give a report to the hotel management on the quality and taste of the meal.
You can correlate the chef's mindset with that of a Developer and the quality inspector's mindset with that of a Tester. The chef cooks the food with positive intent, whereas the quality inspector looks out for flaws/mistakes in the dish prepared by the chef.
A human psychology element called Confirmation bias refers to thinking that makes it difficult to accept information that disagrees with currently held beliefs. For example, Developers believe that their code has no errors. So, it is difficult for them to take that their code is incorrect. Testing is often looked upon as bearer of bad news by Developers as it highlights defects/failures in the system. It's difficult to see the bigger picture that these defects eventually make the software better and more usable.
Role & Characteristics of a Software Tester
Software Development and Software Testing go hand in hand, simultaneously. Both aim to meet pre-defined requirements and purposes. The work of developing software is constructive or creative. On the other hand, software testing usually falls in the category of destructive work or negative work. Because testing a software needs the mindset to break the application/software. Hence, it's considered a destructive process.
Additionally, software testing has established procedures and techniques that are designed to give a tester the best chance to find defects. To conclude, software testing is a destructive process to achieve a constructive purpose.
Software Testers also need to acquire the following skills in addition to technical skills:-
- Interpersonal skills: Firstly, there should be effective communication between testers & developers about defects, failures, test results, the progress of tests and risks, etc. The way of conveying messages should be very concise, complete, and humble. Additionally, they should try to build friendly relations with developers so that they are comfortable to share feedback.
- Sharp observation: Secondly, the software testers must have an "eye for detail". The testers can quickly identify or detect many critical errors if they observe sharply. Moreover, they should examine the software for the parameters such as 'look & feel' of GUI, incorrect data representation, ease of use, etc.
- Destructive creativity: In addition to the above, the tester needs to develop destructive skills as well. In other words, the tester should not "hesitate to do negative testing". Negative testing is checking the system under unexpected conditions. For instance, if a login ID is specified to use only alphabets, then the tester should test it with numbers and special characters as well. A creatively oriented but destructive approach is necessary. It produces a more robust & reliable software.
- Customer-oriented perspective: The software testers should adopt a customer-oriented perspective while testing the software product. They should be able to place themselves in customer shoes and test the product as a mere end-user.
- Cynical but friendly attitude: Regardless of the nature of the project, the tester must be tenacious when questioning even the minor ambiguity until it is proven. Different situations may arise during the test. For instance, the detection of a large number of errors may cause a more significant delay in the shipment of the product. It can lead to a tight situation between testers and other development teams. The tester must balance this relationship. It should not happen at the expense of errors. Testers should convince and defend the intentions of "attacking software issues but not software developers".
- Organized, flexible, and patient at work: Testers realize that they can also make mistakes. Therefore, they should be excellent organizers -they must-have checklists, facts, and figures to support their findings. Additionally, the tester should be flexible and open to new strategies. Sometimes, significant tests must be re-run that would otherwise change the fundamental functionality of the software. Therefore, the tester should have the patience to retest the software for as many new errors as may arise. Testers must be patient and stay prepared in projects where requirements change rapidly.
- Objective and neutral attitude: No one likes to hear and believe the bad news. Well, testers resemble messengers of bad news in a software project team. No matter how brilliant the testers are at their job; nobody wants to share the bad news. But, the tester always communicates the wrong part of the software, which the developers do not like. The tester must be able to deal with the situation in which he has to face the accusation of doing his job (i.e., detecting errors) too well. The tester's work should be appreciated, and the development team should welcome the errors. That is because every potential error encountered by the tester would mean a reduction of an error that the client might have encountered.
Regardless of the perceptions of testing being destructive, the role of a tester is to report honestly every known mistake found in the product with a specific objective and neutral attitude.
How to improve communication and relationships between Testers and Developers?
As discussed above, testing highlights defects/errors. Therefore, the perception is that it is a destructive activity. It, in turn, makes it all the more important for testers to convey the defects/faults constructively. Apart from technical and domain skill-set, one of the primary skills of a tester/test manager is his ability to communicate effectively. This communication can be about defects, test results, test progress, and risks. They should also be able to build a positive relationship with their colleagues, specifically with their development counterparts.
Here are a few ways of effective communication:-
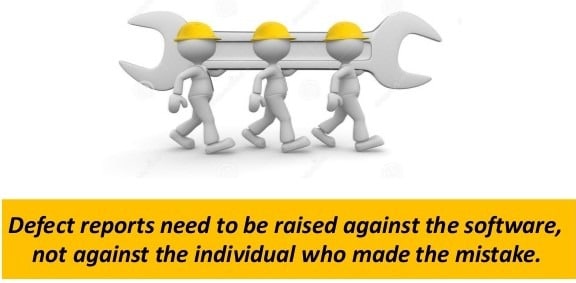
- Communicate findings of the product in a neutral, fact-centric manner, without criticizing the person who created it. For example, write objectives and provide a logical, organized, and detailed defect report. The sections of this defect report may include: Complete description, build/Platform, steps to reproduce, actual results, and expected outcomes.
- Do not boast - You're not perfect either!
- Do not blame - the errors are probably from the group instead of an individual.
- Be constructively critical and discuss the defect and steps to reproduce it.
- Discuss how to fix the defect so that the delivered system is better for the client.
- Demonstrate the risk involved with the defect and clearly define the priority of the defects.
- Do not just see the pessimistic side, praise the efforts as well.
- Show discovered risks and the benefits of fixing the defects.
- Confirm that the developer has understood the defect clearly
- Collaborate instead of battling around. Remember everyone in the project has a common objective of creating better software.
- Be collaborative, kind, and helpful to your colleagues
- Try to understand how the other person feels and why he/she reacts the way they do.
- Confirm that the other person has understood what you said and vice versa.
- Offer your work to be reviewed, too.
- Try to understand how the other person may feel, and if they will react negatively to the information presented.
Conclusion
To achieve successful testing it is essential for software engineers to consider the psychology of testing. The tester must have a good working relationship with the developers. It, in turn, will not only help in creating a quality product but will also promote collaboration and learning opportunities.
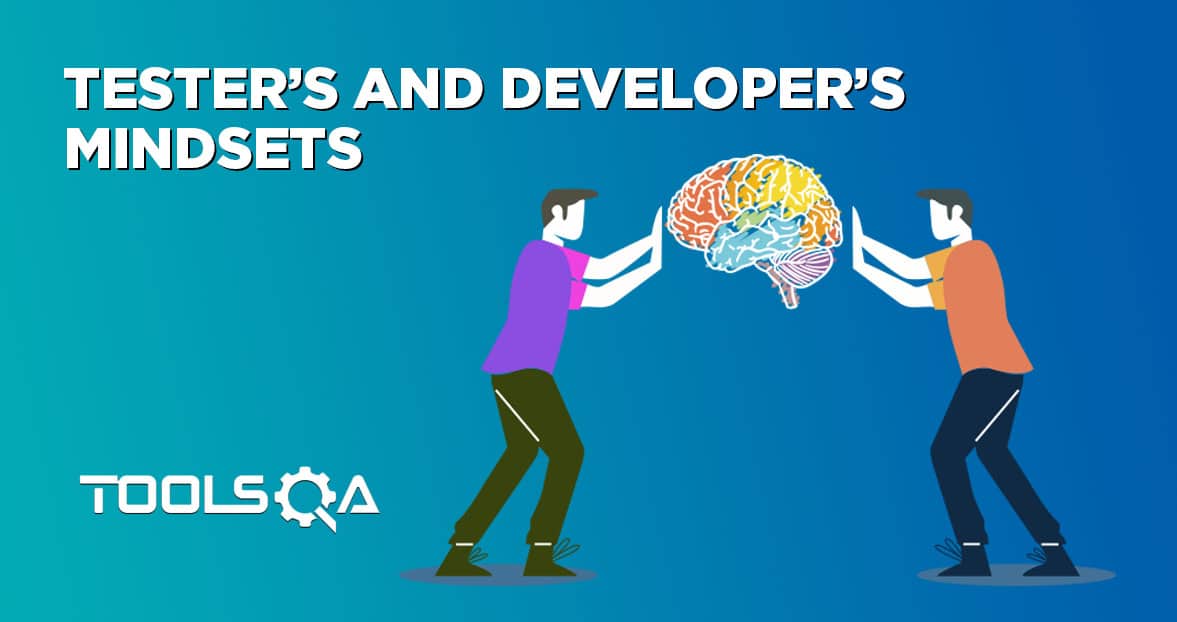
Tester’s and Developer’s Mindsets
Tester's and Developer's carry different mindsets, they often think differently. The developers think: "How can I make the application? " whereas the tester's perspective is: "How can I break the application?" But one can achieve the desired result only when both Testers and Developers work together collaboratively.
In this article, we will discuss the different perspectives of testers and developers and how they can work together to achieve efficiency and success.
Tester’s and Developer’s Mindsets
Tester’s and Developer's Perspective at different phases of Software Development Life Cycle (SDLC)
Comparison of Tester’s and Developer’s Mindsets
Tester’s and Developer’s Mindsets
A mindset is a belief that guides the way we handle situations, how we solve what is happening, and what we should do. Different people around us have different mindsets. Likewise, developers and testers have a different way of thinking too. A developer will ask: "What do I need to build, how should I do it?" The tester will ask: "What can go wrong? What can I do to break the application or find the weaknesses?"
By saying, 'How can I break the application?' it does not mean that the motto of a tester is to spoil the work done by the developers. It means that the tester should place himself in the customer's shoes and test the application for all possible scenarios. Which, in turn, ensures that the application does not break when it is in the production environment.
Tester’s and Developer's Perspective at different phases of Software Development Life Cycle (SDLC):
Software Development Life Cycle (SDLC) plays a very important role in any software application development. Previously, software testing happened in the last stages of development. However, fixing errors in the last stage usually, turned out to be very difficult and expensive. Therefore, now, software testing happens in every phase of SDLC. It means that the testing starts right from the requirement phase. Both tester and developer become an integral part of the development process right from the beginning.
Let us discuss and get a brief idea of testers and developers involvement at different phases of SDLC:
1. Requirement Gathering and Analysis: The preparation of requirement documents happens in this phase, as stated by the customer.
- Developer's role: After getting the requirement document, they will analyze the requirements and start finalizing the technology stack.
- Tester's role: After analyzing the requirements document, the testing team can ask their set of queries. The testers can also find requirement defects. It saves time and money if detected and fixed at this stage.
2. System design: In this phase, the architecture, interfaces, modules, and data for a system are defined to meet the specified requirements.
- Developer's role: The transformation of the requirements identified in the requirements analysis phase into a system design document happens here. This document accurately describes the system design. Additionally, it works as an input for the development of the system in the next phase. Based on these detailed specifications, developers write the code for the software.
- Tester's role: The testers, from their understanding and creative thinking, analyze all the possible scenarios for all the new features, integrations, etc. Preparation of test scenarios & test data happens to ensure smooth testing of the application. For this, they create a test strategy, integration test plan, test cases, checklists, and test data.
3. Coding phase: The coding phase is also called the "implementation" or "development" phase. It involves the development of the actual product. The developer writes the code and then tests it continuously and incrementally to ensure that the different components work together. It is the most time-consuming phase of the SDLC process.
- Developer's role: Once the system design phase ends, the next stage is coding. In this phase, developers begin to build the entire system by writing code using the chosen programming language. In the coding phase, the task division into units or modules takes place and thereafter, it is assigned to different developers.
- Tester's role: In current agile methodology, progressive automation and functional testing happen. Whereby, a tester automates and tests the application after coding. At this stage, the tester would test each component and also carry out component integration testing. Therefore, the tester needs to work closely with developers to make this phase successful.
4. System Testing: Once the software is complete and deployed in the test environment, the testing team begins to test the functionality of the entire system. It is to ensure that the entire application works according to customer requirements.
- Developer's role: The testing team may find some defects and communicate them to the developers. The development team corrects the error and sends it back to the testing team for the retest. This process continues until the software is error-free, stable, and functioning & in accordance with the business requirements.
- Tester's role: In this phase, the tester executes the end to end test cases and verifies every aspect of the system. Apart from the desired functionality, they also check the system from a user's perspective. So the testers use their creative thinking and explore each possible scenario. System integration testing, which involves integration with third-party systems, also occurs at this stage.
5. Maintenance phase: The maintenance phase starts once the system deployment to production happens, and customers begin using the product. This phase includes the post-deployment supports and fixes.
- Developer's role: In this phase, the developer performs the following three activities:
- Bug fixes: Developer fixes the bugs that are reported by the customer.
- Update: They update the application to the latest versions of the software.
- Enhancements: Developers also add some new features to existing software based on customer feedback.
- Tester's role: When the developer finishes his job, the tester retests the application. The tester ensures that the system is working correctly after the code change or enhanced functionality. Tester is also responsible for doing regression testing to ensure existing functionality does not break by the latest changes.
Thus, we see that developers and testers interact a lot during each phase of the software development life cycle. Therefore, they must work together as a single team to ensure the project is a success.
Comparison of Tester’s and Developer’s Mindsets
Creating software products is a complex effort that requires the cooperation of people with different skills, knowledge, and thinking. Developers and testers have to work together to create and deliver quality products. These people can have different points of view, perceptions, and knowledge. To understand the difference in their approaches and opinions let us consider the following points-
- Comparison of the tester and developer approach: The testing and reviewing of the applications are different from their analysis and development. A developer, while creating or developing applications, is working positively to make the product according to the user's specifications. He continuously solves the problems during the development process. However, during testing or reviewing a product, testers lookout for defects or faults in the product. Therefore, building software requires a different mindset to test the software.
- The developer plays the role of a tester: Even though, Testers and Developers are separate roles; it does not mean that their roles are not reversible. In other words, the tester can be the developer or the developer can be the tester. Developers always test the component that they built before giving it to anyone. This process is known as unit-testing. However, we all know that it is difficult to find our own mistakes. So, the developer sends the applications to test specialists or professional testers which allows independent testing of the system. This degree of independence avoids the author's bias and is often more effective in finding defects and failures.
- Clear and courteous communication and comments about defects between the tester and the developer: Responsibility of tester is to test the software against specified requirements and report the defects and failures. But the developer who builds the application can react defensively and take this reported defect as a personal criticism. Therefore, a tester oughts to be very careful when acting or reporting bugs/flaws to the developer.
To sum up, appreciating differences is essential for productive teams. But different approaches help to find solutions and lead to the delivery of a product that works in the best way. The testers and the developers together form a capable team. It is their responsibility to guarantee the best product. And, it is possible only if both work hand in hand with proper understanding and positive feedback.
Component Testing
Do you know how developers test their code? What methods do they use to test before releasing the code? The answer to all this is Unit testing. Unit testing is also known as Module, Program, or Component testing. In this article, we will discuss the importance of Component testing so that development and testing teams can work more collaboratively to design, test, and launch a bug-free software.
- Introduction to Component Testing?
- What are its Objectives?
- What are the typical defects and failures in Component Testing?
- When and who should do Component testing?
- Approach and Responsibilities for Component Testing
- Component Testing Tools
What is Unit/Component Testing?
According to ISTQB, Component testing is the testing of individual hardware or software components. Error detection in these units is simple and less time consuming because the software comprises several units/modules. However, the production of outputs by one unit may become the inputs for another unit. Therefore, if an incorrect output produced by one unit works as an input to the second unit, then it also produces erroneous output. If the first unit contains errors that are not corrected, then all integrating software components may produce unexpected outputs. Therefore, testing of all software units happens independently using Component testing to avoid this.
Below are some of the critical considerations of component testing:
- Performance of Unit tests of software applications happens during the development (coding) of an application.
- The developer usually performs unit tests.
- In SDLC, unit tests are the first level of tests performed before integration tests.
- Component testing can be a WhiteBox or Black-box testing technique that is performed by the developer. Most of the articles confuse component testing with component integration testing. Component testing happens on a single component/unit. Whereas the component integration test occurs when two components are involved, and one of the components acts as a stub or a driver.

You can read about component integration testing in detail in our article "Integration Testing."
What are the Objectives of Component testing?
Objectives of Component testing include:
- Reducing risk: Firstly, it verifies every single unit of the application. Developers find out the errors in the code and fix it. Therefore, it reduces the chances of risk at a fundamental level.
- Verifying whether functional and non-functional behaviors of the component are as expected: The second objective is to confirm that the functional and non-functional attributes of the component are working correctly. In other words, it ensures that their design and specifications are as expected. It may include functionality (e.g., the correctness of calculations) and non-functional characteristics (e.g., searching for memory leaks).
- Building confidence in the component’s quality: Thirdly, since the component testing happens on the unit level, most of the errors are detected and removed while coding itself. It develops confidence in the product that it will have a lesser number of errors in further testing.
- Finding defects in the component: Its main objective is to find errors in the source code. Moreover, it also verifies functions, control flow, data structure, etc., used in the program.
- Preventing defects from escaping to higher test levels: Finally, in Component testing, the coding errors are detected and eliminated by the developers. As a result, it reduces the presence of errors in the higher level of testing.
Component testing often happens in isolation from the rest of the system. It is mainly dependent on the SDLC model and the system, which may require mock objects, service virtualization, harnesses, stubs, and drivers. Component testing may cover functionality (e.g., the correctness of calculations), non-functional characteristics (e.g., searching for memory leaks), and structural properties (e.g., decision testing).
In iterative development models (E.g., Agile), the frequency of builds (code changes) is pretty high. As a result, there is always a risk that a new build will break existing functionality. As such component testing becomes vital to ensure that the developer catches any defect in his code before it goes out to the testing team. The best practice is to automate component tests and run them every time the developer checks-in a new code.
What is the Test basis for Component testing?
The Test Basis is the source of information or the documents needed to write test cases and also for test analysis. The basis of the test must be well defined and adequately structured so that one can quickly identify the test conditions from which the test cases derive.
E.g., for Component testing, the test basis can be as follows:
- Detailed Design for each component
- Code blocks for each component
- Data Model that defines how a component will receive data from the upstream component. Along with, how it will pass the data to the down-stream integrating component.
- Additionally, it includes Component Specifications that define the architecture of the component.
What are the Test Objects for Component testing?
Test Object describes what should one test in a test level. It refers to the component, integrated components, or the full system.
For Component testing, test objects can be as follows:
- Components, Units or Modules: Each component or a unit that a single developer creates should be unit tested by that same developer.
- Code and Data Structures: This could include best coding practices, and ensuring that code will not break some other shared component.
- Classes: This includes testing each class, and ensuring that correct Object Oriented Principles are put to use. E.g., for a banking application, it is vital to use encapsulation, so another class can not directly access any data in a class. It results in minimizing security threats to the application.
- Database modules: A database saves data entered in a User Interface (e.g., A new customer registration). As such, the Database should also undergo testing in component testing along with the front end.
What are the typical defects and failures in Component testing?
Component tests are used to verify the code produced during software coding, and it is responsible for evaluating the correctness of a particular unit of source code. Typical defects that identified in it are as follows:
- Incorrect functionality: It often results in finding the wrong functionality. E.g., A component that should return the discount value when a customer applies a discount coupon on the Amazon website is not returning any discount value.
- Data Flow Problems: A component often passes on some data to another integrating component, and this data flow often leads to defects. E.g., the discount component that returns discount value when a customer applies a discount code only accepts alphanumeric characters. The component that creates these discounts is creating discount codes with special characters. On the other hand, if the discount component uses these discount codes, it will lead to data flow problems.
- Incorrect code and logic: It identifies any issues with the logic. E.g., A "buy two get one free" logic on Amazon site works when three items are in the cart. However, it doesn't work when four things are in the cart. Defects logged during Component Testing is fixed there and then, and there is no formal defect management process that's followed for unit testing defects. A developer can still log a defect when a root cause analysis is pending, and if the defect is complex and challenging to fix immediately. E.g., A developer is working on a component. However, during component testing, he finds a critical defect which leads to the spillover of his task to the next sprint. In this case, a defect needs to log. Which, in turn, can give visibility to Scrum Master, or Dev Leads about the identification of a critical defect, and pass information that it will take time to get fixed.
When and who should do Component testing?
- It happens before Integration testing.
- It is the first level of testing performed on the system.
- The developers usually do component testing in their local environment before the code propagates to higher settings.
- Sometimes, depending on the appropriate risk level, a different programmer performs Component testing, thus introducing independence.
Approach and responsibilities for Component testing
Usually, the developers who write the code perform Component testing. They should do this testing before they move on to develop another component. Once the identification of the defects happen in component testing; either the developer can fix all of them before moving to another component, or he can alternate between the fixing and development alternatively. Test-Driven Development (TDD) is an example of a test-first approach (where a test is written first before the development). Even though the origin of TDD is Extreme Programming, other forms of agile use it as well.
Steps followed in Test Driven Development:
- Create a Test: In TDD, the first step is to create a failing test case. E.g., if you are creating a login component, you will write a test case which will say that enter a valid user id and password to login successfully.
- Run the test to check that the test fails: The test case will fail upon execution because the coding is still incomplete.
- Write the code: The developer writes the code to ensure the test case will pass. The objective of code is to pass the test case, and that is the only focus of the code.
- Run the Test: If the test case has passed, the developer will move on to the next feature; otherwise, he will move to refactor the code.
- Refactor Code: If the test case has failed, the code will need to be modified. In some cases, the test case will pass, but there could be performance issues where code refactoring will happen again.
- Repeat the Cycle: The entire process (Step 1-5) repeats until the code refactors to pass the test case.
Unit Testing Tools
There are several automated tools available to help with Component testing. We will provide some examples below:
- Jtest: Parasoft Jtest accelerates the development of Java software by providing a set of tools like static analysis, unit tests, code coverage, etc. Which, in turn, maximizes quality and minimizes business risks. By automating these time-consuming aspects of unit tests, it frees the developer to focus on business logic and create more meaningful sets of tests.
- Junit: Junit is an open-source testing tool used for the Java programming language. It provides assertions to identify the test method. This tool first tests the data and then inserts it into the code snippet.
- NUnit: NUnit is a unit test framework that all .net languages use widely. It is an open-source tool that allows you to write scripts manually. It supports tests based on data that run in parallel.
- JMockit: JMockit is an open-source Component test tool. It is a code coverage tool with line and route metrics. This tool offers line coverage, route coverage, and data coverage.
- EMMA: EMMA is an open-source toolkit for analyzing and reporting code written in the Java language. Emma admits coverage types such as method, line, basic block. Its basis is Java. Therefore, it has no external library dependencies and can access the source code.
- PHPUnit: PHPUnit is a unit test tool for PHP programmers. Take small portions of code called units and test each one separately. The tool also allows developers to use predefined affirmation methods to affirm that a system behaves in a certain way.
I am sure that by now, you have got a clear understanding of Component testing and its importance in ensuring the overall quality of the product. It ensures that "Everyone owns the Quality", and not just the testing team.
What is System Testing?
System Testing means testing the system in its entirety. In other words, all modules/components are integrated to verify if the system works as expected or not.
The performance of the system test happens after the Integration tests. It plays an essential role in delivering a high-quality product. In this article, we are going to cover:-
- What is System Testing?
- Objectives of System Testing
- What is the Test basis for System testing?
- What are the Test Objects for System Testing?
- Which are the typical Defects and Failures for System Testing?
- Approach and Responsibilities
- What are Different Types of System Testing?
What is System Testing?
System testing is a testing level that evaluates the behavior of a fully integrated software system based on predetermined specifications and requirements. It is a solution to the question "if the complete system works according to its predefined requirements?"
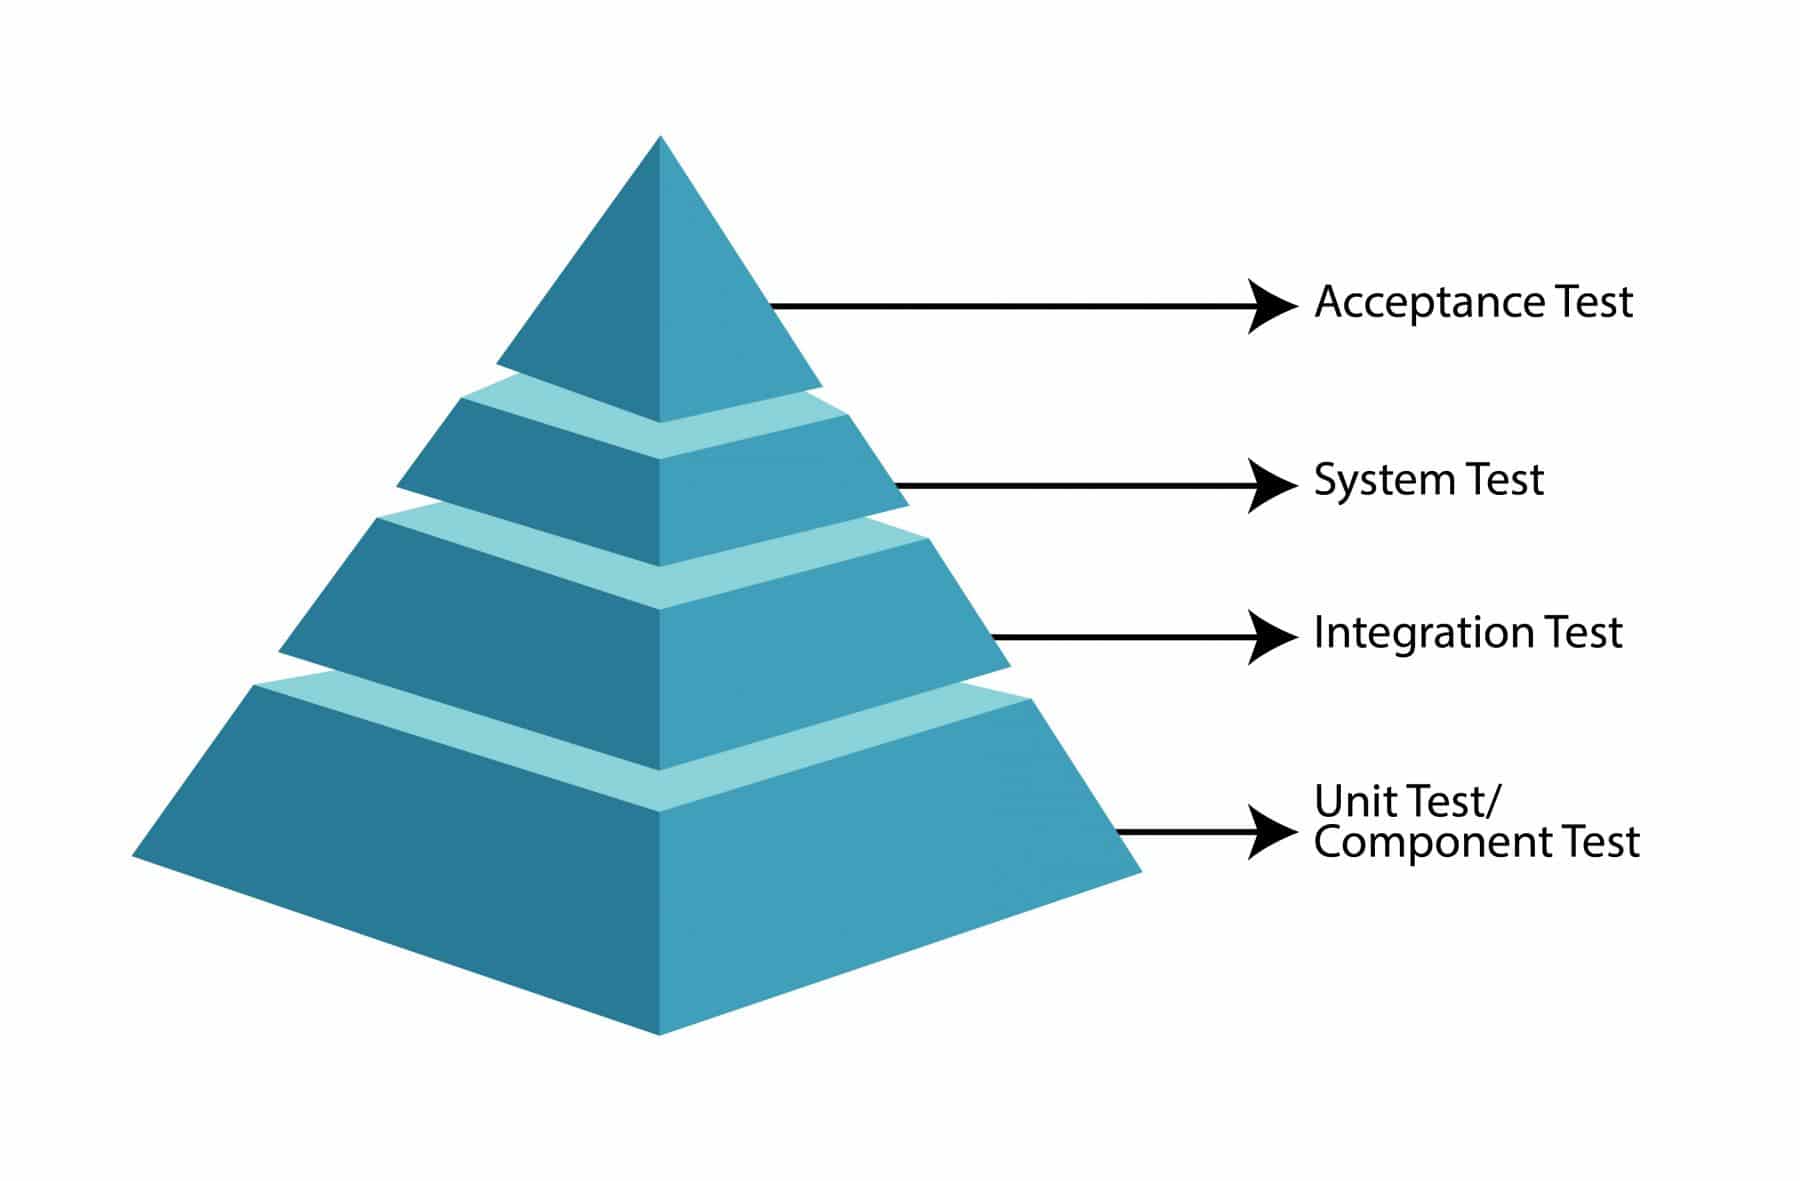
Therefore, some of the critical considerations for System testing are:
- Firstly, the performance of System testing happens in a fully developed and integrated system.
- Secondly, the performance of System tests happens on the entire system in the context of the functional requirements specifications (FRS) or the system requirements specifications (SRS), or both. In other words, System tests validate not only the design but also the behavior and usability aspects.
- In addition to the above, it verifies the entire product, after integrating all software and hardware components and validating it according to the specifications.
- Moreover, System testing can include both functional and non-functional types of testing.
We will try to understand the concept with the help of an example:
Let us take the case of a car manufacturer. A car manufacturer does not produce the car as a complete car. Each car component is manufactured separately, such as seats, steering, mirror, brake, cable, motor, car frame, wheels, etc. After the production of each item, independent testing happens to see if they are working the way they are supposed to work. It is called Unit testing.
After assembling each part, verification happens. It checks whether the assembly has not produced any side effects on the functionality of each component. Additionally, checking of smooth working of both the components also happens. It is called Integration testing.
Once all the parts are assembled, and the Car is in place - Can we safely assume that the car is ready to drive? The entire Car must be checked for the different aspects according to the defined requirements, as if:
- The car can be operated smoothly, the brakes, gears, and other functions work correctly (Functional Testing).
- The Airbags will come out in case of a crash (Non-Functional Testing).
And all this test effort is called System Testing, which verifies the car on every aspect.
Once the car is assembled, and ready for use, do we just roll it out to the public? No, we have another test level called User Acceptance testing, where a group of Users/Customers will test the car in real-life conditions. They will drive the car on the road, see how the car performs in terms of overall comfort, experience, and key features like Brakes, Gears, music system, etc. Once UAT stage is passed, then the Car is ready to be rolled out to the customers. We will learn more about UAT in our subsequent articles.
Objectives of System Testing
The primary objectives of System testing are as below:
- One of the primary objectives of System testing is to reduce risk. Even after individual testing of components, risk of how they will all come together to form a complete System still exists. System testing eliminates this risk by ensuring that it will function as per customer requirements.
- System testing must verify whether the design of the functional and non-functional behaviors of the system is as per the customer's specifications.
- Validate that the system is complete and will work as expected.
- System testing aims to build confidence in the quality of the system as a whole.
- System testing also aims to find defects and to prevent defects from escaping to higher test levels or production. Additionally, it is the only phase that occurs on the full System just before the User Acceptance testing. So it's critical to find all the possible defects at this stage, and they don't leak to production.
- System Testing results are used by stakeholders to make release decisions. The Entry criteria for User Acceptance testing is the basis completion of System Testing. System testing may also adhere to legal or regulatory requirements or standards.
What is the Test basis for System testing?
The test basis is the source of information or the document, which is the main requirement for writing test cases and also for test analysis. The base of the test must be well defined and adequately structured so that one can quickly identify the test conditions from which the test cases are derived.
Examples of work products used as a test basis for system tests include:
- System and software requirements specifications (functional and non-functional) - SRS gives complete requirements on how the integrated System should work. It should form the basis of coming up with System Test Scenarios.
- Risk analysis reports - It indicates areas that are risky. It could be from the implementation perspective or legal/compliance perspective. System tests should ensure that the focus is on these areas.
- Use cases - They show the journey flows of the System. It forms the basis of created end to end scenarios
- State diagrams - This is visual representation in the form of flow charts of how each component interacts with each other and their trigger points.
- Models of system behavior - This describes the processes and activities that each component is involved in, and also shows how they will interact with other components.
- System and user manuals - Often for a product based software, user manuals are created, so it's easy for the user to figure out the usage. E.g., for an income tax calculation software, user manual will describe how to fill the data, and how the calculation takes place
- Epics and user stories - Epics and user stories will give a high-level view of the System. A combination of them creates an end to end system test cases.
What are the Test Objects for System Testing?
Test Objects are the component or systems that require testing. Now let's look at the test objects for system testing:
Typical Test Objects of System test include:
- Applications
- Hardware/Software Systems
- Operating Systems
- System under Test
- System configuration and configuration data
If you look at these Test Objects, you will notice that these are fully integrated Systems. The System could be a software (like Amazon or Flipkart website/app), or it could be an Operating System (like Windows 10), etc.
Which are the typical Defects and Failures for System Testing?
The System test is usually the final test from the software development team. It ensures that the system delivered finally will meet the specification. In addition to that, its purpose is to find as many defects as possible before it goes to the next level of User Acceptance testing.
Examples of defects and typical failures for System tests include:
- Failure to carry out end to end functional tasks - E.g., A train ticket booking software successfully books the ticket but fails to send the customer a confirmation email with their ticket number.
- Incorrect calculations - E.g., Consider that you are shopping on the Amazon website. You have added two products worth $100 and $50. The cart value shows as $150. Now you apply a 10% discount on the Cart which gives you a discount of $15 and brings the Cart value down to $135. After placing the order, you decide to cancel the $50 product. The cancellation of the product happens, and you get a refund of $50. Its a System failure that applied a10% discount whereas the actual refund should have been $45.
- Incorrect control or data flows within the system. E.g., Consider that you have used a discount of 15% on a product which is worth $5. After the discount, the value comes out to be $4.75. Now the application has a wrong logic of rounding off at first decimal place, where it charges the card $4.8 instead of $4.75. Such incorrect data flow could lead to defects in System testing phase
- Unexpected functional or non-functional behavior of the system - E.g., you are using the Amazon app, and if there is an incoming call, the application is crashing. While there is nothing functionally wrong with the app, fixing such non-functional behaviors is critical to the overall success of the application.
- There are situations where the system doesn't work as described in the system and user manuals.
- There are situations where the system fails to work correctly in production environments. Often the System works perfectly fine in test environments, but upon it's release to a production-like environment, it fails to work. Therefore, a System test must always happen in an environment that mimics production; in terms of software and hardware, simultaneously.
Approaches and Responsibilities
Independent testers often do System testing to have an objective view of the System. The strategy is to involve the testing team from the start, so they have a complete understanding of the System. System test scenarios are usually end-to-end tests that can cover the full System. Architects and product owners usually review these scenarios.
Responsibilities of System Testing Team:
- Understand System flows, and create high-level user journeys
- Create Detailed End to End System test cases
- Identify and generate any test data required to execute the test cases
- Coordinate with Scrum teams to ensure adequate support is available to fix defects
- Defect triage meetings to fix accountability of a defect fix to a Scrum team
What are Different Types of System Testing?
Like any software test, System tests are also an amalgam of various test types, which allow the team to validate the overall performance and functionality of the product. Each of these test types focuses on different aspects of the product and satisfies the various requirements of the client/user. These types of system tests are:
- Usability testing: Usability tests mainly focus on the user's ease of using the application, the flexibility in handling controls and the ability of the system to meet its objectives
- Load testing: The load test is necessary to know that a software solution will work under real-life loads.
- Regression testing: Regression tests involve tests performed to ensure that none of the changes made during the development process have caused new errors. It also ensures that no old errors appear when adding new software modules over time.
- Recovery testing: Recovery testing happens to demonstrate that a software solution is reliable and can successfully recover from possible crashes.
- Migration testing: Migration testing happens to ensure that the software moves from older system infrastructure to current system infrastructure without any problem.
- Performance testing: We do Performance Testing to examine the response, stability, scalability, reliability, and other software quality metrics, under different workloads.
- Security testing: Security Testing evaluates the security features of the software to guarantee, protection, authenticity, confidentiality, and integrity of information and data.
The performance of System tests happens once the software development process completes. In addition to that, it happens after the product has gone through the Unit and Integration tests. It is an integral part of the software testing life cycle. This test is not limited to one aspect or component of the product. But it tests the software system as a whole which makes it an essential part of any successful test cycle.
Testing Techniques - Factors to Consider
We already learned about test levels and how these test levels contribute to the overall quality of testing. But how do we ensure that what we test in a test level will ensure quality? Each test level (E.g., System Test) has a defined set of test cases, so the quality of testing will largely depend on the quality of test cases. So how do we ensure our test cases are of the highest quality?
It is where Testing Techniques come into the picture. They are the best practices and scientific techniques that established over a period, to ensure that we write test cases such that they provide maximum coverage. Even then, we keep the test case number minimal. (Why? Of course to save time and money !)
How to Choose Right Testing Techniques?
There are several testing techniques, and most of the time, you can apply more than one - So how do you chose the right test technique?
It depends on several project factors. We will discuss the actual techniques in subsequent articles, but let's find out what are the factors that influence this decision.
- Type of Component or System: Assume that you are testing the amazon website. Two components need testing - Home page Categories and User Registration. Do you see the difference? One is the navigation of categories to ensure they open up the right pages. Whereas, the other will require you to enter data in the user registration form. Therefore, you will have more variations when you enter data.
- Component or System Complexity: Complexity of the system is another crucial factor in determining the test technique. E.g., a user registration form is a simple component. All we have to do is to figure out what values to enter. Now compare it with another component - The order status, which gives you information about the order. If you are familiar with Amazon or Flipkart, you will realize that order status can be order Created, Shipped, Cancelled, Delivered, or order Returned. However, if you further dig down, there are several variations to this. For instance, the order created; but, the payment failed, Full order shipped, Partial order Shipped, Full order Cancelled, Partial order Cancelled, User Cancellation Vs. System cancellation, etc. The list is big! So we see that complexity will play a significant role in determining test techniques.
- Regulatory Standards: The software needs to adhere to the regulatory standards of each country that will be using it. E.g., A retail site in the UK will need to give a 30-day return option to customers. Whereas, the same website in India might do away with seven days! Knowing these regulatory standards helps to choose the right testing techniques.
- Customer or Contractual Requirements: At times, there could be specific contractual requirements like the site should be responsive, and it should have validation on 20 devices/browser combination. The testing techniques that you will apply in this case will differ from the case where you are testing only two devices.
- Risk Levels: Test techniques depends on the risk level of component or system under test. Assume the amazon website again. Say you are testing a footer component that will have static links like Careers, Contact Us, etc. and compare it with a Login Component. The site may survive if there is an issue in the footer component, but what happens if login throws an error? The risk level would impact the test technique, and as you rightly figured out - the number of test cases will be more for a high-risk component vs. the low-risk component.
- Risk Types: We have seen risk levels, but what is risk type? Let's retake the login component example. We determined that it's high risk, but what is the impact - probably a financial impact as users will not be able to place orders. Now consider emergency management software. So, if you are in the US, you will realize that they have got the number 911, which takes care of all emergencies (Fire, Medical, theft, etc.). When you call, the software also detects where you are calling from, and alerts the nearest emergency center. Imagine if this software errors out? Can you compare it with Login failure at amazon? As you rightly realized, the risk type is higher in this case as compared to log in on amazon, and hence the testing techniques will differ as well.
- Test Objectives: Consider a test objective of executing a component-level test vs. a test objective of running a System Test. The amount of testing (and hence the test technique) will significantly differ between a component test and the System test.
- Available Documentation: How much the requirements have been detailed out also determines the test technique. Consider an example of a user registration form, where you have to enter the First and Last Name. If the rules have been clearly defined (like Name can contain only letters, minimum length is two, and maximum length is 20), then the test cases are focused on this validation. However, if the rules are not defined, then we have to validate these fields with a lot more combinations.
- Testers' knowledge and Skills - Re-considering our example of order status, the test technique will depend on testers' knowledge of order management. Which means, how much he knows about the various statuses that the order can have, and his expertise to execute the scenarios to get those order statuses.
- Available Tools - Consider that you have been testing the Sign-in component of the Amazon website(Yes, Amazon seems to be my favorite retailer !). There could be several input variations for the sign-in field. Therefore, manual testing will lead to the application of test techniques to a minimum to get maximum coverage. On the other hand, the availability of automation tools will lead to more test cases. Thereby further increasing the coverage.
- Time and Budget - End of the day, everything boils down to time and money! Everyone understands that you cannot have 0 bugs in software, and you need to stop testing at some point. So a project with two resources can execute a maximum of say 400 test cases, given the testing needs to complete in 10 days. Now the question arises on how you will write 1000 test cases? We cannot execute them. So you need to apply the right techniques so we can minimize test cases but still keep the coverage high.
- Software Development Life cycle model - We all remember the old waterfall days, and how the testing team had enough time to write test cases. So we could always write many more test cases to increase coverage. However, in agile, it's all on the go! So we need to be smart in identifying test cases that can execute within the sprints. Additionally, we have to ensure that we don't lose out on coverage.
- Expected Use of the software - We can take the same example of amazon vs. the emergency management software. The expected usage of software determines risk levels and types. Hence, it will influence the test techniques used.
- Previous experience with using the test techniques on the component or system to be tested - Well, nothing beats experience! No matter what test techniques you apply, it might still result in failures. So it's crucial to retrospect, and see what worked and what didn't, and accordingly modify the test techniques.
- The types of defects expected in the component of the system - If we are doing a UI redesign project where only look and feel will change. But existing core functionalities will remain the same Versus a project where we are doing say only DB changes. Both will have a different type of defect. Therefore, the test technique in UI change will focus more on error messages, alignment, etc. In contrast, for DB, it will focus more on the data that passes to DB.
That was a long list of factors that can influence the test technique that needs to choose. As we see, there is not just one factor. You can have multiple factors within the same project. For instance, a project has a high-risk level, yet it has very little time! So the success of the test highly depends on the effective application of the right testing techniques.
Now you must be wondering what are these test techniques? More on this in our next article!
Black Box Testing Techniques
We have already learned about the factors that influence how to choose the test techniques. Now let's dive into the actual test techniques. At a high level, the test techniques can be categorized into two groups - Black-box techniques and White-box techniques. In this article, we will discuss the Black-box testing techniques. We will cover each method in detail as a separate article, but let's give you an overview of them here!
- What is the Black box testing technique?
- How to do Black box testing?
- Black-box technique and its typical characteristics
- Types of Black-box testing techniques
What is Black Box Testing Technique?
The black box is a testing type where the tester doesn't know the internal design of the component or system which undergoes testing. So if we don't know the internal design, how do we ensure that our test cases can still find defects and provide excellent coverage? It is where Black Box testing techniques come into the picture. These are scientific and time tested techniques that will help us get maximum coverage in minimum test cases.
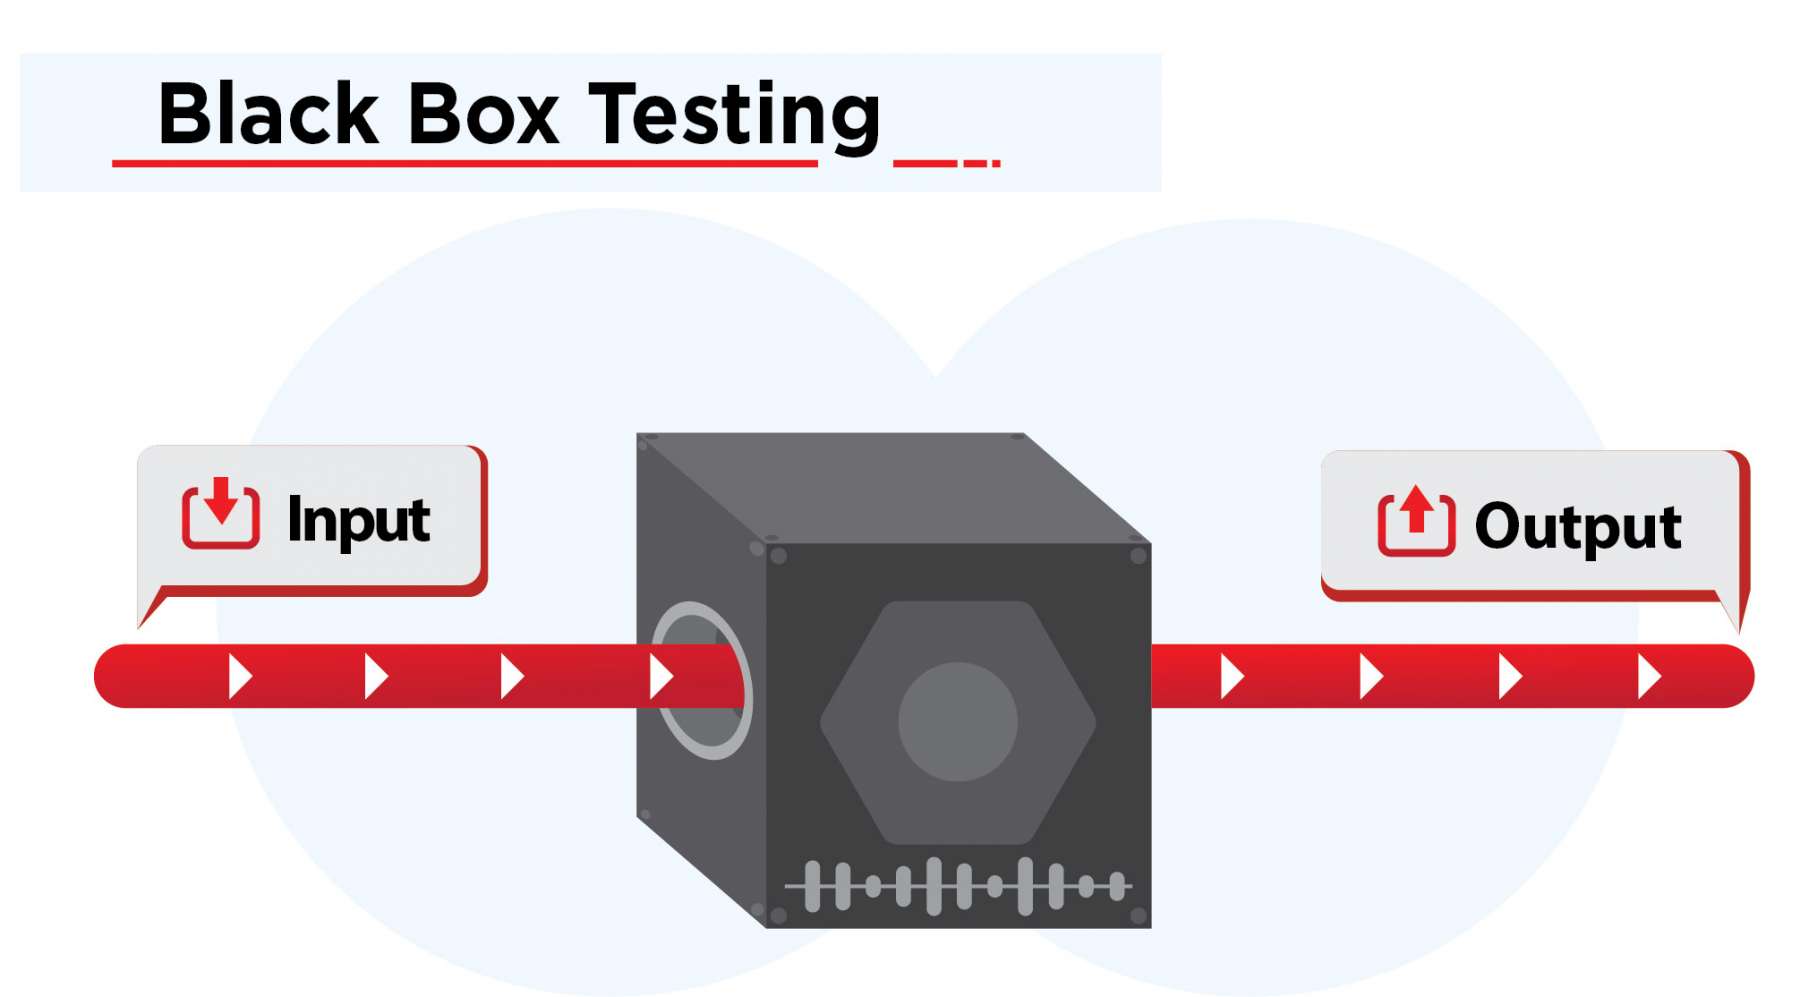
How to do Black Box Testing
We already know what Black box testing is, and we are going to learn it's techniques (which is an efficient way of creating test cases for a black box testing type). But before we dive in there, it's essential to know a few critical characteristics of Black box testing. Additionally, it's equally important to understand what it takes to execute a black box test type successfully.
- Understand the Requirements: The first step to execute a black box testing is to understand the system requirements thoroughly. As the internal system design is not known to us, the system requirements act as the source of truth to create effective test cases. Any understanding gap must be clarified, and the tester should ensure that specifications are detailed enough to write a black-box test case successfully.
- Effective Test case Creation: Once the requirements are understood, the next step is to create test cases. The biggest challenge is to write test cases that are effective enough to find defects (Remember - We don't know the internal design !). We will discuss the actual techniques in detail later, but keep in mind that it's essential to ensure that our test cases cover below.
- Happy Paths - These are the Critical business scenarios where we give positive inputs. Additionally, happy paths involve the most commonly used steps. For instance, a successful login if I provide a valid user id and password.
- Alternate Paths - These are critical business scenarios that involve positive inputs. However, the steps are not the most commonly used. E.g., I should be able to automatically log in if my session doesn't expire without inputting user id and password again!
- Negative Paths - These are business scenarios where we give negative inputs, and we expect the system to throw error message (Of course, a user-friendly one !)
- Adaptive Execution - We all do execution, and we compare the actual result with expected results, so what is adaptive about it? Well, the black box testing is guesswork- a Scientific one, though! So, what happens when you find some critical defects in a particular area but don't find any in other areas? In such cases, we need to adapt our execution to focus more on the buggy areas - some developers had a bad day! Additionally, we review our test coverage and techniques where we are not finding bugs.
- Defects Logging and Closure - The last step is to log the defects, and retest it once it's fixed. Everyone does that, but what you can do better is to test scenarios around the defect fix. Often a fix leads to another defect, and it's best to catch it while retesting the defect.
Black-Box Technique and its Common Characteristics
Before we dive into actual techniques, let's discuss some of the common characteristics of Black box techniques.
- Test cases (including test conditions and test data) derive from Requirements, User Stories, User cases, and user specifications.
- Test cases are used to detect gaps between the requirements and the actual implementation.
- Measurement of Coverage happens in terms of requirements and the test cases written for these requirements.
- Black box testing techniques apply to all test levels (Component Testing, Component Integration testing, System Testing, and Unit Testing).
As you can see, we are not looking at design and code coverage (Why ? Because it's a black box ! ).
Types of Black-Box Testing Techniques
Let's have a quick overview of black-box testing techniques. We will cover these in detail in subsequent articles. However, this should give you an overall understanding.
Equivalence Partitioning: We use this technique when we have an input range to enter. E.g., A User registration form where we need to enter a mobile number. Equivalence partitioning works on the logic that you divide the input conditions into valid and invalid partitions. All the input values in that partition should behave the same. So let's say that we have to partition the mobile number input field. As we know, the mobile number should be ten digits. So the partitions will be
> 10 Digits Mobile number (Invalid Partition)
= 10 Digits Mobile number (Valid Partition)
< 10 Digits Mobile number (Invalid Partition)
Boundary Value Analysis: Equivalence partitioning helped reduced test conditions, and increase coverage, but it was not enough. Realization surfaced that faults often occur at the boundary of equivalence classes. Boundary value analysis verifies the borders of the equivalence classes. On every border, testing of the exact boundary value and both nearest adjacent values happens (inside and outside the equivalence class). For the same, e.g., of the mobile number input field, the boundary conditions will be :
- 9 Digit mobile number
- 10 Digit mobile number
- 11 Digit mobile number
Decision Table Testing: We use it when we need to execute complex business rules. Usually, this is in the form of a table where input combinations and corresponding outputs are listed. These combinations are used to create test cases.
| Conditions | 1st Input | 2nd Input | 3rd Input |
|---|---|---|---|
| Salaried? | Y | N | Y |
| Monthly Income > 25000 | N | Y | Y |
| IT Returns available? | Y | N | Y |
| Loan Approval | N | N | Y |
State Transition Testing: We use this testing when the output of the system can change even when you give the same input. It means that the system can have different states despite the same inputs. As an example, consider that you withdraw $1000 from the ATM, and the cash comes out. Later you again try to withdraw $1000, but this time you are refused the money. So the input is the same in both the cases ($1000), but the state has changed. After the first transaction, the account doesn't have enough money, so the state of account has changed. Usually, we create a state diagram, and derivation of the test cases happens out of that.
Use Case Testing: Use cases are defined in terms of System behavior by an actor (User of the system). A use case describes the process flow from the actor's point of view, and the use cases derive test cases. Consider a flight booking system. It will have 3 actors (users). Additionally, test cases writing will be basis what these actors can do in the system.
- Customer who will book the tickets
- Agent who will book the ticket on behalf of the customer
- Admin (Like Makemytrip personnel) who can provide support for any issues
All these black-box techniques ensure that we are writing test conditions that are more likely to catch defects. Consequently, keeping the number of test cases at a minimal requirement. In the absence of these techniques, either the test case combinations will increase (thereby increasing cost and time), or we will miss on ensuring the right coverage.
To conclude, the purpose of this article was to give you a high-level overview of the Black Box techniques. We will discuss each of these testing techniques in detail in subsequent articles, where we will deep dive with the help of detailed explanations and examples!
We have already learned about the factors that influence how to choose the test techniques. Now let's dive into the actual test techniques. At a high level, the test techniques can be categorized into two groups - Black-box techniques and White-box techniques. In this article, we will discuss the Black-box testing techniques. We will cover each method in detail as a separate article, but let's give you an overview of them here!
- What is the Black box testing technique?
- How to do Black box testing?
- Black-box technique and its typical characteristics
- Types of Black-box testing techniques
What is Black Box Testing Technique?
The black box is a testing type where the tester doesn't know the internal design of the component or system which undergoes testing. So if we don't know the internal design, how do we ensure that our test cases can still find defects and provide excellent coverage? It is where Black Box testing techniques come into the picture. These are scientific and time tested techniques that will help us get maximum coverage in minimum test cases.
How to do Black Box Testing
We already know what Black box testing is, and we are going to learn it's techniques (which is an efficient way of creating test cases for a black box testing type). But before we dive in there, it's essential to know a few critical characteristics of Black box testing. Additionally, it's equally important to understand what it takes to execute a black box test type successfully.
- Understand the Requirements: The first step to execute a black box testing is to understand the system requirements thoroughly. As the internal system design is not known to us, the system requirements act as the source of truth to create effective test cases. Any understanding gap must be clarified, and the tester should ensure that specifications are detailed enough to write a black-box test case successfully.
- Effective Test case Creation: Once the requirements are understood, the next step is to create test cases. The biggest challenge is to write test cases that are effective enough to find defects (Remember - We don't know the internal design !). We will discuss the actual techniques in detail later, but keep in mind that it's essential to ensure that our test cases cover below.
- Happy Paths - These are the Critical business scenarios where we give positive inputs. Additionally, happy paths involve the most commonly used steps. For instance, a successful login if I provide a valid user id and password.
- Alternate Paths - These are critical business scenarios that involve positive inputs. However, the steps are not the most commonly used. E.g., I should be able to automatically log in if my session doesn't expire without inputting user id and password again!
- Negative Paths - These are business scenarios where we give negative inputs, and we expect the system to throw error message (Of course, a user-friendly one !)
- Adaptive Execution - We all do execution, and we compare the actual result with expected results, so what is adaptive about it? Well, the black box testing is guesswork- a Scientific one, though! So, what happens when you find some critical defects in a particular area but don't find any in other areas? In such cases, we need to adapt our execution to focus more on the buggy areas - some developers had a bad day! Additionally, we review our test coverage and techniques where we are not finding bugs.
- Defects Logging and Closure - The last step is to log the defects, and retest it once it's fixed. Everyone does that, but what you can do better is to test scenarios around the defect fix. Often a fix leads to another defect, and it's best to catch it while retesting the defect.
Black-Box Technique and its Common Characteristics
Before we dive into actual techniques, let's discuss some of the common characteristics of Black box techniques.
- Test cases (including test conditions and test data) derive from Requirements, User Stories, User cases, and user specifications.
- Test cases are used to detect gaps between the requirements and the actual implementation.
- Measurement of Coverage happens in terms of requirements and the test cases written for these requirements.
- Black box testing techniques apply to all test levels (Component Testing, Component Integration testing, System Testing, and Unit Testing).
As you can see, we are not looking at design and code coverage (Why ? Because it's a black box ! ).
Types of Black-Box Testing Techniques
Let's have a quick overview of black-box testing techniques. We will cover these in detail in subsequent articles. However, this should give you an overall understanding.
Equivalence Partitioning: We use this technique when we have an input range to enter. E.g., A User registration form where we need to enter a mobile number. Equivalence partitioning works on the logic that you divide the input conditions into valid and invalid partitions. All the input values in that partition should behave the same. So let's say that we have to partition the mobile number input field. As we know, the mobile number should be ten digits. So the partitions will be
> 10 Digits Mobile number (Invalid Partition)
= 10 Digits Mobile number (Valid Partition)
< 10 Digits Mobile number (Invalid Partition)
Boundary Value Analysis: Equivalence partitioning helped reduced test conditions, and increase coverage, but it was not enough. Realization surfaced that faults often occur at the boundary of equivalence classes. Boundary value analysis verifies the borders of the equivalence classes. On every border, testing of the exact boundary value and both nearest adjacent values happens (inside and outside the equivalence class). For the same, e.g., of the mobile number input field, the boundary conditions will be :
- 9 Digit mobile number
- 10 Digit mobile number
- 11 Digit mobile number
Decision Table Testing: We use it when we need to execute complex business rules. Usually, this is in the form of a table where input combinations and corresponding outputs are listed. These combinations are used to create test cases.
| Conditions | 1st Input | 2nd Input | 3rd Input |
|---|---|---|---|
| Salaried? | Y | N | Y |
| Monthly Income > 25000 | N | Y | Y |
| IT Returns available? | Y | N | Y |
| Loan Approval | N | N | Y |
State Transition Testing: We use this testing when the output of the system can change even when you give the same input. It means that the system can have different states despite the same inputs. As an example, consider that you withdraw $1000 from the ATM, and the cash comes out. Later you again try to withdraw $1000, but this time you are refused the money. So the input is the same in both the cases ($1000), but the state has changed. After the first transaction, the account doesn't have enough money, so the state of account has changed. Usually, we create a state diagram, and derivation of the test cases happens out of that.
Use Case Testing: Use cases are defined in terms of System behavior by an actor (User of the system). A use case describes the process flow from the actor's point of view, and the use cases derive test cases. Consider a flight booking system. It will have 3 actors (users). Additionally, test cases writing will be basis what these actors can do in the system.
- Customer who will book the tickets
- Agent who will book the ticket on behalf of the customer
- Admin (Like Makemytrip personnel) who can provide support for any issues
All these black-box techniques ensure that we are writing test conditions that are more likely to catch defects. Consequently, keeping the number of test cases at a minimal requirement. In the absence of these techniques, either the test case combinations will increase (thereby increasing cost and time), or we will miss on ensuring the right coverage.
To conclude, the purpose of this article was to give you a high-level overview of the Black Box techniques. We will discuss each of these testing techniques in detail in subsequent articles, where we will deep dive with the help of detailed explanations and examples!
Equivalence Partitioning - A Black Box Testing Technique
We already know that Black box testing involves validating the system without knowing its internal design. Testing a black-box wFay is a more natural way to test. However, it brings its complexity that the number of test conditions can have several hundred variations. So how do we keep the total number of test cases to a minimum and yet ensure that we have good test coverage? Few black-box techniques have evolved to address this complexity, which is time tested and scientific. We will discuss one such test case design technique known as Equivalence Partitioning.
- What is Equivalence Partitioning?
- How to do Equivalence Partitioning?
- What are its Pitfalls?
What is Equivalence Partitioning?
Equivalence partitioning is a black-box testing technique that applies to all levels of testing. Most of us who don't know this still use it informally without even realizing it. But there are defined rules and best practices that can make it more useful and scientific.
The idea behind the technique is to divide a set of test conditions into groups or sets that can be considered as same. Partitioning usually happens for test objects, which includes inputs, outputs, internal values, time-related values, and for interface parameters. Equivalence Partitioning is also known as Equivalence Class Partitioning. It works on certain assumptions:
- The system will handle all the test input variations within a partition in the same way.
- If one of the input condition passes, then all other input conditions within the partition will pass as well.
- If one of the input conditions fails, then all other input conditions within the partition will fail as well.
The success and effectiveness of Equivalence partitioning lie in how reasonable the above assumptions hold. We will discuss this in detail in the latter part of the article with practical examples where these assumptions hold or fail.
How to do Equivalence Partitioning?
Now that we have a fair idea of equivalence partitioning, let's discuss how to do partitioning effectively.
Consider that you are filling an online application form for a gym membership. What are the most important criteria for getting a membership? Of course, the age! Most of the gyms have age criteria of 16-60, where you can independently get the membership without any supervision needed. If you look at below membership form, you will need to fill age first. After that, depending on whether you are between 16-60, you can go further. Otherwise, you will get a message that you cannot get a membership.
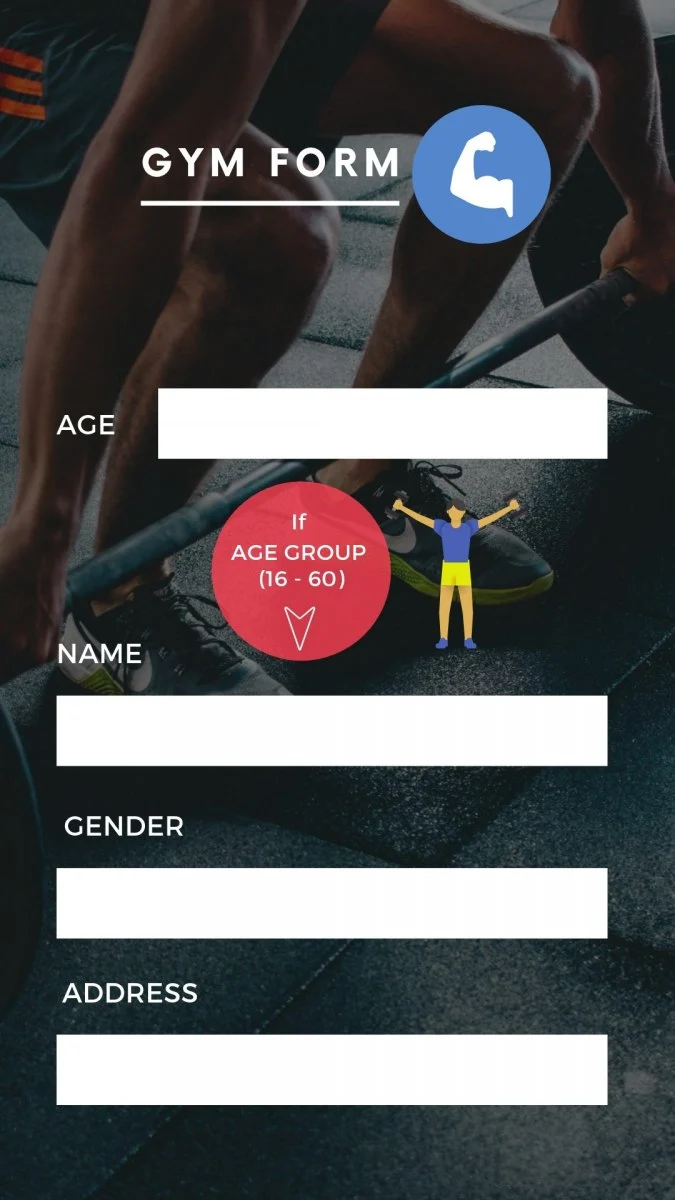
If we have to test this age field, the common sense tells us that we need to test the values between 16-60, and values which are less than 16, and some values which are more than 60. It is easy to figure out, but what is not very evident is how many combinations we need to test to say that the functionality works safely?
- <16 has 15 combinations from 0-15, and if you test negative values, then some more combination can be added
- 16-60 has 45 combinations
- >60 has 40 combinations (if you only take till 100)
Should we test all these 100+ combinations? Surely! If we had all the time in the world, and the cost was not an issue at all. Practically we can never do that because there is minimal time for testing.
Additionally, we need to ensure that we create minimal test cases with maximum test coverage. It is where the testing techniques come into the picture. Let's see how Equivalence Partitioning will solve this problem.
The First step in Equivalence partitioning is to divide (partition) the input values into sets of valid and invalid partitions. Continuing the same example our partition will look like below -
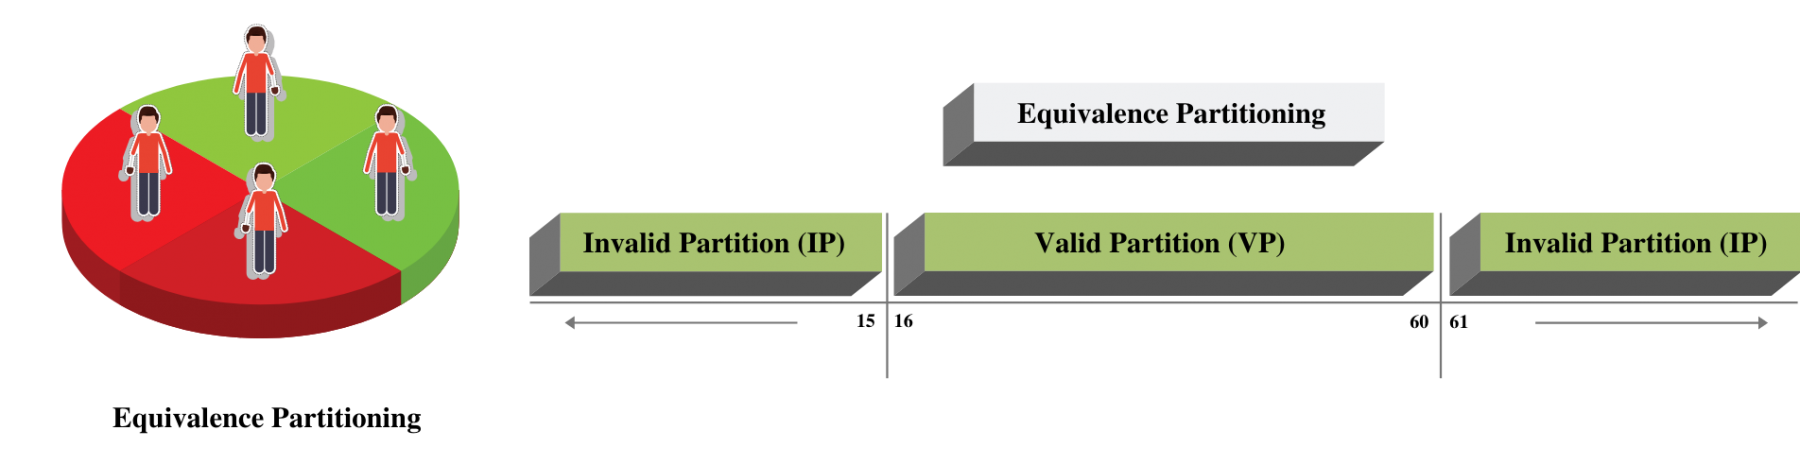
Valid Partitions are values that should be accepted by the component or system under test. This partition is called "Valid Equivalence Partition."
Invalid Partitions are values that should be rejected by the component or system under test. This partition is called "Invalid Equivalence Partition."
So what should we do after knowing these partitions? The premise of this technique works on the assumption that all values within the partition will behave the same way. So all values from 16-60 will behave the same way. The same goes for any value less than 16 and values greater than 60. As such, we only test 1 condition within each partition and assume that if it works/doesn't work, the rest of the condition will behave the same way.
Our Test conditions in Such case could be:
- Enter Age = 5
- Enter Age = 20
- Enter Age = 65
If you see, these 3 test conditions will cover the 100+ conditions that were not possible otherwise. By applying this technique, we have significantly reduced our test cases, but yet the coverage remains high.
These partitions can be further divided into sub-partitions if required - Let's understand it by expanding the same example of Gym membership. Let's assume that if you are 16-20 years old or 55-60 years old, there is an additional requirement to attach your age proof while submitting the membership form. In this case, our partition will look like below-
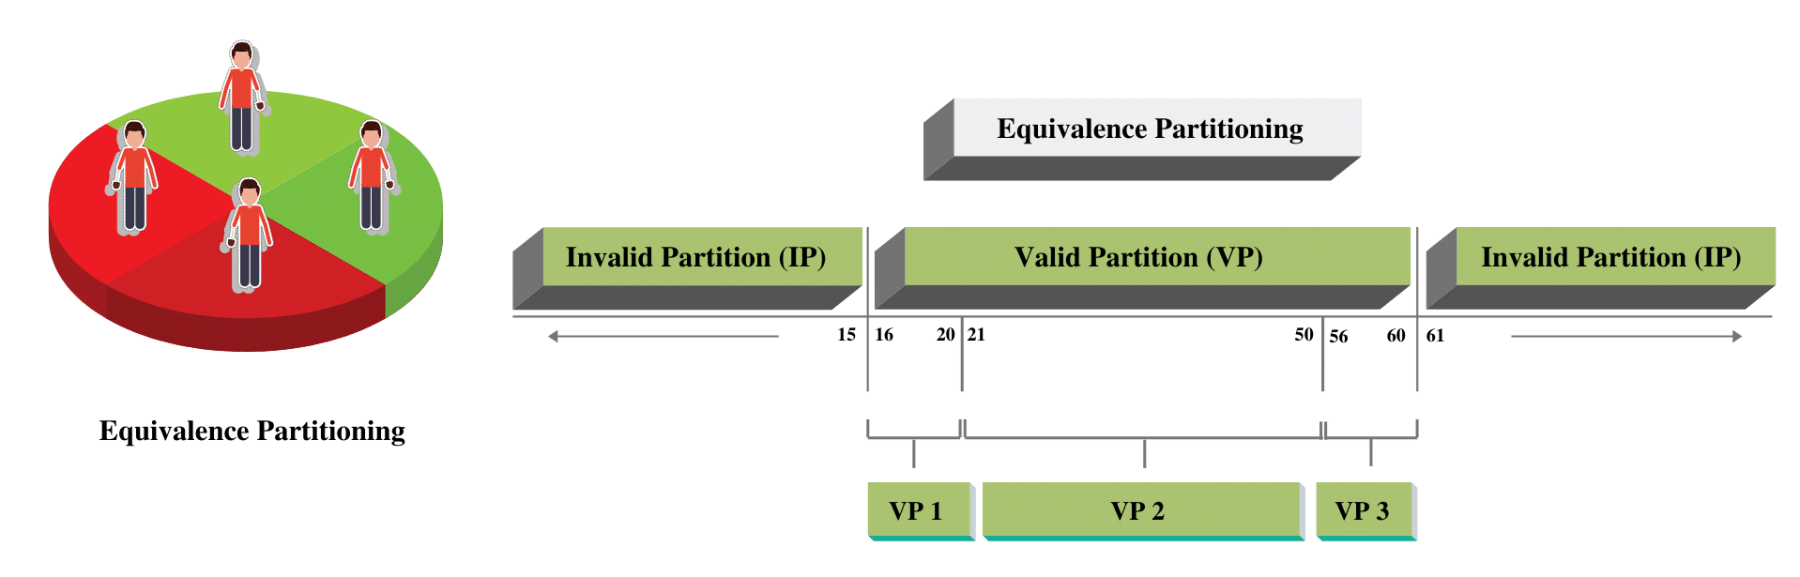
VP1, VP2, and VP3 are all valid subpartitions based on the additional requirements. So how do our test conditions look like now?
- Enter Age = 5
- Enter Age = 18
- Enter Age = 30
- Enter Age = 58
- Enter Age = 65
These five conditions will cover all the requirements that we have for the age field. Of course, you can use any other values from each partition as you like.
We need to ensure that our partitioning is unique and not overlapping. Each value that you take should belong to only one partition.
When we use invalid equivalence partitions, their testing should happen individually and not combined with other partitions or negative inputs. E.g., if you have a name field which accepts 5-15 characters (a-z). If you try to enter abc@, this gives an error, but we don't know whether the error is because we have entered four characters, or it's because we have used "@". Thus combining two invalid partitions or negative values, we end up masking the actual root cause.
To achieve 100% coverage, we should ensure that our test case covers all the identified partitions. We can measure the Equivalence partitioning test coverage as the number of partitions tested by at-least one value divided by the total number of recognized partitions.
Pitfalls
Now that we know how useful equivalence partitioning is, let's try to understand some of its pitfalls.
The success of Equivalence partitioning is dependent on our ability to create correct partitions. Sounds simple right? If you dig deeper, you will realize that we are testing the application as a black box. Therefore, our ability to create partition limits to what is called out in requirements. We have no understanding of designs and what the developer would have coded.
If we take our Gym example - Let's assume developer wrote below logic-
If (age > 16 and Age <60 )
{ Allow the user to submit the form}
Do you see the problem here? The requirement said age should be greater than or equal to 16. If we go by partition rule, we might miss checking 16 as value. Also, the partition doesn't cater to other negative values like entering non-numeric characters (@, abc, etc.). So while partitioning helps us minimize our test cases to maximize coverage, we need to be aware that it doesn't cover all the combinations required to test the application successfully.
It concludes our discussion on Equivalence partitioning.
Discussions on using techniques like Boundary Value Analysis to cover up some of the pitfalls of using partitioning alone will be taken up in the subsequent articles.
Boundary Value Analysis - A Black Box Testing Technique
We already know that Black box testing involves validating the system without knowing its internal design. We have also discussed the pitfalls of Equivalence partitioning and how they can fail at partition boundaries. In case you haven't read our article on Equivalence Partition, I would highly recommend to read it before you read this one. In this article, we will discuss another black box testing technique known as Boundary Value Analysis. We will also see how this technique compliments Equivalence partitioning.
- What is Boundary Value Analysis?
- How to do Boundary Value Analysis?
- Boundary Value Analysis with Equivalence Partitioning
- Pitfalls of Boundary value Analysis
What is Boundary Value Analysis?
The basis of Boundary Value Analysis (BVA) is testing the boundaries at partitions (Remember Equivalence Partitioning !). BVA is an extension of equivalence partitioning. However, this is useable only when the partition is ordered, consisting of numeric or sequential data. The minimum and maximum values of a partition are its boundary values.
We have seen that there are high chances of finding the defects at the boundaries of a partition (E.g., A developer using >10 instead of >= 10 for a condition). Equivalence partitioning alone was not sufficient to catch such defects. Therefore, a need to define a new technique that can detect anomalies at the boundaries of the partition arose. It is how Boundary value analysis came into the picture.
Boundary value analysis can perform at all test levels, and its primarily used for a range of numbers, dates, and time.
How to Do Boundary Value Analysis?
Now that we have got some idea on boundary value analysis let's understand how to derive test conditions using this technique. We will refer to the same example of gym form (Refer to our article on Equivalence Partitioning) where we need to enter Age.
The first step of Boundary value analysis is to create Equivalence Partitioning, which would look like below.
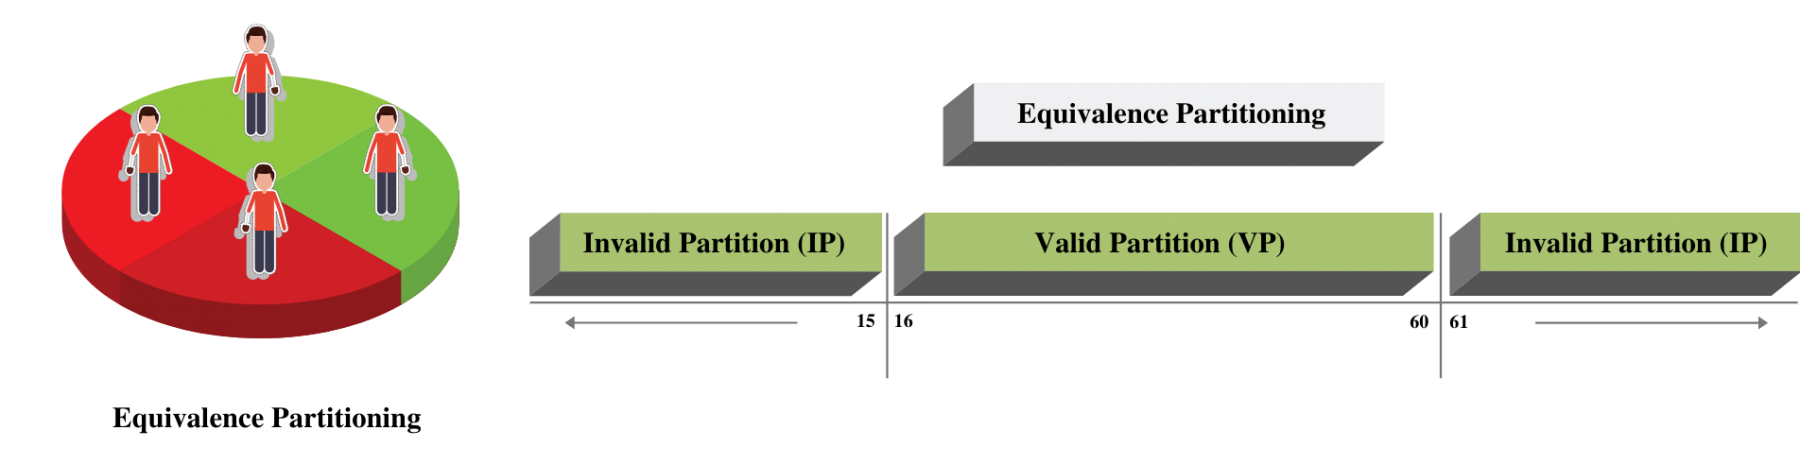
Now Concentrate on the Valid Partition, which ranges from 16-60. We have a 3 step approach to identify boundaries:
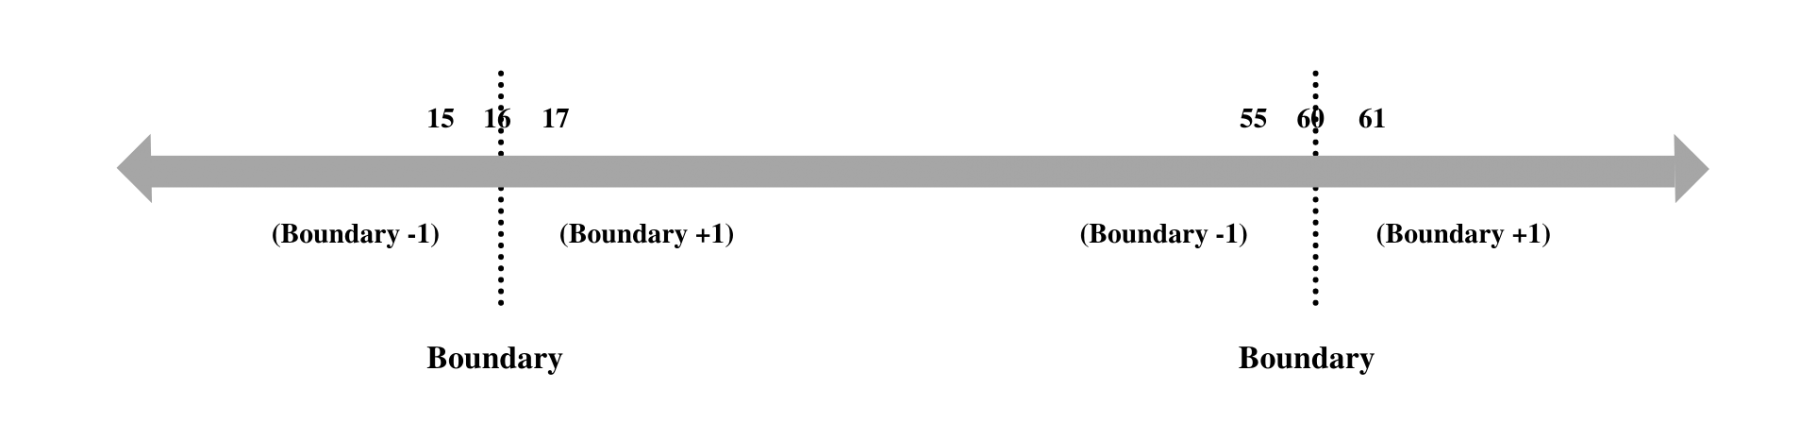
- Identify Exact Boundary Value of this partition Class - which is 16 and 60.
- Get the Boundary value which is one less than the exact Boundary - which is 15 and 59.
- Get the Boundary Value which is one more than the precise Boundary - which is 17 and 61 . If we combine them all, we will get below combinations for Boundary Value for the Age Criteria.
Valid Boundary Conditions : Age = 16, 17, 59, 60
Invalid Boundary Conditions : Age = 15 61,
It's straightforward to see that valid boundary conditions fall under Valid partition class, and invalid boundary conditions fall under Invalid partition class.
Can you figure out why we have not used 16.1, 15.9, 59.9, and 60.1 as the boundary increment and decrement values? It's a concept that has an insufficient explanation in most of the articles. Therefore, let's take another example to explain this. Assume that you are entering your weight on a website. Based on your weight and height, the site will tell you the Body Mass Index (BMI). You can enter values from 30 to 150 kg in the weight input field. The weight input field only allows natural numbers i.e., positive integers!
In this case, if you will create the boundaries using the same method - you will end up with
Valid Boundary Conditions : Age = 30, 31, 149, 150
Invalid Boundary Conditions : Age = 29, 151
Now consider the same scenario, but the weight input field allows decimal numbers up to 1 decimal place. In this case, the boundary conditions will come as:
Valid Boundary Conditions : Age = 30, 30.1, 149.9, 150
Invalid Boundary Conditions : Age = 29.9, 150.1
Did you see the difference? We take the minimal acceptable value on either side of the boundary. If we take the value as 30.01, then we end up testing the software for two decimals where the requirement is one decimal place. It is a separate test condition and should not be mixed up with Boundary value.
Measurement of the Boundary coverage for a partition can happen as the number of boundary values tested divided by the total number of boundary test values identified.
Boundary Value Analysis with Equivalence Partitioning
We have got a fair understanding of Boundary Value Analysis now. So, let's see how we can combine it with Equivalence partitioning to get a full set of test conditions.
Coming back to our earlier example, let's review the diagram again.

The range is from 16 - 60, and Boundary Value analysis gives us test conditions as 15, 16, 17, 59, 60, 61. If you have a close look, don't you think we have already covered Valid Equivalence partitioning by covering up 17, 59, and Invalid Equivalence Partitioning by covering 15 and 61? After all Equivalence partitioning says that we should choose a number between 16-60 for valid partition and less than 16 or more than 60 for invalid partition. So, if the boundary value is already covering Equivalence partitioning, why do we need partitioning as a separate technique? It is a concept that is not clear to most of the folks, and not many articles have explained it clearly.
Theoretically, Boundary value has indeed covered Equivalence partition, but we still need a partition. If we only apply Boundary value, and it fails, we will never know whether the edge condition failed, or the entire partition failed. Let's comprehend it with the help of an example. Continuing with our gym form, let's assume the developer has written below logic :
If (age < = 17 ) Then Don't allow Gym Membership
If (age > 60) Then Don't allow Gym Membership
If you look at the logic, you will realize that the logic should have been If (age <17), but the developer added = wrong sign. Did you also realize that the logic for the entire valid partition is missing? If (age>=16 and age <= 60 ) Then allow Gym membership !
If we only use boundary condition value 17, it will fail the test execution. However, it will not tell you whether the boundary condition failed or if the entire partition failed. As such, it's essential to use an Equivalence partition value, which is not a boundary value. In this case, if we use the value 20, it will fail the execution. It will give a clear indication that the developer has missed implementing the entire partition.
So if we combine both Boundary Value and Equivalence Partitioning, our test conditions will be :
Valid Boundary Conditions : Age = 16, 17, 59, 60
Invalid Boundary Conditions : Age = 15, 61
Valid Equivalence Partition : Age = 25
Invalid Equivalence Partition : Age = 5 , 65
Pitfalls of BVA
After applying both boundary value and Equivalence partitioning, can we confidently say that we got all the required coverage? Unfortunately, it's not that simple! Boundary value and equivalence partitioning assume that the application will not allow you to enter any other characters or values. Such characters, like @ or negative values or even alphabets, will not be allowed to enter. This assumption is, however, not valid for all applications, and it's essential to test these out before we can say that the field value is completely working.
Apart from that, we can have situations where the input value depends on the decision of another value. E.g., If the Gym form has another field Male and Female, and the age limit will vary according to that selection. Boundary value alone cannot handle such variations, and this leads us to another black box technique called Decision Table Testing. We will discuss that in detail in our next article. Stay tuned!
Decision Table Testing
We know that Black box testing involves validating the system without knowing its internal design. Moreover, we have also discussed that Boundary Value Analysis and Equivalence Partitioning can only handle one input condition at a time. So what do we do if we need to test complex business logic where multiple input conditions and actions are involved? Consequently, we will discuss another black box testing technique known as Decision Table Testing. Because this testing can handle such cases.
To get a better understanding, it's recommended that you read our articles on Boundary Value Analysis and Equivalence Partitioningbefore proceeding further. Subsequently, we will cover the below items in this article.
- What is Decision Table Testing?
- How to create a Decision Table?
- Pitfalls of Decision Table Testing
What is Decision Table Testing?
We often test applications where the action is basis of multiple input combinations. E.g., if you are applying for a loan, then the eligibility for getting a loan will depend on several factors like age, Monthly Salary, loan amount required, etc. Consequently, these combinations are called business logic based on which the application functionality works. The decision table is a black box testing technique that is used to test these complex business logic. It's a tabular representation of input conditions and resulting actions. Additionally, it shows the causes and effects. Therefore, this technique is also called a cause-effect table.
| CONDITIONS | 1st Input | 2nd Input | 3rd Input |
|---|---|---|---|
| Salaried? | Y | N | Y |
| Monthly Income > 25000 | N | Y | Y |
| IT Returns available? | Y | N | Y |
| ACTIONS | |||
| Loan Eligibility | N | N | Y |
Therefore, it is a simple decision table where Salaried, Monthly Income, and IT Returns are input conditions. In addition to the above, their combination results in the final action (Loan Eligibility).
Testing combinations can be a challenge, especially if the number of combinations is enormous. Moreover, testing all combinations is not practically feasible as it's not cost and time effective. Therefore, we have to be satisfied with testing just a small subset of combinations. That is to say, the success of this technique depends on our choice of combinations
Consequently, let's dive into practical examples and see the methods and best practices to create decision tables.
How to Create a Decision Table?
The decision table works on input conditions and actions. That is to say, we create a Table in which the top rows are input conditions, and in the same vein, the bottom rows are resulting actions. Similarly, the columns correspond to unique combinations of these conditions.
Common Notations for Decision Table
- For Conditions
- Y means the condition is True. We can depict it as T Or 1.
- N indicates the condition is False. We can also refer to it as F Or 0.
- - It means the condition doesn't matter. We can represent it as N/A.
- For Actions
- X means action should occur. We can also refer to it as Y Or T Or 1.
- Blank means action should not happen. We can also represent it as N Or F Or 0.
Now that we are clear on notations, let's consider the below scenario.
Consider a Banking application that will ask the user to fill a personal loan application online. Based on the inputs, the application will display real-time whether the loan will get approval, rejection, or requires a visit to the branch for further documentation and discussion. Let's assume that the loan amount is 5L. In addition to this, we won't change it to reduce the complexity of this scenario.
Accordingly, the application has the following business rules:
- If you are Salaried and your Monthly Salary is greater than or equal to 75k, then your loan will be approved.
- If you are Salaried and your Monthly Salary is between 25k and 75k, then you will need to visit the branch for further discussion.
- If you are Salaried and your Monthly Salary is less than 25k, then your loan will be rejected.
- If you are Not Salaried and your Monthly Salary is greater than or equal to 75k, then you will need to visit the branch for further discussion.
- If you are Not Salaried and your Monthly Salary is less than 75k, then your loan will be rejected, consequently.
There are four steps that we follow to create a Decision table. Subsequently, let's have a look at these steps based on the above scenario.
Step 1 - Identify all possible Conditions
Consequently, the possible conditions are as below:
- First, whether the person is Salaried or not.
- Second, Monthly Salary of the applicant.
Step 2 - Identify the corresponding actions that may occur in the system
Therefore, the possible actions are:
- Should the loan be approved (Possible values Y or N)
- Should the loan be rejected (Possible values Y or N)
- Should the applicant be called for further documentation and discussion (Possible values Y or N)
Step 3 - Generate All possible Combinations of Conditions
Each of these combinations forms a column of the decision table. Firstly, let's see how many variations are possible for each condition:
- Condition 1 - Whether the person is salaried or not - 2 Variations: Y or N
- Condition 2 - Monthly Salary of the Applicant - 3 Variations : <25k , 25k - 75k and >75k
Subsequently, based on this our total combinations will come up as 2*3 = 6
- 1st Combination : Salaried = Yes , Monthly Salary < 25k
- 2nd Combination: Salaried = Yes, Monthly Salary 25k - 75k
- 3rd Combination: Salaried = Yes, Monthly Salary >75k
- 4th Combination : Salaried = No , Monthly Salary < 25k
- 5th Combination: Salaried = No, Monthly Salary 25k - 75k
- 6th Combination: Salaried = No, Monthly Salary >75k
At this point, our Decision table will look like below:
| CONDITIONS | Combination # 1 | Combination # 2 | Combination # 3 | Combination # 4 | Combination # 5 | Combination # 6 |
|---|---|---|---|---|---|---|
| Salaried? | Y | Y | Y | N | N | N |
| Monthly Income < 25k | Y | NA | NA | Y | NA | NA |
| Monthly Income 25k - 75k | NA | Y | NA | NA | Y | NA |
| Monthly Income >75k | NA | NA | Y | NA | NA | Y |
| ACTIONS | ||||||
| Loan Approved | ||||||
| Loan Rejected | ||||||
| Further Documentation & Visit |
Step 4 - Identify Actions based on the combination of conditions
Subsequently, the next step will be identifying actions for each combination based on the business logic as defined for the system.
- 1st Combination - Action = Loan Rejected
- 2nd Combination - Action = Further Documentation & Visit
- 3rd Combination - Action = Loan Approved
- 4th Combination - Action = Loan Rejected
- 5th Combination - Action = Loan Rejected
- 6th Combination - Action = Further Documentation & Visit
After this, our final decision table will look like below:
| CONDITIONS | Combination # 1 | Combination # 2 | Combination # 3 | Combination # 4 | Combination # 5 | Combination # 6 |
|---|---|---|---|---|---|---|
| Salaried? | Y | Y | Y | N | N | N |
| Monthly Income < 25k | Y | NA | NA | Y | NA | NA |
| Monthly Income 25k - 75k | NA | Y | NA | NA | Y | NA |
| Monthly Income >75k | NA | NA | Y | NA | NA | Y |
| ACTIONS | ||||||
| Loan Approved | NA | NA | Y | NA | NA | NA |
| Loan Rejected | Y | NA | NA | Y | Y | NA |
| Further Documentation & Visit | NA | Y | NA | NA | NA | Y |
Now that we have created the decision table, what's next? Consequently, we have to use this decision table to generate test cases for each of these combinations. The actions will be our expected output. Subsequently, we will compare this to the actual results to pass or fail the test cases.
In addition to the above, the typical minimum coverage standard for decision table testing is to have at least one test case per decision rule in the table. That is to say; it generally involves covering all combinations of conditions. In addition to that, we measure the coverage as the number of decision rules tested by at least one test case, divided by the total number of decision rules. Consequently, we express it as a percentage.
Pitfalls:
To conclude, we have seen that Decision table testing is immensely beneficial when we have to test complex business rules. However, like every other technique, there are pitfalls for the decision table as well that we should know.
- Capturing All Combinations and Actions - Firstly, it's often challenging to ensure that we have got all the input combinations and actions captured. In other words, there are several combinations in large systems that it's easy to miss out on them. In addition to that, we should remember that the success of the decision table solely relies on our ability to capture these combinations correctly.
- Redundant Combinations - Secondly, the decision table could also introduce redundant combinations if we solely go by the permutations. E.g., If the number of conditions is six and each condition can take three values. As a result, our total combination will become 333333 = 729 !! Do you think we can cover all these combinations in our test cases? It's practically impossible unless there is infinite time & money! So what do we do in such cases? The bare minimum requirement for any decision table is that the variation of each condition is covered at least once. Therefore, if you ignore all the permutations, there are six conditions with three variations each. Which, in turn, means that 18 combinations (63) can cover each of these variations at-least once. Moreover, there is also a possibility that your one combination can cover multiple conditions. As a result, we can further reduce the combinations. Additionally, while selecting these combinations, we need to ensure that the selection of all our actions happens at least once.
For instance, if you look at our earlier example, do you realize that combination 4 and 5 are redundant? In other words, there is no need to keep both. More importantly, the business rule says Salary less than 75k for the non-salaried person, and it doesn't need to split further!
- Boundary and Edge Conditions - Lastly, let's assume we have taken care of all the right things and pitfalls. In our earlier example, one of the test conditions is to have Salary <25k, and another where Salary is between 25k - 75k. Merely applying the decision table, you can take the input value as 20k and 50k. Which, in turn, will suffice the requirement of the decision table. However, if you remember, we get more errors in boundary conditions. Which, in fact, are entirely missing here! In addition to that, as there is a range involved here, we can use Equivalence partitioning as well, along with Boundary value. Please read our article on Boundary Value Analysis if you want to know why we will get more errors in boundary conditions. Additionally, you can also understand how to apply Equivalence partitioning along with boundary value.
Moreover, the decision table alone is not sufficient to catch all the defects. Therefore, we should always use it with boundary value and Equivalence partitioning techniques wherever possible.
In our earlier example, the input condition for Salary can be taken as 24999, 25000, and 25001 for the 25k input.
However, what happens when the system behavior changes even when you give the same input? E.g., If you are entering a wrong password multiple times, you will get a message that your password is incorrect. However, once your user id gets locked, you will get a different message that you cannot access your account anymore. Conclusively, all this happens even when the input condition remains the same. Therefore, you would have figured out by now that we cannot handle this situation using the Decision table. Hence, we will need to learn another technique called State Transition testing that will cover such conditions. More on that in the next tutorial!
Experience Based Testing
There is a famous quote by Albert Einstein “Information is not knowledge. The only source of knowledge is experience. You need the experience to gain wisdom.” This quote is apt when we think of the importance of experience while coming up with test cases. In this tutorial, we will talk about experience based testing techniques.
- What is experience based testing?
- What are the types of experience based test technique?
- Common pitfalls of experience based testing.
What is Experience Based Test technique?
In previous articles, we have gone through blackbox testing techniques like equivalence partitioning and boundary value analysis. These approaches are more structured, and there is a clear approach defined to apply these techniques. If multiple testers apply the same technique on a requirement, then they will come up with a similar set of test cases.
When applying experience based test techniques, the test cases are derived from the tester’s skill and intuition. Their past works with similar applications and technologies also play a role in this. These techniques can be helpful in looking out for tests that were not easily identified by other structured ones. Depending on the tester’s approach, it may achieve widely varying degrees of coverage and effectiveness. Coverage can be difficult to assess and may not be measurable with these techniques.
When should we use experience based technique?
- Requirements and specifications are not available.
- Requirements are inadequate.
- Limited knowledge of the software product.
- Time constraints to follow a structured approach.
Once the structured testing is complete, there can be an opportunity to use this testing technique. It will ensure the testing of important and error-prone areas of applications.
Intuition too, play a key role in this technique. For example, consider your favorite web or mobile app that you use – E.g. Amazon. You did not get any requirements or a document on how to use a functionality. Yet, most of you are aware of the features and functionalities that they offer. How did you do that? By exploring the application on your own. This is a classic example of knowing the application by using it over time.
A similar thought applies to a tester as well. It’s just that they are trained to look for finer details and to look out for defects. Over a period, they know the areas that can be buggy.
For example, if you test an eCommerce application like Amazon, there are some scenarios that a tester would know from his experience that a casual user might not try such as:
- Enter a negative value in the quantity field.
- Order multiple products or quantities, apply a discount code on the cart value, and then return some quantity. E.g. if you bought 3 quantities at 100 each and then applied a 10% discount your final amount is 270. When you return one quantity, you should get 90 refunded and not 100.
- Also, try loging in to multiple sessions and see if cart gets updated correctly.
- Add a product in cart and make it out of stock from the backend.
- Add product to cart, enter payment details, and just before clicking place order make it out of stock from the backend.
These types of scenarios (and many more) come from experience, and they would apply to most of the ecommerce applications.
Scenarios to avoid
While we can always use this testing along with the structured techniques, in some cases, we cannot use it stand alone. At times there are contractual requirements where we need to present test coverage and specific test matrices. Experience based techniques cannot measure the test coverage. Hence, we should avoid them in such cases.
Types of experienced based testing
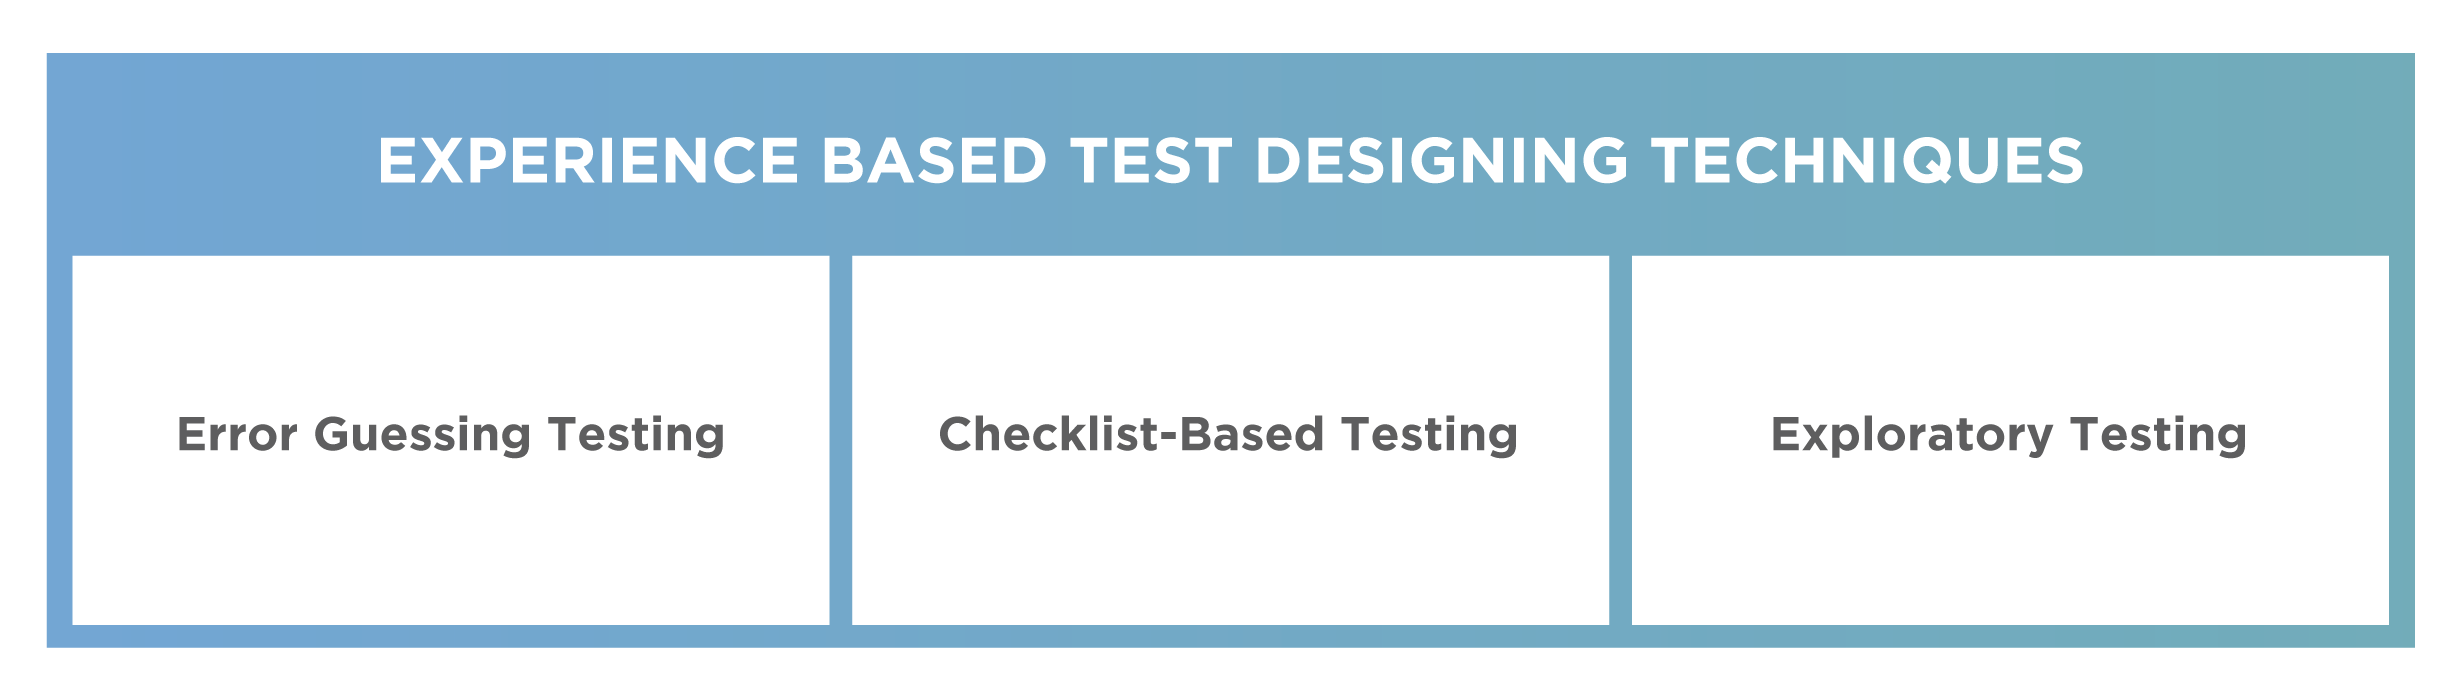
Error Guessing – Tester applies his experience to guess the areas in the application that are prone to error.
Exploratory Testing – As the name implies, the tester explores the application, and uses his experience to navigate thru different functionalities.
Checklist Based Testing– In this technique, we apply a tester's experience to create a checklist of different functionalities and use cases for testing.
Common Pitfalls
As the name suggests, this testing technique is solely based on the experience of the tester. The quality of testing depends on the tester, and it would differ from person to person.
This approach might result in a very poorly tested application if the experience of the tester is not enough and can lead to bugs in the application.
In some cases, the tester has the experience but the domain is new. E.g. the application is in a banking domain, but the tester has worked on eCommerce applications. In such cases, the experience based testing would not work as well.
Hence, it’s extremely important that we use this technique when a tester has been working in the same domain or on the application for a long time.
So, to summarize, experience based testing is really useful to come up with test cases. In next tutorials we will dig deep into different types of these techniques and learn how we can apply these in our projects.
Error Guessing
rror guessing in software testing is one of the most common experienced-based techniques used across projects. In this tutorial, we will learn in detail about these topics:
- What is Error guessing technique?
- How to apply the Error guessing technique?
- When to use error guessing?
- Pitfalls of error guessing technique
What is Error guessing technique?
Error guessing is a technique that makes use of testers' skills, intuition, and experience to anticipate the occurrence of errors, defects, and failures that may not be easily captured by formal techniques like Boundary Value Analysis and Equivalence partitioning.
This technique is unstructured, which means there is no math behind it. If multiple testers apply this technique to the same application, they might end up with different test cases. The test cases might reflect the experience of the tester with similar applications and his domain expertise.
A methodical approach to the error guessing technique is to create a list of possible errors, defects, and failures, and then design tests that will cover this list.
How to apply the Error guessing technique?
Error guessing depends on testers' experience with the below considerations:
How the application has worked in the past?
A tester who has worked on the same application is best for the error guessing technique. He would have a good understanding of how the application has worked in previous releases. For e.g. it's likely that a particular area of application has always been buggy, and hence additional testing is required. The tester can apply error guessing here, while stable areas call for only formal techniques.
What kind of errors tend to be made?
Every application has a history, which is based on the people that are working on it, and also the functionality or integration points that the application has. An experienced tester would know the type of errors that have occurred in the past. E.g. there is an e-commerce application where the discount logic has often failed with the application of a random discount code. In such cases, the tester will try different combinations of valid and invalid discounts and see that the logic is working fine. This insight comes only when the tester has enough experience in the application to know the historical issues.
What are the Failures that have occurred in other applications?
An experienced tester would not only rely on the current application but also make use of his experience in testing similar applications. In some cases, the requirements themselves may not be enough, or the application is new so there is no historical data available. In such cases, the tester will have to rely on the domain experience.
Let’s understand this with the help of a simple example:
Consider a scenario where you are testing the functionality of funds transfer in a banking application. There is a field where you need to enter the amount. The requirements say that you can transfer any amount between 100 and 100000
If you apply standard techniques of Boundary value analysis and Equivalence Partitioning, you may come up with the below validations:
99, 100, 101, 500000, 99999, 100000, 100001.
However, an experienced tester has seen that a few of the similar applications have not handled the cases with a negative value. He would use this experience to create error-guessing scenarios for the current application
When to use the Error guessing technique in software testing?
We should always remember that error guessing is not a substitute for formal techniques. Wherever possible, we should use it in addition to formal techniques and only when the tester has past experience on similar applications.
Error guessing will be effective when-
- Tester has got good experience with the same/similar applications.
- There is enough data on historical behavior and failure of the application in past
- The requirements are inappropriate and formal techniques are difficult to apply.
- The application or functionality is business-critical, and there is a case to put more testing efforts by applying error guessing in addition to formal techniques.
Some of the defects found in error guessing are usually a result of exhaustive testing on the application. However, the tester has seen such issues in past and he can use his experience to come up with such scenarios without running the exhaustive tests again. This would save a lot of time and still find some quality edge case defects.
Pitfalls of Error Guessing technique
Similar to any unstructured approach, the error guessing technique is dependent on the testers’ intuition and experience. Lack of experience can enforce the failure of this technique. This is especially riskier in cases where requirements are not very clear, or product knowledge is not enough. Then it’s important to make sure that the testers on the project have got enough domain knowledge and experience on similar applications. If the testers are not experienced, they would create error scenarios that may not be relevant, and this would result in poor quality of testing.
Risk in Software Testing
We often see situations where we have applied the best testing techniques and processes, and yet the testing wasn't completed in time or with quality. It happens when we have not planned for risks in our testing process. In this tutorial, we will get a good understanding of Risks and it's various levels. We will also discuss how we can categorize risk in software testing basis their probability and impact.
- What is Risk in Software Testing?
- Dimensions of Risk
- Levels of Risk
What is Risk in Software Testing?
Risk is the possibility of an event in the future, which has negative consequences. We need to plan for these negative consequences in advance so we can either eliminate the risk or reduce the impacts.
From the Testing perspective, a QA manager needs to be aware of these risks so he/she can minimize the impact on the quality of the software. Does this mean that the QA manager should address every risk that the project could face? In an ideal world, YES, but in all practicality, he would never have the time and resources to plan for every risk. Therefore we need to prioritize risks that would have severe consequences on software. How do we do that? We do that by determining the level of risk.
Dimensions of Risk
There are two dimensions of Risks that we should know.
- Probability - Risk is always a possibility. The likelihood of risk is always between 0 % to 100 %. The probability can never be 0%; otherwise, risk will never occur. It can never be 100%; otherwise, it's not a risk; it is a certainty. E.g., We are hosting a website on a server that guarantees 99% uptime. What is the probability of the server going down? You guessed it right! It's 1 %.
- Impact - Risk by its very nature has a negative impact. However, the size of the impact varies from one risk to another. We need to determine the impact on the project if the risk occurs. Continuing with the same example - What's the impact if the server goes down? Well, the site will not be accessible, so the impact is very high!
Levels of Risk
Based on these two dimensions, we determine the level of risk.
Level of Risk in Software = Probability of Risk Occurring X Impact if risk occurred
We can calculate the probability of risk between 0 - 1 with 0 depicting 0% occurrence and 1 depicting 100% occurrence. In this case, the classification of the impact is Low, Medium, and High. Some folks also classify it as Minimal, Minor, Moderate, Significant, and Severe. For the formula to calculate the level of risk, we can show the impact on a scale of 1 - 10 with 1 being the lowest impact and 10 being the highest impact. We can also use a range of 1-5, but irrespective of that, the core concept remains the same.
If we continue with our earlier example of server uptime of 99% - The Risk level will be calculated as :
Level of Risk = 0.1 X 10 = 1
0.1 is the probability of server going down (1% will translate to 0.1), and 10 is the impact on a scale of 1-10.
The Level of Risk calculation helps us in prioritizing risks. If we plot the probability and impact on a graph, we can classify the level of risk as below.
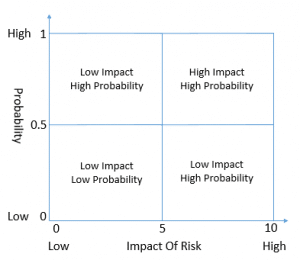
Let's understand these with examples - We will only discuss the concepts here. We will address the actual risk mitigation in our next article.
Low Impact Low Probability
These are the risks that have a low probability of occurrence, and the impact on software is pretty low.
E.g., Consider an e-commerce website that provides a Chat option so customers can chat with the service desk executive if they face any issues. Chat integration is a third-party plug-in, and it gives an uptime guarantee of 99%.
- What's the probability of chat service not available? It's 1% which is pretty low
- What's the impact if chat service goes down? The effect on software is pretty low, provided only a few users use chat service. Or there are other options to reach customer service executives (E.g., phone, and emails).
Such risks, which are low probability and the low impact, can be ignored. There isn't much value, add spending time on these risks.
Low Impact High Probability
These are the risks that have a high probability of occurrence, but the impact on software is pretty low.
E.g., We are migrating users from one website to another. The phone number format of both sites is different. As such, the probability of users losing their phone numbers in their profile is pretty high. However, As the phone number is not a mandatory field, it will not impact any user journeys. Also, a user can go ahead and update the phone number in the new format in My Account. Hence, the impact on software is low.
Such risks don't need much mitigation planning. These, however, need to be monitored to ensure that the impact remains low (What if the phone number becomes mandatory and user journey gets blocked ?)
High Impact Low Probability
These are the risks that have a low probability of occurrence, but the impact on software is pretty high.
Consider that we are hosting our test website on a server that guarantees 99.9 % uptime.
- What's the probability of the server going down? It's 0.1 %, which is pretty low.
- What's the impact if the server goes down? The website will not be accessible, and testing will completely stop. Do you see that it's a very high impact?
For such situations, we need to ensure that we have a mitigation plan if the risk does occur. It could be executing the tests in a different environment for the time the original server is down.
High Impact High Probability
These are the risks that have a high probability of occurrence, and the impact on software is pretty high as well.
Consider a situation where we are planning for testing software, and the timelines are very aggressive. The testing requires 10 Appium skill set resources; however, the availability of this skill set is very minimal in the organization.
- What's the probability that we will not get the required resources on time? Well, It's pretty high, given that this skill set is scarce, and deployment of existing resources in on-going projects has finished already.
- What's the impact if we don't get these resources in time? As the timelines are pretty aggressive, the impact on test completion will be pretty high!
High Impact and High Probability is the highest level of risk in software testing, and maximum planning and attention should go to this bucket. These risks have serious potential to derail testing thoroughly, and it could lead to delays in test completion or poor software quality.
For our current example, one mitigation could be to hire this skill set from the market. We can also hire contractors for a short duration to help in execution. As you would realize, the earlier we identify these risks, the easier it is to put the mitigation plan in place.
I hope you got a good understanding of risk in this tutorial. In our next tutorial, we will discuss product and project risks.
Project Risk and Product Risk
We have discussed the definition of risk and how to calculate the risk levels. If you haven't read our article on Risk Definition, then I would suggest you read that first before you jump on to this one. In this article, we will talk about Project Risk and Product Risk with some practical examples, so you get a solid understanding of this topic.
- What is Project Risk?
- What is Product Risk?
- Who should identify Product/Project risk?
What is Project Risk?
Project risks are uncertain situations that can impact the project's ability to achieve its objectives. What are these Objectives? Every Software project has an objective. It could be building a new eCommerce website with a defined set of acceptance criteria. It includes functional and non-functional characteristics of the software. Any event that may risk these objectives classifies as Project Risk.
There is often confusion on whether a Test Manager should involve himself in Project Risks, or should he limit himself to testing risks?
Testing is a part of the project, like development or product management. Any risk that will impact the development could have an impact on testing as well. As such, the QA Manager must be aware of all the project risks that can have an impact on testing. Who Identifies these risks?
Before we answer this question, we need to see what all risks can occur in a project. It's crucial that you understand these risks and how they can affect testing.
Project Issues:
- Delays in Delivery and Task completion - Heard this story before? The testing team was supposed to get stories on Monday, and it's already Friday !! It's the most common project risk where there is a delay in completing the Development Task for a story. Therefore, there is a delay in the story delivery to the testing team.
- Cost Challenges - Project funds and resources might get allocated to other high priority projects in the organization. There could also be cost-cutting across an organization, which could lead to reduced funds and resources for the project. It will impact testing resources, as well. Can you relate to the risk that six folks would now do a work that was supposed to be done by ten people? Of course - the timeline always remains the same!
- Inaccurate Estimates - Estimation of Home Page development for a website was 20 days of development and 7 days of testing. When actual work started, the team figures out that they will need 35 days of development and 12 days of testing. Can you relate to this? When a project begins, then the high-level estimation happens according to which allocation of resources and funds takes place. These estimates likely turn out to be inaccurate when actual work starts. It could lead to delays, quality issues, or cost overruns for both development and testing teams.
Organizational Issues:
- Resource Skillset Issues - Imagine you are on an automation project which requires 10 QA resources skilled with Selenium. You end up with 3 resources who know Selenium and rest 7 useful resources who got three days of Selenium training. Sounds familiar? It is a vital issue where the skill set of resources doesn't match project needs. The training is also not sufficient to bridge that gap. Quite evident that this will lead to quality and on-time delivery issues.
- Personnel issues - This could be HR and people-oriented policies of the organization. It also includes any workplace discrimination that may affect people
- Resources Availability - Often, business users, subject matter experts, or key developers/testers may not be available due to personal issues or conflicting business priorities. It has a cascading impact on all the teams.
Political Issues:
- Team Skills - What will happen if Developers and testers don't talk to each other? There will be back and forth on defects and will lead to everybody's time wastage. It often happens that Dev Managers and Test Managers don't get along well. It cascades down to the team as well, and such an environment hampers effective test execution.
- Lack Of Appreciation - What if you do all the hard work, but only development efforts get appreciation in team meetings?
Technical Issues:
- Poor Requirements - Poor definition of the requirements leads to different interpretations by the clients and development/testing teams. It leads to additional defects and quality issues.
- Tech Feasibility - The requirements may not be feasible for implementation. There could be technical constraints due to which some of the client requirements may not meet as expected.
- Environment Readiness - If the Test Environment is not ready in time, then it would lead to delays in testing. Moreover, at times, the testing team might need to test in a dev environment, which could lead to data issues.
- Data Issues - If there is a delay in Data conversion and Data migration, then it would affect the testing team's ability to test with real data. E.g., If we are moving our website from one platform to another, it would need data migration. If a delay happens in this activity, in the testing environment, then it would affect testing.
- Development Process - Weakness in the development process could impact the quality of deliverables. It could be due to a lack of skill set of the architect. It's could also be due to scrum master not setting up the right processes.
- Defect Management - Poor Defect Management by Scrum Master or Project Managers could also lead to accumulated defects. Sometimes, the team picks up lower priority defects, which are easy to fix. It helps them to show up numbers. However, the high priority defects pile up. It leads to a lot of regression issues, and defect reopens might also occur.
Supplier Issues:
- Delivery Constraints - A third party that is required to supply services or infrastructure is not able to deliver in time. It could lead to delays and quality issues. E.g. For an eCommerce website, a third party provides images. The site is all ready and tested, but cannot go live as images are not ready!
- Contractual Issues - Contractual issues with Suppliers could also affect the deliverable. E.g., A supplier comes on contract to fix any defect in 7 days. However, the project team needs to fix P1 defects in 2 days. It is a classic example where the contract does not happen as per project needs. It leads to delays in delivering the software.
These were the broad set of risks that come under project risk. I hope you got a good understanding of these. Subsequently, we will discuss yet another risk called product risk.
What is Product Risk?
Product risks result from problems with the delivered product. Product Risks associate with specific quality characteristics of the product. Therefore they are also known as Quality Risks. These characteristics are :
- Functionality as per client requirements
- Reliability of software
- Performance Efficiency
- Usability
- Security of software
- Compatibility
- Ease of Maintenance
- Portability
Examples of Product Risks
Let's discuss some practical cases of product risk, so you get a better understanding of it.
- Software doesn't perform some functions as per specification. E.g., When you place an order on an eCommerce website, then order confirmation email triggers, but SMS functionality does not work.
- Software does not function as per user expectations. E.g., A user intends to buy a product and adds it to his Cart. During checkout, the product goes out of stock and subtracts from the Cart. However, the user is not shown any message to tell him what went wrong.
- Computation Errors - These are common issues that a developer has not written the correct computational logic in code. E.g., When a discount applies to a product, then the discount gets applied to shipping costs as well.
- *A loop structure is coded wrong - E.g., A loop that was to run nine times, runs ten times as the developer has used the condition <=10 instead of <10
- Response times are high for critical functions. E.g., You are placing an order on a website. The order is successful, and your money deducts. However, the order confirmation screen takes a min to load. This response time is too high for a customer.*
- User Experience of the product doesn't meet customer expectations. E.g., When a user is searching for a product on a website, he wants to filter out results. E.g. Filter with Size = Medium , Brand = Nike , Color = Blue. However, he cannot select all these filters at one go. He Selects Size, and the page refreshes. He then selects Brand and page again gets refreshed with updated results. It works as per functional requirements. However, it leads to poor user experience.
As you can see, product risks are nothing but defects that can occur in production.
Who should identify Project Risk and Product Risk?
We know what the product and project risks are, and it's type. But who should identify these risks, and who should plan for its mitigation? It has always been a contentious topic of how much the QA team should be involved in risk assessment. Should this be left for Scrum Masters and Project Managers?
From the testing perspective, there are two types of risks.
- Direct Risk - These are the risks that originate in testing. E.g., Test Lead not available in the Integration phase is a direct testing risk. The QA manager should raise it and work for its mitigation.
- Indirect Risk - Delay in the Development Story completion can happen. It is a direct development risk. The Architect or Dev Manager should raise it and work for its mitigation. However, do you see a QA impact over here? The QA Manager can raise a new testing risk that the impact on testing will happen if stories don't deliver on time. He can also call out QA's impact on the risk that Dev Manager has raised. The QA Manager should then work on its mitigation as well.
So as you see, QA Lead / Manager needs to know all the product/project risks. These may or may not originate in testing. However, they could still impact test deliverables. The QA Manager should analyze the impact of these risks on testing, and plan for its mitigation.
In our next article, we will discuss mitigation strategies for these risks.
Difference between White Box and Black Box Testing
It is said for testers “Choose the right approach to deliver quality products”. A tester usually faces the dilemma in choosing a “White box” or a “Black box” approach for testing their application. Yes! Here we are talking about the two predominant test methodologies: White box and Black Box testing.
In this article, we have considered the following points to give you a good concept of the White box and Black box testing techniques.
- What is White Box Testing (with example)?
- Why and When to Perform White box Testing? Along with its advantages.
- What is Black Box testing (with example)?
- Why and When to Perform Black Box Testing? Along with its advantages.
- Difference between Black Box and White Box Testing
What is White Box Testing?
The White box testing is a type of testing in which only internal structures or workings of an application is tested. It is usually performed by the team members who know the code, usually developer. Since the developers have an in-depth understanding of the project code, they are capable of making the changes in the source code easily and in a small time. In White box testing, a tester needs to have a good understanding of the code so that he/she can exercise different code paths using tests.
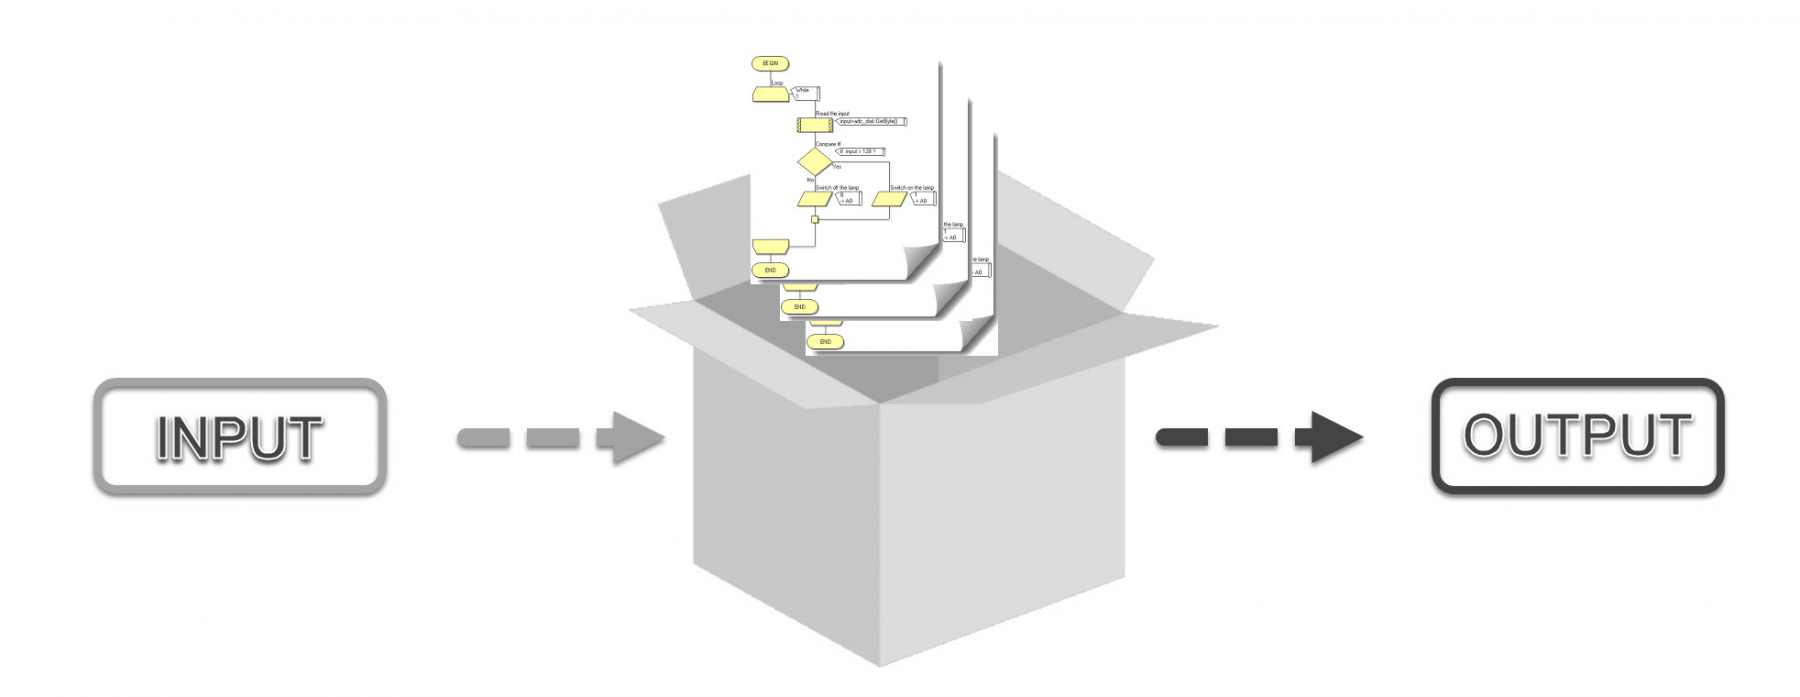
White box testing is also called:
- Clear Box testing
- Structural testing
- Open Box testing
- Code-Based testing
- Transparent Box testing
- Glass Box testing
The developers, after completing the coding, verify that each and every line of code is working correctly or not. This method is mainly used in the Unit and Integration testing.
The purpose of White Box testing is:
- To improve security
- Improve performance and reliability
- Test the flow of inputs and outputs through the application
- Improve design and ease of use
Let's see, how the approach of testing a Banking application is related to the concept of White Box testing in the below-mentioned example:
Usually, in a banking application, white box testing involves verifying the return codes from different authentication or validations service. For example, when we make payments online:
- the web application contacts an online Payment gateway
- Payment gateways talk with the application in terms of messages and response codes
These messages and codes are not directly visible to an end-user but are part of the web application's internal communication. A white box tester would write tests to verify that correct status codes and messages are received and sent by the application to the payment gateway. A White box tester will also verify that his/her application is responding correctly to those status codes and messages. This level of testing requires an understanding of the internal code of the application.
In Banking application, each and every feature is very critical, be it
- Log in to the system
- Fund transfer
- Change Address etc.
Each feature of the system is tested deeply before developer/tester proceeds to test another feature. Each and every line of the source code is checked along with its dependencies like in case of the Fund Transfer module:
- Currency selection
- Local/International transfer limits
- Adding beneficiary etc
are some of the features that are tested for every scenario. This type of testing involves checking the internal structure, flow, and source code of the application.
Why White Box Testing Performed?
White box tests are mainly used to detect logical errors in the program code. These tests focus on individual code units for e.g. classes. modules or subsystems.
By testing at the most granular level i.e source code of the system, you can build a robust system that works exactly as expected, and make sure it will not come as a surprise. The white box testing tests all possible scenarios that a system/the code under test is programmed to perform. When the testing is performed at such a granular level, most of the possible defects are exposed out. And the developers and testers will have the opportunity to evaluate if some or all of them need to be fixed.
The major techniques that help you run the white box tests successfully are:
- Statement coverage: This technique makes sure that each line of code is tested.
- Branch coverage: This technique ensures that all branches (for example, true or false) are tested.
- Path coverage: This technique tests all the possible paths/routes.
When to Perform White box Testing?
White box testing emphasizes finding bugs before it goes to one step above in the development process. It can be applied at all levels of system development, especially in Unit, System and Integration testing.
When performing Unit testing, developers can make changes to small units/components in case of any enhancement or bug fix. This reduces the cost and time in the project.
Advantages:
As with the black box testing, there are different advantages for the white box testing also. Here are some of the most commonly cited:
Application Analysis: Application analysis allows Developers to evaluate each and every section of code and how well they are linked to other sections of the code. While application analysis,
- Developers can figure out the non-relevant code which needs to be cut out or could be improved,
- Re-evaluate design of application from a scalability perspective.
Stability: The white box testing can offer greater stability and reuse of test cases if the requirement never changes. In White Box Testing the developer checks and updates the internal code for any bug fix or requirement change. When the same process has to be repeated, then the already designed test cases are used which saves time and effort.
The thoroughness: Thoroughness is the quality of being complete. In situations where it is essential to know that each code or path has been thoroughly tested, that every possible internal interaction has been examined, white box testing is the only viable method. In the example of a banking application, the feature of fund transfer is tested and all its derived paths like currency, national/international limit are also checked. When testing at the source code level, a tester can execute each permutation and combination that the program that can theoretically accept.
What is Black Box Testing?
Black box testing is a type of testing in which the tester only focuses on the inputs and the expected outputs, without knowing how the application works internally and how these inputs are processed. Tester treats the Application Under Test (AUT) as a black box. Calling the application as Black Box is a figure of speech to show that Tester does not know anything about it.
In the Black Box testing technique, the software tester does not worry about the internal mechanisms of an AUT (Application under test). Testers focus only on the outputs generated in response to the selected inputs and the execution conditions.
This is identical to the approach followed by end-users. They interact using GUI, not via code directly. They interact with an application by giving it an input and wait to get something back as an output. If the process works well, they get an acceptable result; if not, they experience a problem.
Let's take an example of an ATM machine to understand the concept of Black Box testing in a better way. As a general user, we perform the following functions at the ATM machine.
- Card Authorization
- Balance inquiry
- Cash Withdrawal
- Display Balance
- Generate receipt
You give input to the machine by just pressing/touching the buttons and the machine produces the desired output as dispatching the cash or displaying the balance etc. You don’t know anything about the internal functioning of the ATM machine.
Same way, in Black Box testing, testers aren't bothered about the internal functioning of the application which they are testing.
Why Black Box testing?
Black box testing is performed from the end-user perspective and it is also known as Behavioural Testing. This ensures that any gaps in the applications for real users are identified. Black Box testing tests by using both valid and invalid input from the customer and gives the desired output or the error message which ensures that the application works properly in both positive and negative conditions.
In the case of ATM machine example:
- If the user gives invalid input i.e if he/she enters wrong ATM PIN then the system gives an error message
- If the correct PIN is entered, the system navigates to the next step.
Thus both the aspects valid and invalid input can be checked in Black Box testing.
When to perform Black Box Testing?
Black box testing can be performed in various conditions and for various reasons, here are the some reason
- When we want to simulate how real users would use the application, we should do Black box testing.
- Black box testing also enables exploring the application, which can help us identify missing features, issues or incorrect behavior in the application. If we want to identify these things we should do Black box testing.
- Depending on the skill set of the team also we can decide to do Black box testing. For e.g., if we have a team of testers who are not skillful in programming, we should do black-box testing.
Black box testing is an essential type of testing, we should always make sure that our teams do Black box testing. It helps us remove any biases for the application and treat the application as a real user would do.
Advantages:
The black box testing has many advantages. Here are some of the most commonly cited:
- Easy to perform: Since the testers do not have to worry about the internal workings of an application, it is easier to create test cases by simply working through the application.
- Faster development of test cases: Because black box testers care about the GUI and different types of input that will be sent to the application. Identifying different GUI paths and the inputs generally require less effort compared to writing code as part of unit tests.
- Simplicity: When it is a big, highly complex application, the black box testing offers a means to simplify the testing process by focusing on valid and invalid usage of the application from the user's viewpoint. Ensuring that the correct outputs are received for all the most common user scenarios.
Difference between Black Box and White Box Testing
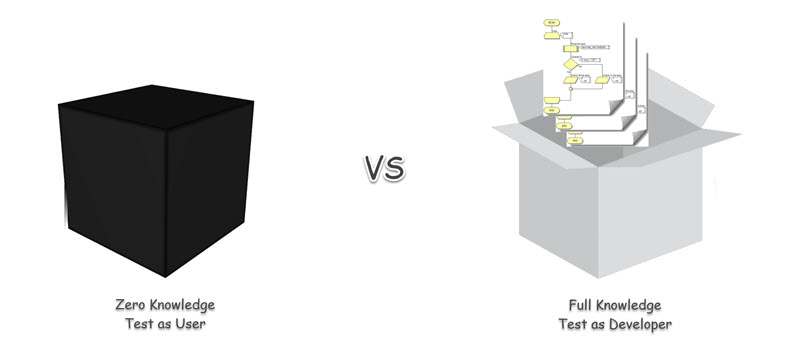
| Feature | Black Box Testing | White Box Testing |
|---|---|---|
| Definition | It is a form of software test in which the application is treated as a black box. The tester of the application does not know the internal workings of the application. | It is a way of testing software in which the tester/developer knows the internal structure of the code or software program. |
| Performed by | It is mainly done by software testers. | It is mainly done by software developers. |
| Objective | The main objective of this test is to verify what functionality the system has to perform. | The main objective of white box testing is to verify how the system is performing. |
| Programming knowledge | No implementation/code knowledge is needed. | Implementation/code knowledge is required. |
| Type of testing | It is a functional test of the software. | It is a structural test of the software. |
| Documentation | These tests can be initiated based on the requirement specified by the customer. By using the requirement specification document. | This type of test starts only after the team develops the design description of the software product. By using the detailed design document. |
| Execution time | This technique is time-consuming and exhaustive. | This technique is comparatively less time consuming as most of the tests are automated |
| Types | Functional Testing, Non-functional testing & Regression Testing | Path Testing, Loop Testing, Condition testing, Unit Testing & Integration Testing. |
Quality Assurance and Quality Control
Organizations often use the terms Quality Assurance and Quality Control interchangeably. However, both represent two very different aspects of quality management. So, let's understand how these two terms are related, and the critical differences between them.
In this article, we will focus on the following points.
- What is Quality Management?
- Quality Assurance - A Defect Prevention Activity
- What is Quality Control - A Defect Identification Activity
- Relationship between Quality Assurance (QA), Quality Control (QC) and Testing
- Difference between Quality Assurance and Quality Control?
What is Quality Management?
Quality management is the process that ensures that only the best products are developed and delivered to customers through a well-planned and structured process. It is a combination of two approaches - Quality Assurance and Quality Control.
Quality Assurance and Quality Control are both parts of Quality Management. Together they ensure that the deliverables are of high quality and meet the expectations of the customers. The below figure shows this relation.
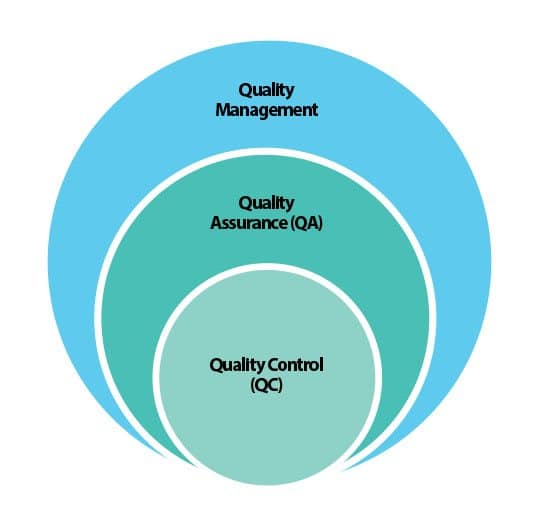
Some of the benefits of Quality Management are as follows:
- Firstly, it brings a higher level of customer satisfaction. Which, in turn, translates into a better brand reputation in the industry.
- Secondly, it produces a highly motivated & dedicated team that participates actively in the processes of quality assurance and quality control.
- Thirdly, it identifies defects across the software life-cycle. In addition to that, it ensures that the end product meets customer expectations.
- Moreover, it leads to appropriately planned methods and processes that save time, money, and efforts.
Quality Assurance - A Defect Prevention Activity
“The conformance to requirements is Quality". Quality assurance (QA) is the process of verifying whether a product meets the required specifications and the expectations of the client. This process ensures that you are doing the right thing in the right way, using the proper techniques. In addition to that, its primary focus is to prevent defects in the system.
Quality Assurance is static testing. In other words, it comes under "Verification" with the primary purpose of the prevention of defects. Quality Assurance is carried out across the entire product life cycle (SDLC), from the requirements phase to project closure.
The static testing types used in Quality Assurance are:
- Informal Reviews - The reviews which don't need documentation/ planning. Usually, the author will present the documents, and the audience will provide their viewpoints. These may or may not require documentation. Moreover, it's up-to-the author whether to accept or reject the feedback.
- Peer Review - This is, again, an informal method where colleagues can check each other's work product and provide feedback. It doesn't require formal documentation of feedback. Additionally, it's up to the author to accept or reject the feedback.
- Walk-through - This is a bit formal, where a lead or a manager would walk-through the document. It involves the official recording of the feedback, and the author incorporates the feedback. E.g., A QA Lead will do the walk-through of the automation scripts that a team member would have created.
- Inspection - This is the most formal review method. Where a higher authority like a client QA Manager or an Enterprise Architect will review the work product (e.g., Automation Framework), after that, formal documentation of these review comments happen. Finally, the author is supposed to formally share the status of the fixes and progress of these.
Quality Control - A Defect Identification Activity
Quality Control (QC) is a product-oriented activity that focuses on identifying the defect. QC involves checking the product against a predetermined set of requirements and validating that the product meets those requirements. Quality control is to inspect something (a product or a service) to make sure it works as per the defined requirements. If the product or service does not work well, then the problem must be solved or eliminated to meet the customer requirements. QC does not focus on the process. However, the main focus here is on the final product. In other words, it ensures that the final product is developed as per the quality process (Quality Assurance) and meets the client's requirements.
Quality Control is Dynamic testing - It comes under "Validation" with the primary purpose of finding defects. Dynamic testing takes place once the development of a component is complete.
The dynamic testing types used in Quality Control are:
- Component Testing - Testing individual components of a System
- Component Integration Testing - Testing two or more integrated components of a System
- System Testing - Testing a full system when it's fully integrated
- User Acceptance Testing - Tests carried out by customers to ascertain if the software is as per their requirements
Apart from that, several non-functional dynamic testing types are also a part of Quality Control. Some of these are:
- Performance Testing - First is Performance Testing, which tells whether the software performs well - E.g., the pages should start loading in less than 3 seconds.
- Load Testing - Second is Load Testing, which tells whether the software can take peak user load. E.g., during the Christmas season, the user load is at the peak. Hence, the software should be load tested to ensure it can sustain with this load.
- Security Testing - Next is Security testing, which ensures whether the software is secure enough. Moreover, security cannot be compromised.
- Recovery Testing - Finally, there is Recovery Testing. It tells whether the software can recover if something unexpected happens. For instance, if the server goes down and backs up, then the software should be able to recover.
Relationship between Quality Assurance (QA), Quality Control (QC) and Testing
The relationship between Quality Assurance (QA), Quality Control (QC) and Testing are hierarchical.
The main motto of Quality Assurance is the prevention of bugs in the software. It is more concerned with developing a quality process for software development. Which, in turn, will prevent the generation of bugs and results in the production of a quality product.
The primary goal of Quality Control is detecting errors by inspecting and testing the product. It involves comparing the product with a predetermined set of requirements and validating that the product meets those requirements.
Testing is a subset of Quality Control. It is the process of running a system to detect errors in the product to be corrected. Additionally, Testing is an integral part of quality control. Because it helps in demonstrating that the product works as expected and designed. In addition to the above, in Software Testing, we find out the problem and try to fix the problem. Which, in turn, is considered relatively easier than preventing the issue before it occurred.
The concept depicted in the figure given below :
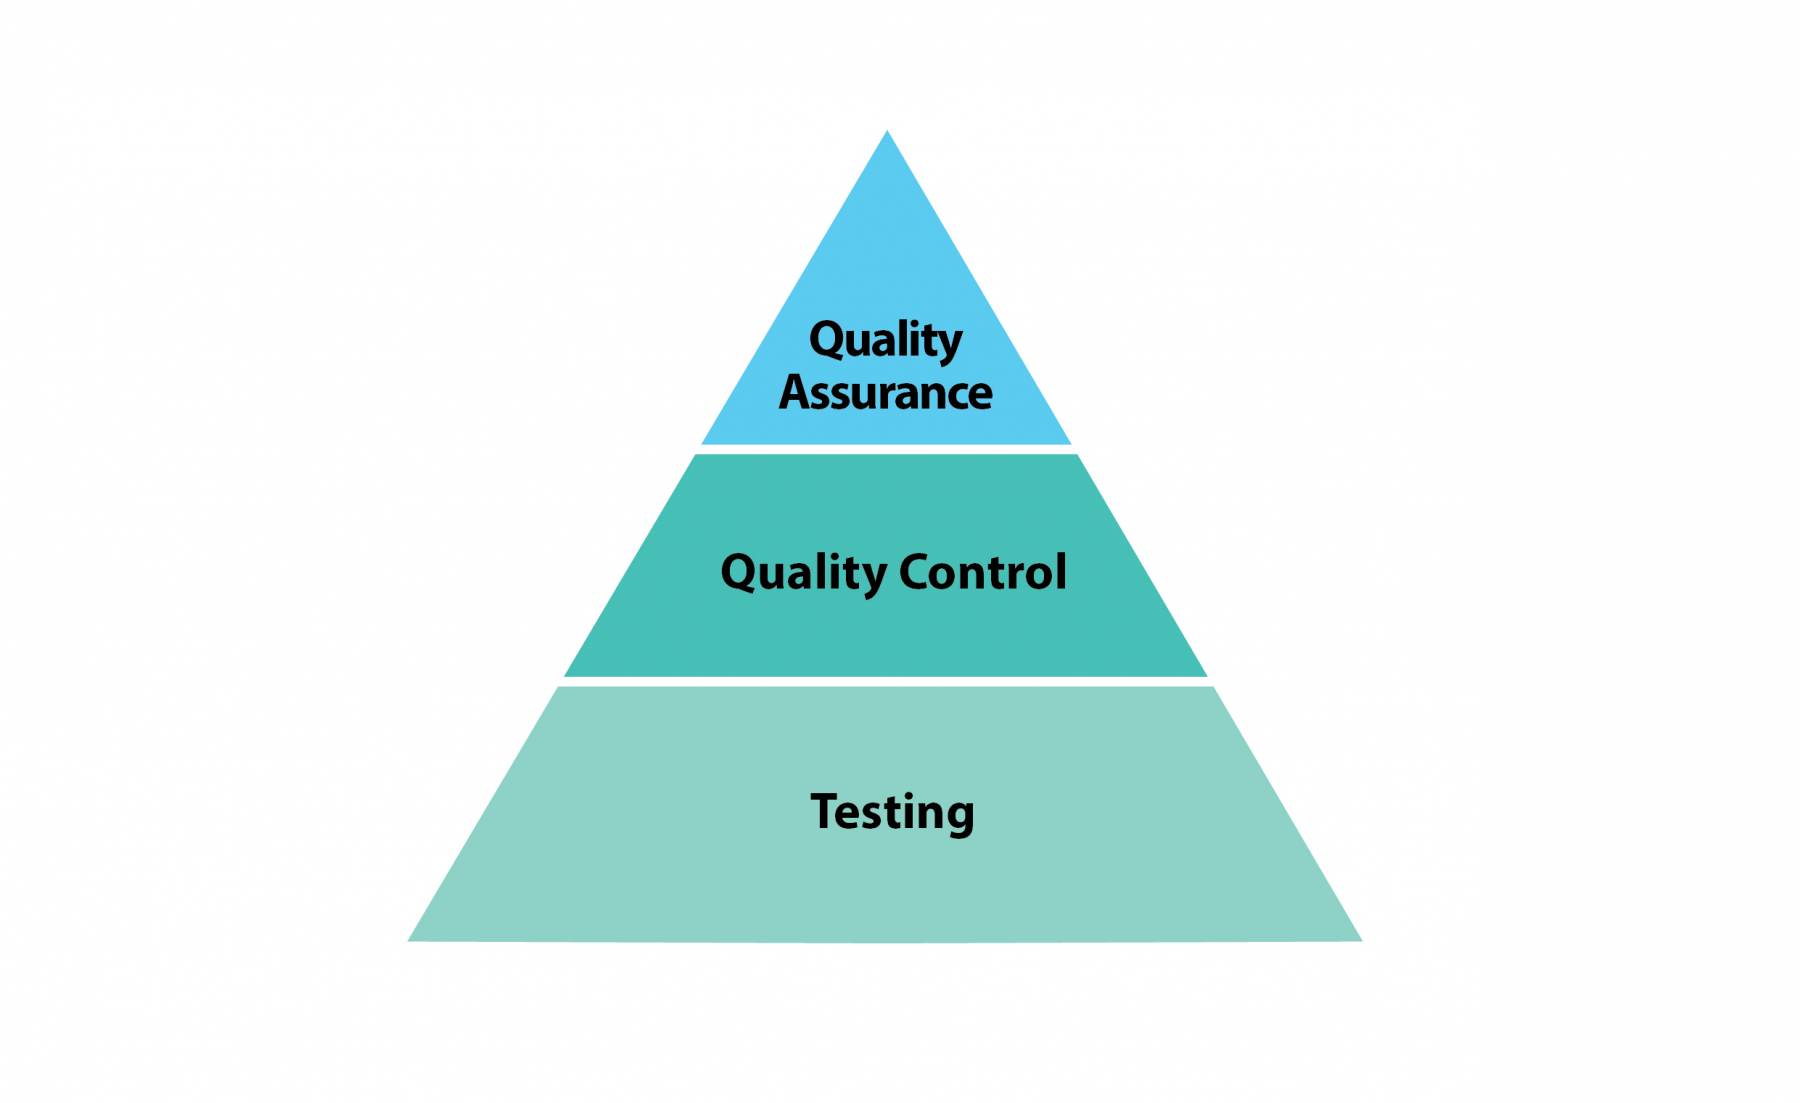
Difference between Quality Assurance and Quality Control
QA & QC collaborate in all organizations. However, they are different from each other. The main difference is that the QA activities are proactive. In other words, they are designed to avoid the production of defective products. Whereas the QC activities are reactive because they are intended to detect and block defective products through inspection and testing mechanisms.
| Features | Quality Assurance | Quality Control |
|---|---|---|
| Purpose | It includes setting up of appropriate processes. Additionally, it introduces quality standards to avoid errors and failures in the product. | Ensure that the product meets the requirements and specifications before its launch. |
| Focus | The focus is on the product creation process. | The focus is on the actual final product. |
| Approach used | Quality assurance uses a proactive approach | Quality control uses a reactive approach |
| Objective | Aims to prevent errors from occurring through thorough planning of activities and adequate documentation. | It detects and discovers the prevalent errors. In other words, it ensures the correct following of the planned activities. |
| Testing Technique | Quality Assurance uses Static testing techniques. | Quality Control uses Dynamic Testing techniques. |
| Process | It uses the Verification Process. In other words, it means, "Are we building the product right". | It uses the Validation Process. Which, in turn, means "Are we building the right product". |
| Team | All the team members - Testing, BA, Developers can participate in Quality Assurance. | The testing team usually has the prime responsibility for Quality Control. |
| SDLC involvement | Quality Assurance begins right from the start of the requirement definition phase. | Quality control happens in the development phase when components start getting ready for testing. |
To conclude, both Quality Assurance and Quality Control is necessary to ensure a successful product. Additionally, they can help detect inefficient processes and identify errors in the product when used together. Therefore, QA and QC can help develop and deliver a high-quality product to their customers.
Smoke and Sanity Testing: A Definitive Guide
There is chaos in testers when it comes to the difference between Smoke and Sanity testing. It is also a very frequently asked Interview Question as well. This article will give a clear idea about:
- What is Build and Release in Software Testing?
- What is Smoke and Sanity Testing (with Example)?
- Who does Smoke testing do? When to perform Smoke testing along with Smoke Testing Techniques?
- Why and When to perform Sanity testing?
- Difference between Smoke and Sanity testing
- Importance of Smoke and Sanity testing for the Software Industry
Smoke and Sanity Testing
Smoke and Sanity testing very much go hand in hand with Build & Release, to better understand these, it is suggested to understand what is Build and Release and how these relate with the Smoke & Sanity Test.
What is Build in Software Testing?
In layman's term, Build is the construction of something that has a visible and tangible result. Let's try to understand this further with the help of an example.
If we are building a house, then -
- Firstly, we will construct the foundation and walls of the building; this is the first build.
- Then we will fix the defects in the walls and construct the ceiling followed by whitewash and woodwork etc. These are the second and third builds simultaneously.
This process continues until the entire completion of the whole building.
Similarly, in the software industry - A build is a growing software application, where the first build will start from scratch and will incorporate some features. It is called Build 1. The errors in the first build are corrected, and some new features added. It is called Build 2. This process continues until the software is fully developed and ready for use.
What is Release in Software Testing?
A Release is the final version of an application for customers, which is generally an outcome after multiple builds. A build, when tested and certified by the software testing team, is provided to the clients as "Release”. The Build is the part of an application while the release is a fully developed application.
Therefore, a fully developed software that is ready to be delivered to the customer after all the testing is called a Release. Also, to note that software can also have multiple releases. If any set of new functionalities or features gets added to the already produced software application, then that is also called a Release. That is why software applications have many different versions. Each version is a release.
What is Smoke testing?
Smoke tests are preliminary tests to reveal simple faults that are serious enough to reject a possible software version. These are the first tests performed in the build, and all the other types of tests follow it.
It is the process that comprises of a non-exhaustive set of tests which give confidence that the essential functions of an application/software are working fine. The outcome of this testing is used to decide if a build is stable enough to proceed with further testing because of which it is also known as Build Verification Testing.
The term "Smoke Testing" is derived from hardware testing; it is performed in the initial stage of hardware testing to verify fire or smoke is not ignited when the hardware power is turned on.
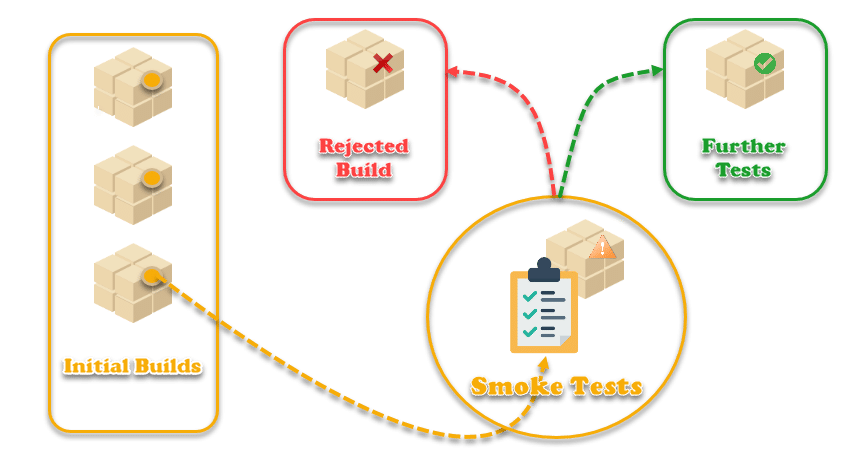
Smoke Testing is performed before accepting any build to the test environment, and generally, these are initial builds. It checks for major Priority1 (P1) issues. If the build is stable and no major P1 issues exist, testers accept the build and then perform later testing like Functional or Regression testing on the same build.
Smoke testing is carried out to find out whether significant functionalities of the system/application are working or not. If the main features break, then there is no point in carrying out further testing, thereby saving time and effort.
Let's try to understand it with the help of an example:
Assume an example - An application for booking a radio taxi
Some of the features/modules of this application can be:
- Log in to the application
- Book a cab
- Change password
- Display traveler name and contact number
- Make a payment
Now assume the developer develops the radio taxi software version 1 / Build 1 (40% complete), checks the application at their level and the build is given to the QA to test.
As a QA, we
- Prepared test cases for each module to test the application.
- Along with that, we also prepared one Smoke Test, which is End-2-End test, where user Login to the application, Book a cab and Make a payment. Scenario 1 - Login functionality breaks
As you are not able to log in so you will not be able to test most of the modules like Booking a cab or Making a Payment. Any attempt to execute test cases will be sheer wastage of time and effort. In this case, it is wise to Reject the Build.
Scenario 2 - Login functionality works fine, but you can log in with the wrong password.
It is a big security issue and needs reporting, but since it allows you to log in to the system and test the rest of the functionalities, so it is safe to Accept the Build.
This testing of critical features is known as Smoke Testing.
Who Performs Smoke testing?
The Quality Control team usually performs smoke tests, but in certain situations, the Development team can also perform it. The development team verifies the stability of the build before sending it to QA for further testing.
Also, this testing is carried out by testers on an environment other than the test environment when the last build is ready to be deployed as a release to make sure all the P1 issues have been fixed or happy path scenarios are working positively.
When to perform Smoke testing?
The smoke test is done immediately after the implementation of the build followed by other tests such as Functional tests (to test newly added functions), Regression tests and User Acceptance tests, etc. It is preliminary testing.
Smoke Testing Techniques
- Manual approach: Here, manual execution of the Smoke test cases takes place. Primarily the manual method is used when the product gets developed from scratch, and it is unstable. The scenario will be costly because it will take a lot of effort to execute the test scripts in each build.
- Automation approach: Here, the Smoke test cases are automated and run with the help of automation tools. In some cases, the smoke scripts may be integrated with automated build creation tools such as Jenkins, so that each time a new compilation gets implemented, the smoke suite automatically starts the execution without manual intervention and without losing time.
- Hybrid approach: The hybrid approach is a combination of manual and automation methods; we use both manually designed test cases and automation tools in the Hybrid approach.
What is Sanity Testing?
It is the process of testing the fixed bugs in an updated or new build. After receiving a build of the software, with small changes in the code, or functionality, the Sanity test is performed to check that the errors are corrected and no more problems occur due to these changes in the same module or feature.
Sanity testing gets generally performed on stable builds:
- Initial builds of software are relatively unstable; therefore, they undergo Smoke testing to verify whether critical functionalities are working fine or not. If Build surpasses Smoke testing, it further undergoes System and/or Regression testing.
- After going through multiple rounds of Regression tests, the build gets relatively stable. If there are any bug fixes or new features introduced to this "stable build”, then Sanity testing is performed to re-test bug fixture. If that goes fine, then proper Regression testing or further testing is performed.
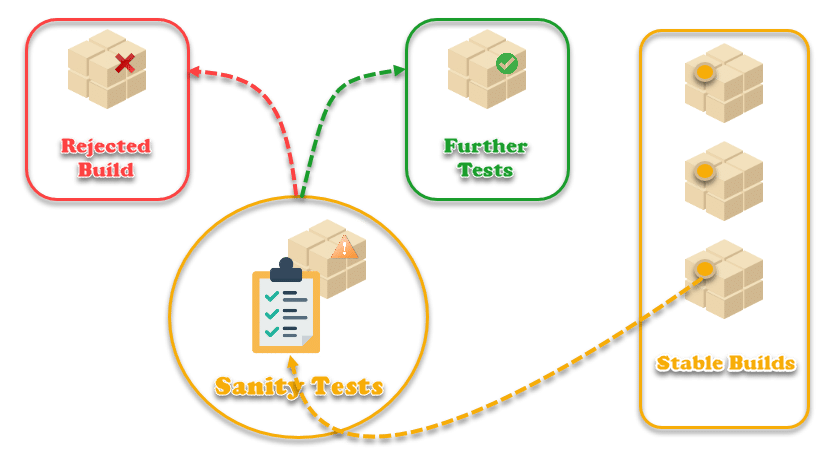
Let us continue with the same example of the radio taxi application to have a better understanding of Sanity testing.
In Build 7, few new features and bug fixes have been carried out in radio taxi application. Here are its details:-
New features - Build 7
- Drivers feedback
- GPS tracking of the ride
- Deals and offers for the ride
Bug Fixes - Build 7
- Book a Cab
- Make a Payment
QA will be retesting the particular features for which bug is fixed to ensure the given features are functioning smoothly. It is called Sanity testing.
Note: The strategy of Smoke and Sanity is used in different organizations interchangeably. Every organization uses these as per their benefits. So, in the above scenario, developer or QA can also carry out Smoke testing on all newly introduced features of Build 7 - Drivers Feedback, GPS tracking, and Deals & Offers.
It is somewhere more significant than the Retesting and less than the Regression testing, as retesting focuses only on the defect which gets fixed while Regression testing focuses on all the features.
Who Performs Sanity testing?
Sanity testing is carried out by testers only.
Why and When to perform Sanity testing?
The purpose of this test is to determine that the proposed changes or functionality are working as expected. If the sanity test fails, the build is rejected by the testing team to save time and money. It is a subset of Monkey testing or Exploratory testing. In Monkey and Exploratory testing, random inputs are given to the system to perform specialized and in-depth testing. This testing does not follow a strictly defined process or test scripts.
A Sanity test is a narrow regression test that focuses on specific areas of functionality. This test is used to determine that the application still works right after the bug has been fixed or new feature added.
Sanity Testing Techniques:
There is not any specialized technique that gets employed in Sanity testing. It is performed generally without test scripts or test cases, but manual performing of all the tests happens.
Difference between Smoke and Sanity testing

Both the terms Smoke and Sanity are used interchangeably to a great extent in the IT industry, but there are also a few critical differences between them, as explained below:
| Feature | Smoke Testing | Sanity Testing |
|---|---|---|
| Test Coverage | Smoke testing is a shallow and broad approach. | Sanity testing is usually a narrow and in-depth approach. |
| Motive | It is designated to touch every part of the application quickly. | It basically emphasis on the small sections of the application and check whether it is working correctly after a minor change. |
| Technique | The test cases for smoke testing can be either manual or automated or sometimes a hybrid approach. | A sanity test is performed generally without test scripts or test cases but manually. |
| Performed By | The application developers or QA team perform this testing. | The QA team usually performs sanity. |
| Subset | It can be a subset of acceptance testing or regression testing. | Sanity testing is more of a Monkey and Exploratory testing. |
| Documentation | Properly documented. Smoke testing is usually managed separately as a Smoke Test Suite. | No proper documentation is available. Sanity testing is generally performed with the experience only and focus on the defect and nearby area. |
Importance in the Software Industry:
| Similarities | Explanation |
|---|---|
| Saves Time | Smoke and Sanity tests are efforts to save time by quickly determining if an application is working correctly or not. Also, it ensures that the compilation is eligible for rigorous testing. |
| Save cost | The saving of time and effort leads to saving the cost of testing the application. Employing the correct approach and eliminating the mistakes in the early stage, lowers the effort and time, thus minimizing the damage. |
| Integration risk | We perform end-to-end tests on each build so that functionality-based problems get discovered earlier. So, the risk of having integration issues minimizes. |
| Quality improvement | Here, the main problems are detected and corrected much earlier in the software test cycle, which increases the quality of the software. |
| Evaluation of progress | It is easier for project managers to assess the progress of development. Since with each compilation, we certify that the product from end to end is working correctly after the addition of new features. |
Difference between Verification and Validation
What is Verification?
Definition : The process of evaluating software to determine whether the products of a given development phase satisfy the conditions imposed at the start of that phase.
Verification is a static practice of verifying documents, design, code and program. It includes all the activities associated with producing high quality software: inspection, design analysis and specification analysis. It is a relatively objective process.
Verification will help to determine whether the software is of high quality, but it will not ensure that the system is useful. Verification is concerned with whether the system is well-engineered and error-free.
Methods of Verification : Static Testing
- Walkthrough
- Inspection
- Review
What is Validation?
Definition: The process of evaluating software during or at the end of the development process to determine whether it satisfies specified requirements.
Validation is the process of evaluating the final product to check whether the software meets the customer expectations and requirements. It is a dynamic mechanism of validating and testing the actual product.
Methods of Validation : Dynamic Testing
- Testing
- End Users
Difference between Verification and Validation
The distinction between the two terms is largely to do with the role of specifications.
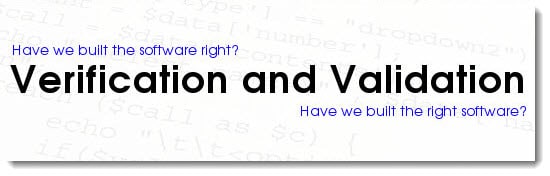
Validation is the process of checking whether the specification captures the customer's needs. “Did I build what I said I would?”
Verification is the process of checking that the software meets the specification. “Did I build what I need?”
| Verification | Validation |
|---|---|
| 1. Verification is a static practice of verifying documents, design, code and program. | 1. Validation is a dynamic mechanism of validating and testing the actual product. |
| 2. It does not involve executing the code. | 2. It always involves executing the code. |
| 3. It is human based checking of documents and files. | 3. It is computer based execution of program. |
| 4. Verification uses methods like inspections, reviews, walkthroughs, and Desk-checking etc. | 4. Validation uses methods like black box (functional) testing, gray box testing, and white box (structural) testing etc. |
| 5. Verification is to check whether the software conforms to specifications. | 5. Validation is to check whether software meets the customer expectations and requirements. |
| 6. It can catch errors that validation cannot catch. It is low level exercise. | 6. It can catch errors that verification cannot catch. It is High Level Exercise. |
| 7. Target is requirements specification, application and software architecture, high level, complete design, and database design etc. | 7. Target is actual product-a unit, a module, a bent of integrated modules, and effective final product. |
| 8. Verification is done by QA team to ensure that the software is as per the specifications in the SRS document. | 8. Validation is carried out with the involvement of testing team. |
| 9. It generally comes first-done before validation. | 9. It generally follows after verification. |
Various systems of bug tracking offer different ways of describing the severity and priority of the defect report. Only the meaning attached to these fields remains unchanged. Everyone knows a bug tracker named Atlassian JIRA. In this tracker, starting from some version instead of using the Severity and Priority fields simultaneously, only Priority was left, which collected the properties of both fields. In the beginning, JIRA has severity and priority fields. Then certain reasons caused severity removal. Those who got used to working with JIRA do not always see the difference between severity and priority whereas they had no experience of applying two mentioned concepts.

Quality Assurance testers insist on the separation of these concepts, or rather, using both fields since the meaning invested in them is different:
- Severity is distinguished as an appanage that determines the defect’s influence on the health of an application. ** Priority is a notion, which demonstrates the order of execution of a task or the elimination of a defect. This is the tool of the planning manager. Highest priority demands specialist to fix issue applying the fastest methods.*
Defect: meaning
Defect (Bug) presents any system testing condition that does not match conduct that was expected, based on project specifications, requirements, design documentation, user documentation, standards, etc., The issue can be distinguished as a defect based on someone's perception, experience, and common sense. The meaning of defect occurs in different classifications, depending on the kind of testing.
Severity Defects Classification
The classification is general and accepted regardless of users, projects or company.
S1 Blocker. A blocking bug affects the inoperability of a system, and as a result, proceed work with the application under test, or its essential functions become Functioning of a scheme can only be ensured by a solution of the problem.
S2 Critical. A critical error can be caused by malfunctioning key business logic, a security hole, an issue that resulted in a temporary disability of server or causing a part of the system to fail, without the ability to fix the bug applying input points. The solution of the problem is necessary for continuous operation of the essential functions of the system under test.
S3 Major. A major defect happens when the piece of the business rationale is not working accurately. The bug is not critical unless there is a chance to proceed with the capacity being tested utilizing other input data.
S4 Minor. Such bug does not aggravate the rationale of tested part of the application. Usually, it is a prominent issue of the UI.
**S5 Trivial. It is an insignificant mistake that does not concern the business rationale of the application is an inadequately reproducible problem scarcely noticeable through the interface. This defect of third-party libraries or services does not have any effect on the quality of the product.
Priority Defects Classification
P1 High. The error has to be fixed the soonest way since its availability is essential for proper operability.
P2 Medium. Elimination of the error is required, though its availability is not critical, but needs a binding elimination.
P3 Low. The presence of a bug is not critical and does not require an urgent solution.
The errors or bugs are to be eliminated according to their priorities: High -> Medium -> Low
Main differences
Severity is directly related to the bug itself when priority appertains more to the full
The severity of the bug shows the level and nature of cooperation between the user and the system. It demonstrates the probability of a framework crash and the outcomes of this mistake if any are found. the significance and criticalness of evacuating a bug are controlled in the process of priority testing.
Defect’s severity often does not change. This constant parameter varies only with the emergence of new details about the bug, for instance, amendments to the client scenarios or new possible workarounds, while dynamics of the bug priority directly depends on the progress of the advance of the item itself.
Static Testing Vs Dynamic Testing
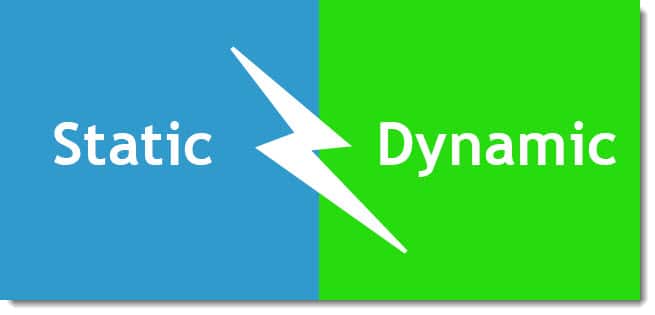
Static Testing is a form of software testing where the actual program or application is not used. This testing method requires programmers to manually read their own code to find any errors. Static testing is a stage of White Box Testing and is also called Dry Run Testing.
In Static Testing, code is not executed. It can be done manually or by a set of tools. It does not need a computer as the testing of a program is done without executing the program. For example: reviewing, walk through, inspection, etc. This type of testing checks the code, requirement documents, and design documents and puts review comments on the work document.
The purpose of Static testing is to improve the quality of the software by finding out the errors, code flaws and potentially malicious code in the software application. It starts earlier in the development life cycle and hence it is also called Verification Testing. Static testing can be done on work documents like requirement specifications, design documents, source code, test plans, test scripts and test cases, web page content. It is a continuous activity and not done just by testers.
Dynamic Testing is a kind of software testing technique by using which the dynamic behavior of the code is analyzed. Dynamic testing is done when the code is in operation mode. And is performed in a run time environment. It is a method of assessing the feasibility of a software program by giving input and examining the output. Dynamic testing is the Validation part of the Verification and Validation process.
Dynamic testing refers to the examination of the physical response from the system to variables that are not constant and change with time. In dynamic testing, the software must actually be compiled and run. It is a method of assessing the feasibility of a software program by giving input and examining the output and checking if the output is as expected. This is done by executing specific test cases that can be done test manually or with the use of an automated process. Unit tests, integration tests, system tests, and acceptance tests utilize dynamic testing.
The main aim of the Dynamic tests is to ensure that software works properly during and after the installation of the software ensuring a stable application without any major flaws.
Difference between Static Testing And Dynamic Testing
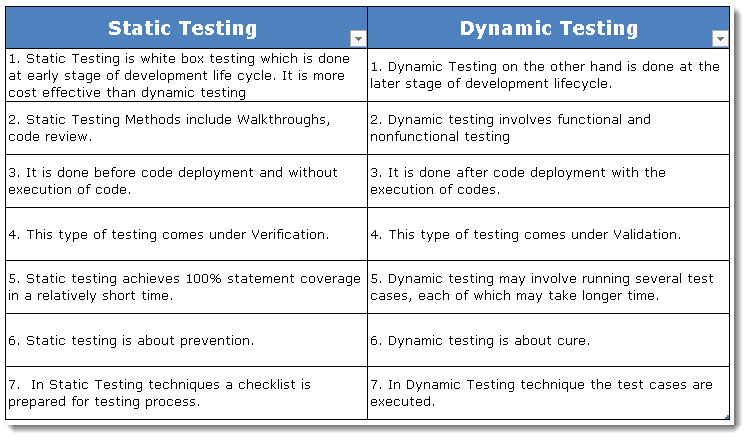
Functional and Non Functional Testing
In this fast pace world of technology development, software companies are striving not only for a bug-free product but also for an excellent performing product. Thus, in this article, we are going to discuss the two main techniques: Functional and Non Functional testing that covers these two aspects Quality and Performance.
Key points of this article are as follows:
- What is Functional Testing? Along with its significance and example.
- What do you test in Functional Testing and what are its types?
- What is Non-Functional Testing? Along with its significance and example.
- What do you test in Functional Testing and what are its types?
- Difference between Functional and Non-Functional Testing.
What is Functional Testing?
Functional testing is a type of test that is carried out to verify that each feature of the application works according to the requirements given by the client.
It is a type of Black Box Testing where each functionality of the application is tested by providing a given set of inputs to know the actual behavior of the application and then compare it with the expected results according to the given specifications.
Some important facts about Functional Testing:
Ensures proper working of all the functionalities of an application: Since each and every function of the application is tested thoroughly at different levels of testing, it ensures that application works as per specifications.
Ensures all the requirements are met: Testers ensure that all the requirements are covered in their test cases by using a technique called a Requirement Traceability Matrix. The successful execution of these test cases will ensure that all the requirements have been tested, and they work as expected. Before the release of the application, the client will test the application and give the go-ahead to release the application to production. This phase is called as UAT (User acceptance testing)
Produces a defect-free product: Functional Testing involves multiple levels and phases of testing to ensure a defect-free product.
Analyze integrating pieces of an application: Applications tend to be weaker in places where different parts come together. In Functional testing, tester identifies the points of integration between two units or modules of the application and then formulate a strategy to inspect those weak points. A functional tester evaluates the individual characteristics of an application.
*Let’s consider an example to explain this approach. You are required to carry out testing for a Website which allows its customers to pay their utility bills. You will open the website, click on the hyperlink and navigate to the bill payment page. You will enter the required details and make a transaction. Your main goal is to check whether the bill payment feature is functionally working correctly or not. We are not bothered about the slowness of application if the number of users is high. We are also not bothered about the security aspects of the application. This similar type of approach is employed in Functional testing, where the tester checks the major functions of the application without bothering how the system is working internally.
What to test?
Functional testing mainly concentrates on:
Major functionalities: Testing the main functions of an application by providing the input data and determine the output based on the client’s specifications.
Basic usability: It focuses on user-friendly behavior of the system like whether a user can freely navigate through the application without any difficulty. The system shouldn't be complex to understand from the end-user perspective.
Error validation: It checks whether suitable error messages are displayed in case of any invalid/wrong input.
What are the types Of Functional Testing?
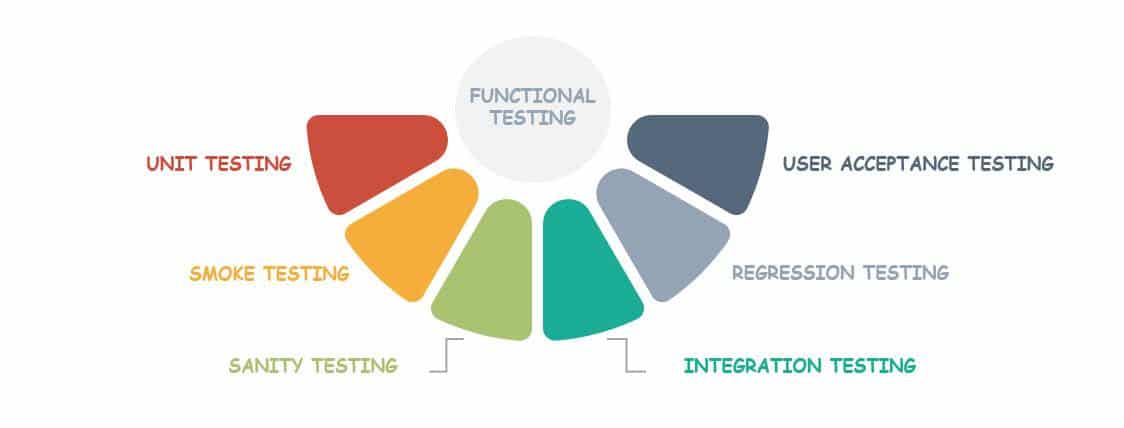
Let us consider different types of Functional testing:
Unit Testing: Individually and independently testing of smallest testable parts of an application.
Smoke Testing: This testing is performed on the initial software build to check whether the critical functionalities are working fine or not so as to carry out further extensive testing.
Sanity Testing: Sanity Testing is performed on a stable software build, which underwent small changes in the code or functionality. The objective is to make sure that the errors have been solved and confirm that there are no more errors/bugs introduced due to the new changes.
Integration Testing: The integration testing is performed when two or more functions or components of the software are integrated to form a system. Basically, it checks the correct functioning of the software when the components are merged as a single unit.
Regression Testing: Regression Testing is performed when a bug is fixed or new functionality has been introduced to a program. It ensures that existing functionality has not been broken due to the introduction of new changes.
User Acceptance Testing: it is a type of software testing where a system is tested for customer's acceptability. The only purpose of this test is to evaluate the compliance of the system with its business requirements and to evaluate if it is acceptable for delivery. It also verifies whether the software can perform specified tasks in real situations.
What is Non-Functional Testing?
Non Functional testing is performed according to the non-functional requirements of the product i.e Accuracy, Security, Stability, Durability, Correctness, etc. The non-functioning tests are carried out according to the requirements defined by the client.
Non Functional testing emphasizes the behavior of the product and not the functionality. Here are some of the important facts about Non-Functional Testing:
- It increases the ease of use, efficiency, maintainability, and portability of the product.
- It helps reducing production risk and the cost associated with non-functional aspects of the product.
- Optimize the way the product is installed, configured, executed, managed and monitored.
- Improve and enhance the knowledge of the behavior of the product and its uses.
Functional testing has already ensured that application can successfully let you pay the bills, but that's not all - We also need :
Application Security: The application should ensure the security of Card details and Personal User information.
Page loading: The pages should load fast, and should not time out despite several users accessing it at the same time
In crash situations, the appropriate recovery of the system should be available.
These scenarios are tested by Non-Functional testing like Security, Performance, Recovery, etc.
What to test?
It should not be forgotten that the inclination and confidence of users with respect to a software product is always affected by non-functional qualities, so always remember that non-functional tests are crucial in their own way.
Some of the important parameters of Non-Functional testing are listed below:
Security: Security is one of the most important aspects of Non-Functional Testing. It ensures software systems and applications are free from any threats, risks or vulnerabilities.
Usability: In Non-Functional testing, Usability refers to the fact that how easily a user can interact with the system. The feature of an application that allows a user to learn, operate, give inputs and analyze the outputs.
Scalability: Non-Functional testing checks the ability of a system to meet the increased demand by expanding its processing capacity.
Interoperability: This non-functional parameter checks the ability of software to communicate with other software systems. For example, data transfer through Bluetooth.
Efficiency: Efficiency is a Non-Functional parameter that checks the response time of a software system.
Flexibility: Flexibility refers to the ease with which the application can work in different hardware and software configurations. Like the minimum RAM requirement, the requirements of the CPU, etc.
What are the Types of Non-Functional Testing?
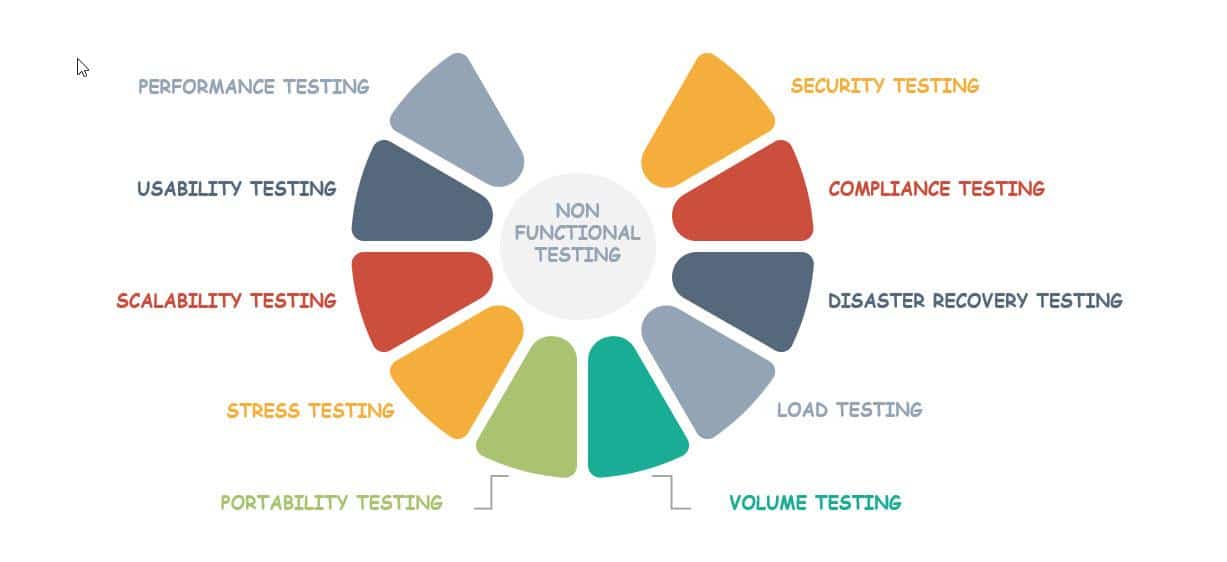
There are many types of Non-Functional testing, some of the key ones are explained below:
Performance testing: Performance testing aims to determine the performance of a system in terms of responsiveness and stability under a certain load. There are basically four types of Performance testing:
Load Testing: To evaluate the behavior of a system by increasing the workload.
Stress Testing: To evaluate the behavior of a system at or beyond the limits of its expected workload.
Endurance Testing: To evaluate the behavior of a system when a significant workload is provided continuously.
Spike Testing: To evaluate the behavior of a system when the load suddenly and substantially increases.
Usability Testing: Usability testing is a way to see how easy to use something is by testing it with real users.
Scalability Testing: In this, an application's performance is measured in terms of its ability to scale up or scale down the number of user requests or other such performance measure attributes.
Security Testing: The security test is defined as a type of Non-Functional testing that guarantees that software systems and applications are free of any risk or threat. The security testing aims to find all possible gaps and weaknesses of the system that could result in a loss of information or any other asset.
Recovery testing: The recovery testing is performed to check how fast and better the application can recover after it has suffered some kind of hardware failure, virus attack or any kind of system crash.
Reliability Testing: The reliability testing verifies whether the software can perform a faultless operation for a specific period of time in a specific environment.
Documentation Testing: The documentation testing is Non-Functional testing that involves testing the documented artifacts that are usually developed before or during the software testing. For example, Test Cases, Test Plans, etc.
Difference between Functional and Non Functional Testing:
Although Functional and Non-Functional both the testing approaches are critically important for the quality and performance of a software product, here we will point out some basic differences between them:
Positive Vs Negative Testing
Software Testing is process of Verification and Validation to check whether software application under test is working as expected. The intent is to find the defects in the code and to improve the quality of software application. To test the application we need to give some input and check if the results are as per mentioned in the requirements or not. Testing of application can be carried out in two different ways, Positive testing and Negative testing.
Positive Testing
Positive Testing is testing process where the system is validated against the valid input data. In this testing, tester always check for only valid set of values and check if a application behaves as expected with its expected inputs. The main intention of this testing is to check whether software application does that what it is supposed to do. Positive Testing always tries to prove that a given product and project always meets the requirements and specifications. Positive testing is testing of the normal day to day life scenarios and to check the expected behavior of application.
Example of Positive Testing:
Consider a scenario where you want to test an application which contains a simple text box to enter age and requirements say that it should take only numerical values. So here provide only positive numerical values to check whether it is working as expected or not is the Positive Testing. 
Most of the applications developers implement Positive scenarios where testers get less defects count around positive testing.
Negative Testing
Negative Testing, commonly referred to as error path testing or failure testing is done to ensure the stability of the application. Negative testing is the process of applying as much creativity as possible and validating the application against invalid data In Negative Testing the system is validated by providing invalid data as input. A negative test checks if an application behaves as expected with its negative inputs. This is to test the application that does not do anything that it is not supposed to do so. Such testing is to be carried out keeping negative point of view & only execute the test cases for only invalid set of input data.
The main reason behind Negative testing is to check the stability of the software application against the influences of different variety of incorrect validation data set. Negative testing helps to find more defects & improve the quality of the software application under test but it should be done once the positive testing is complete.
Example of Negative Testing :
Considering example as we know phone no field accepts only numbers and does not accept the alphabets and special characters but if we type alphabets and special characters on phone number field to check it accepts the alphabets and special characters or not than it is negative testing.
Here, expectation is that the text box will not accept invalid values and will display an error message for the wrong entry.
Difference Between Positive and Negative Testing
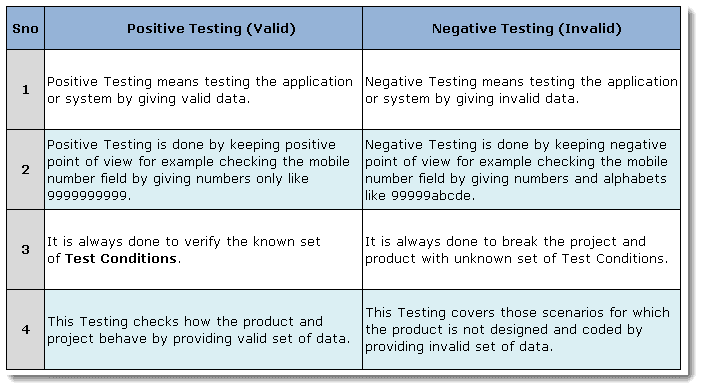
| Features | Functional Testing | Non-Functional Testing |
|---|---|---|
| Objective | Functional testing describes the behavior of the software system. | Non-Functional testing describes the performance or usability of the software system. |
| Focus Area | It is based on the requirements of the business or the client. | It depends on the expectations of the end-user. |
| What to test | Functional testing tests the functionality of the software and helps in describing what the system should do. | Non-Functional testing tests the performance of the software. It helps in describing how the system should work. |
| Execution | It is done before Non Functional tests. | It is done after the Functional tests. |
| Requirement | Defining functional requirements is not difficult in Functional Testing. | For Non-Functional testing, it is difficult to define the requirements. |
| Testing Types | ·Unit testing ·Smoke testing ·Integration Testing ·Regression testing ·User Acceptance Testing | ·Performance Testing ·Usability Testing ·Scalability testing ·Stress Testing ·Portability Testing ·Volume Testing ·Load Testing ·Disaster Recover Testing ·Compliance Testing ·Localization and Internationalization Testing |


